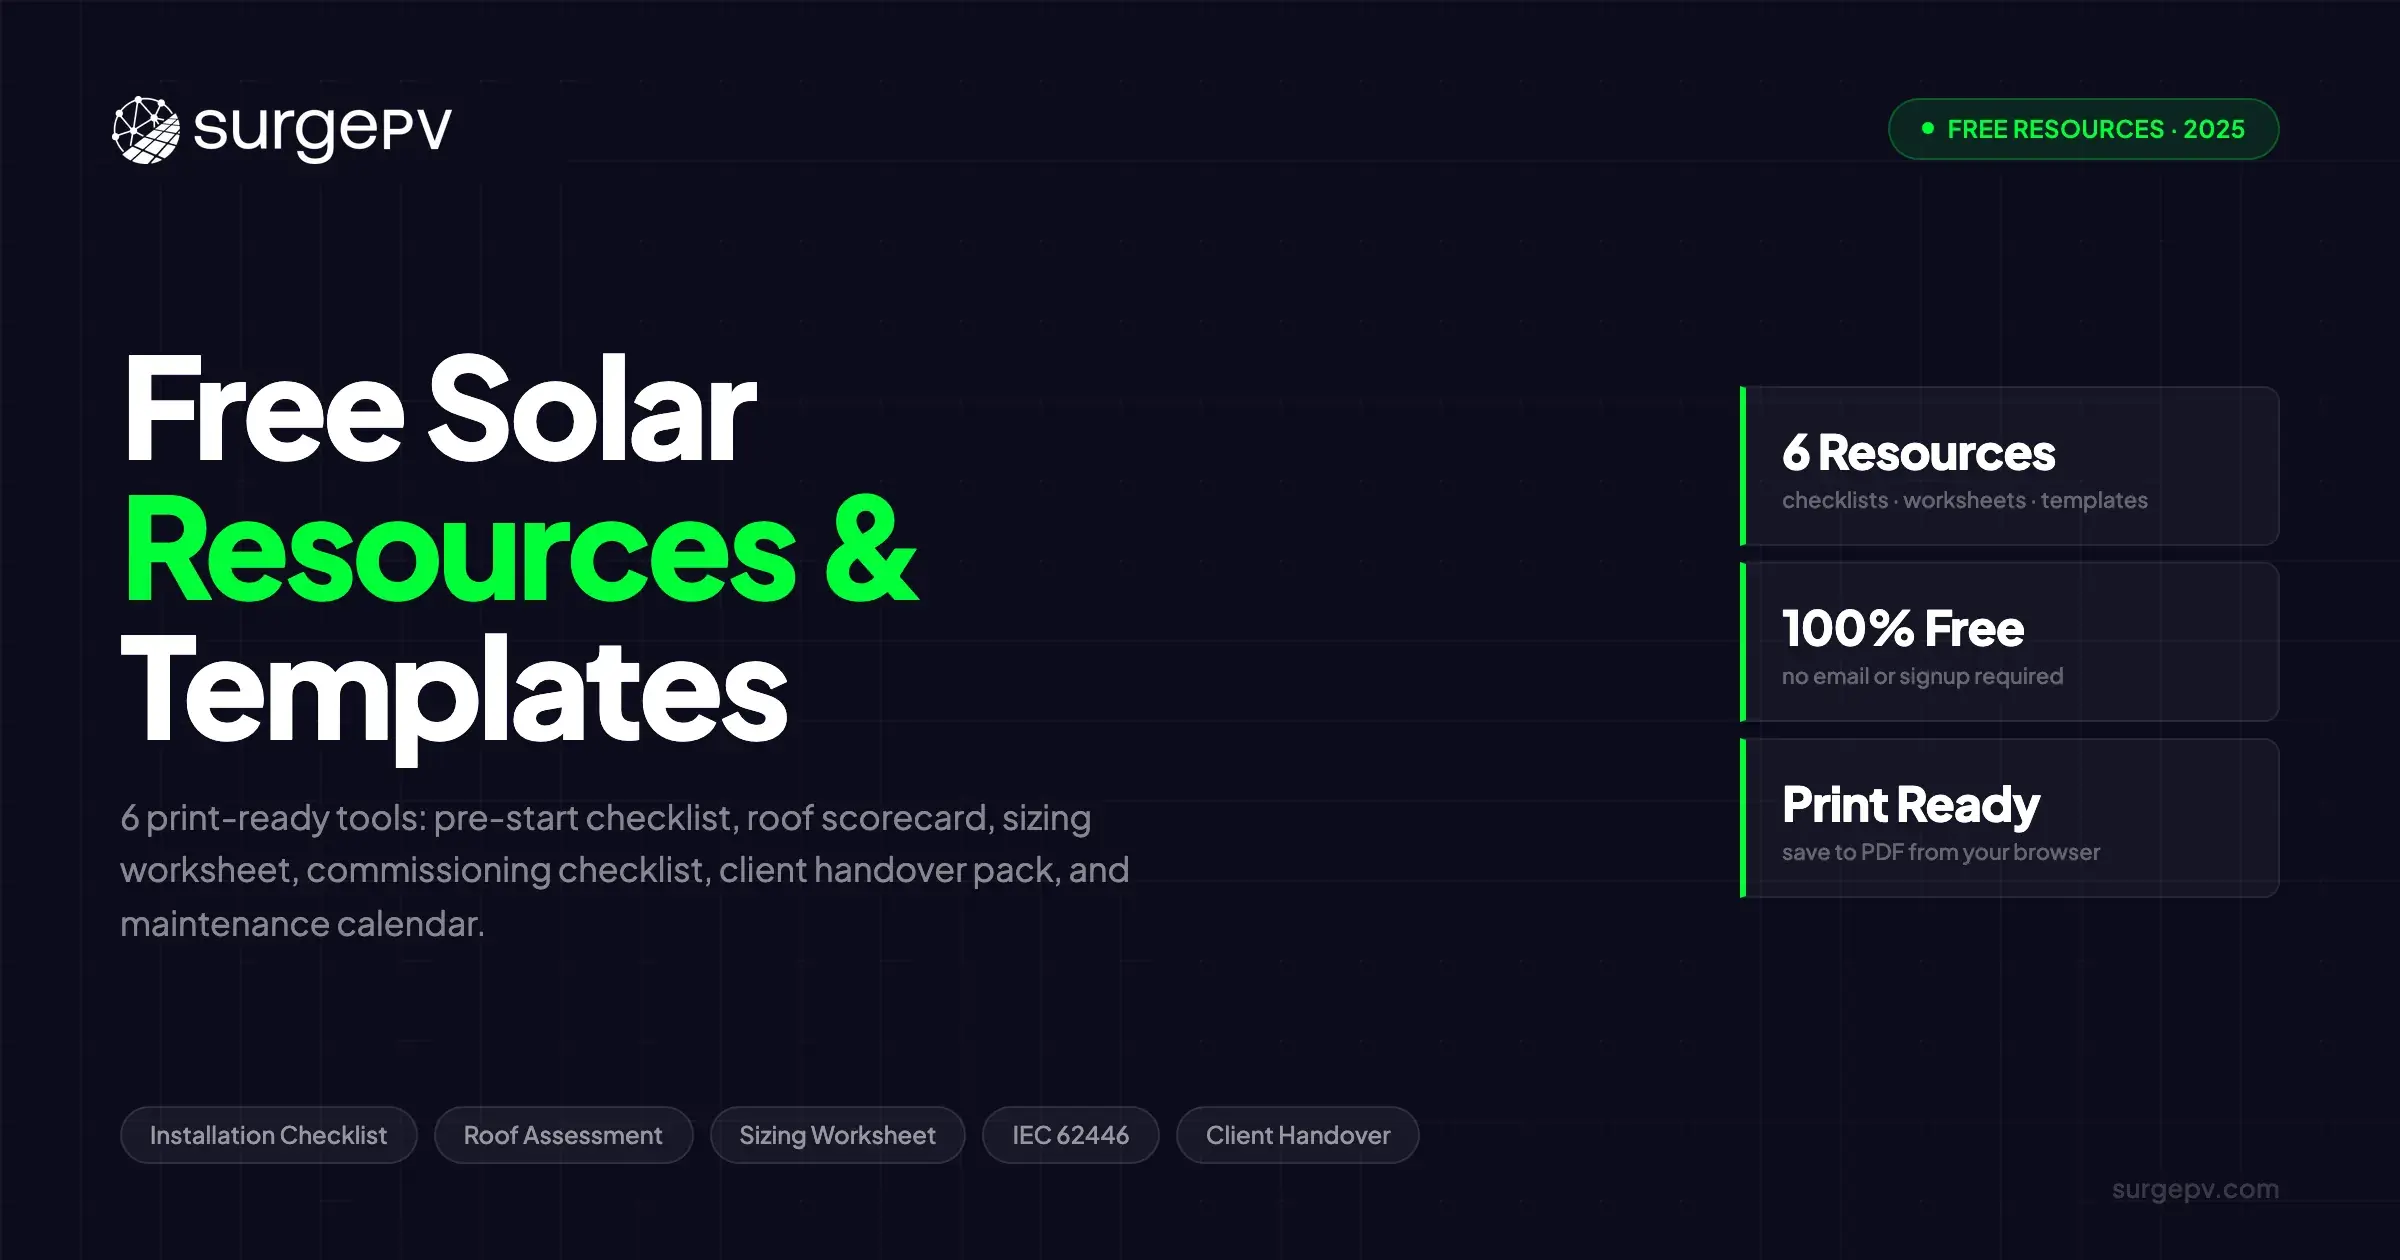
The best installers don't rely on memory. They use the same structured checklists on every job - whether it's a 4 kWp residential system or a 200 kWp commercial roof. Consistency catches the faults that experience misses. These six resources distill the full Solar Installation Hub into formats you can print, fill in, and take to site.
All resources are free. No email required. Click any "Print / Save as PDF" button to open your browser's print dialog and save as a PDF.
What's in this resource pack
- Resource 1: Pre-Installation Checklist - 50 items across 9 categories
- Resource 2: Roof Assessment Scorecard - 5-category scoring system, 100 points
- Resource 3: System Sizing Worksheet - 7-step calculation template with peak sun hours table
- Resource 4: IEC 62446 Commissioning Checklist - all required pre-handover tests
- Resource 5: Client Handover Pack - fill-in template for system documentation
- Resource 6: Annual Maintenance Schedule - 12-month calendar template
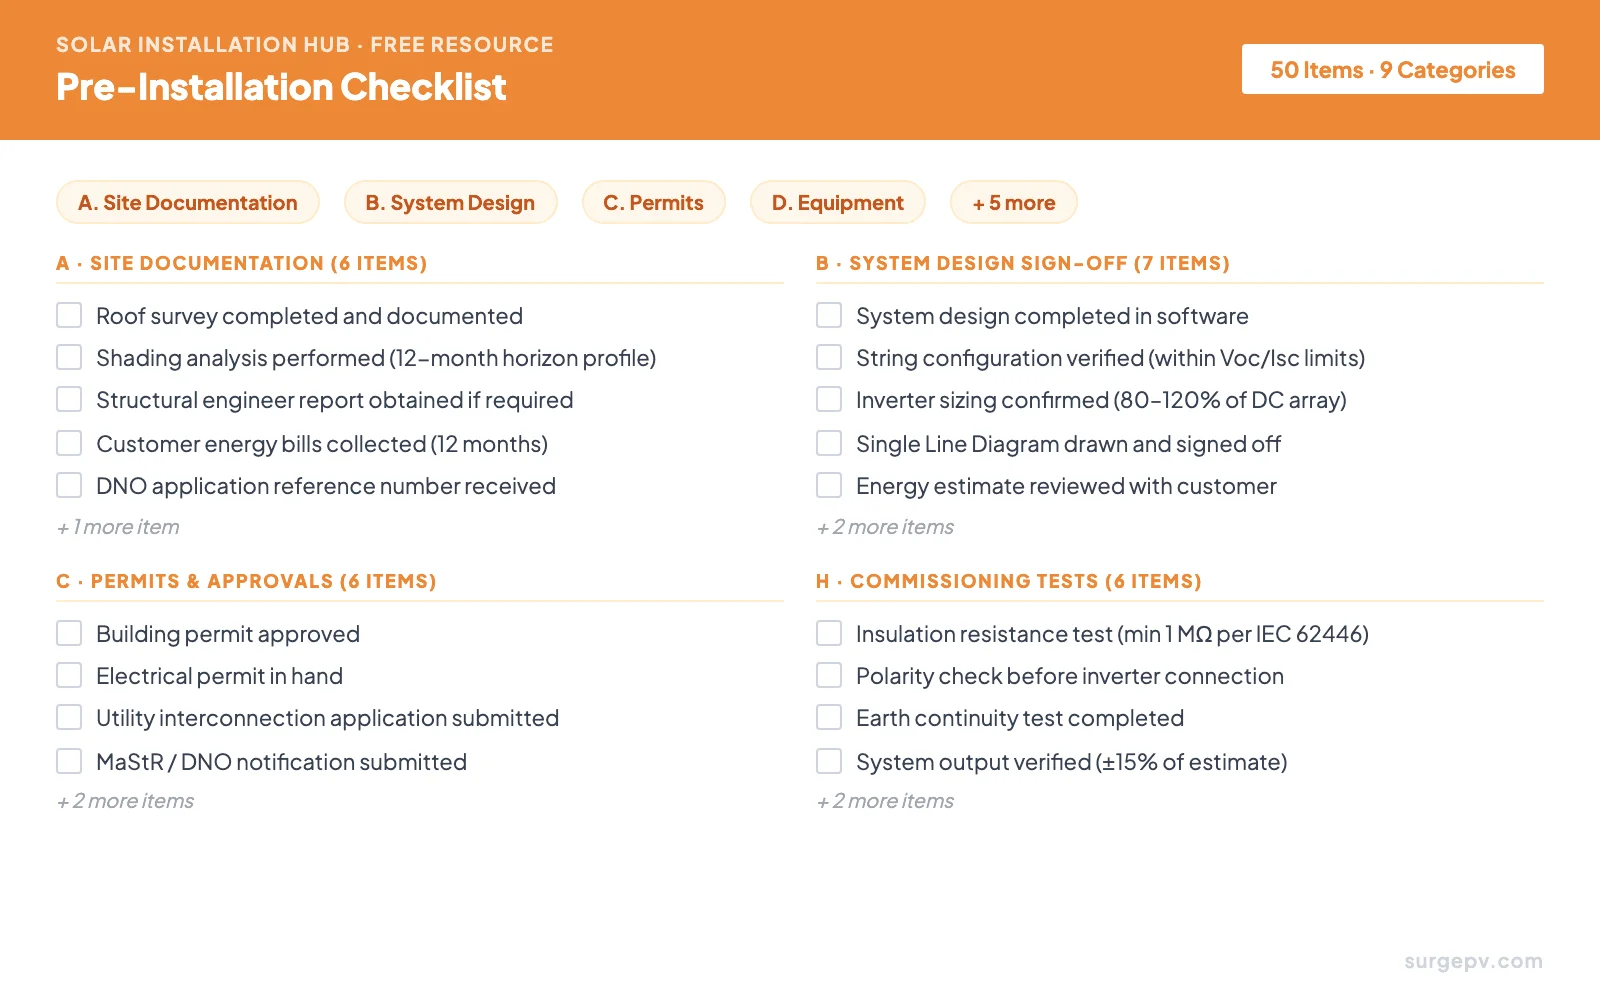
Pre-Installation Checklist
Site documentation, system design sign-off, permits, equipment, safety, commissioning, and client handover - all in one place.
View & Print →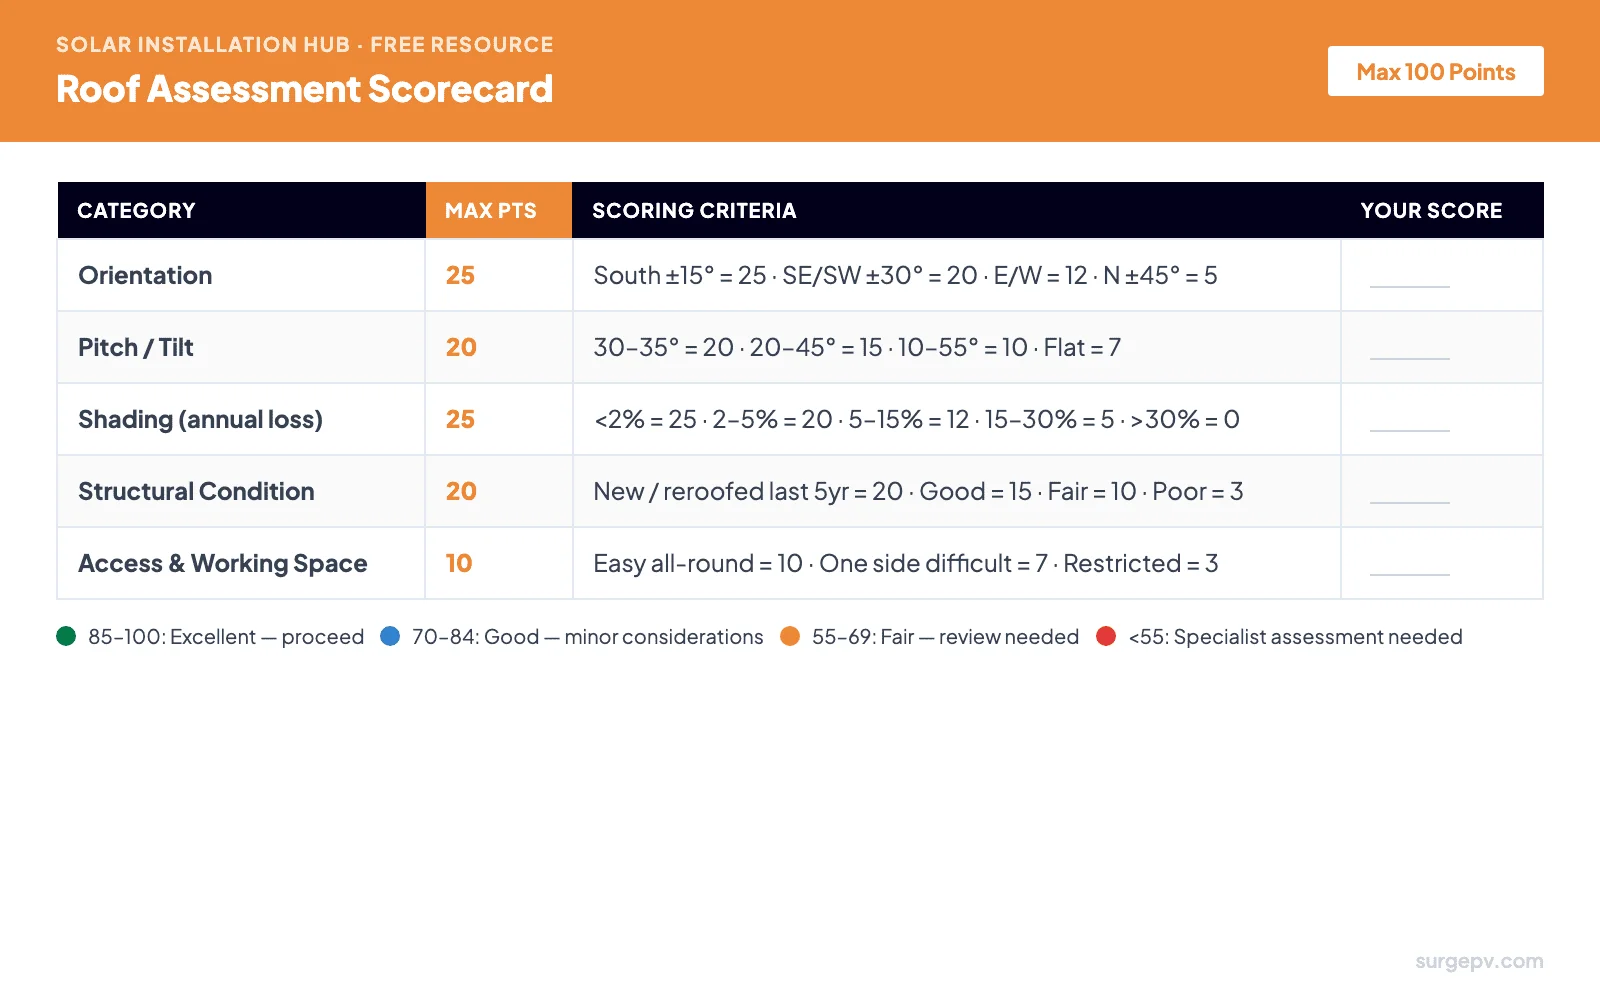
Roof Assessment Scorecard
Score orientation, pitch, shading, structural condition, and access. Know before you design whether the roof is excellent, marginal, or a no-go.
View & Print →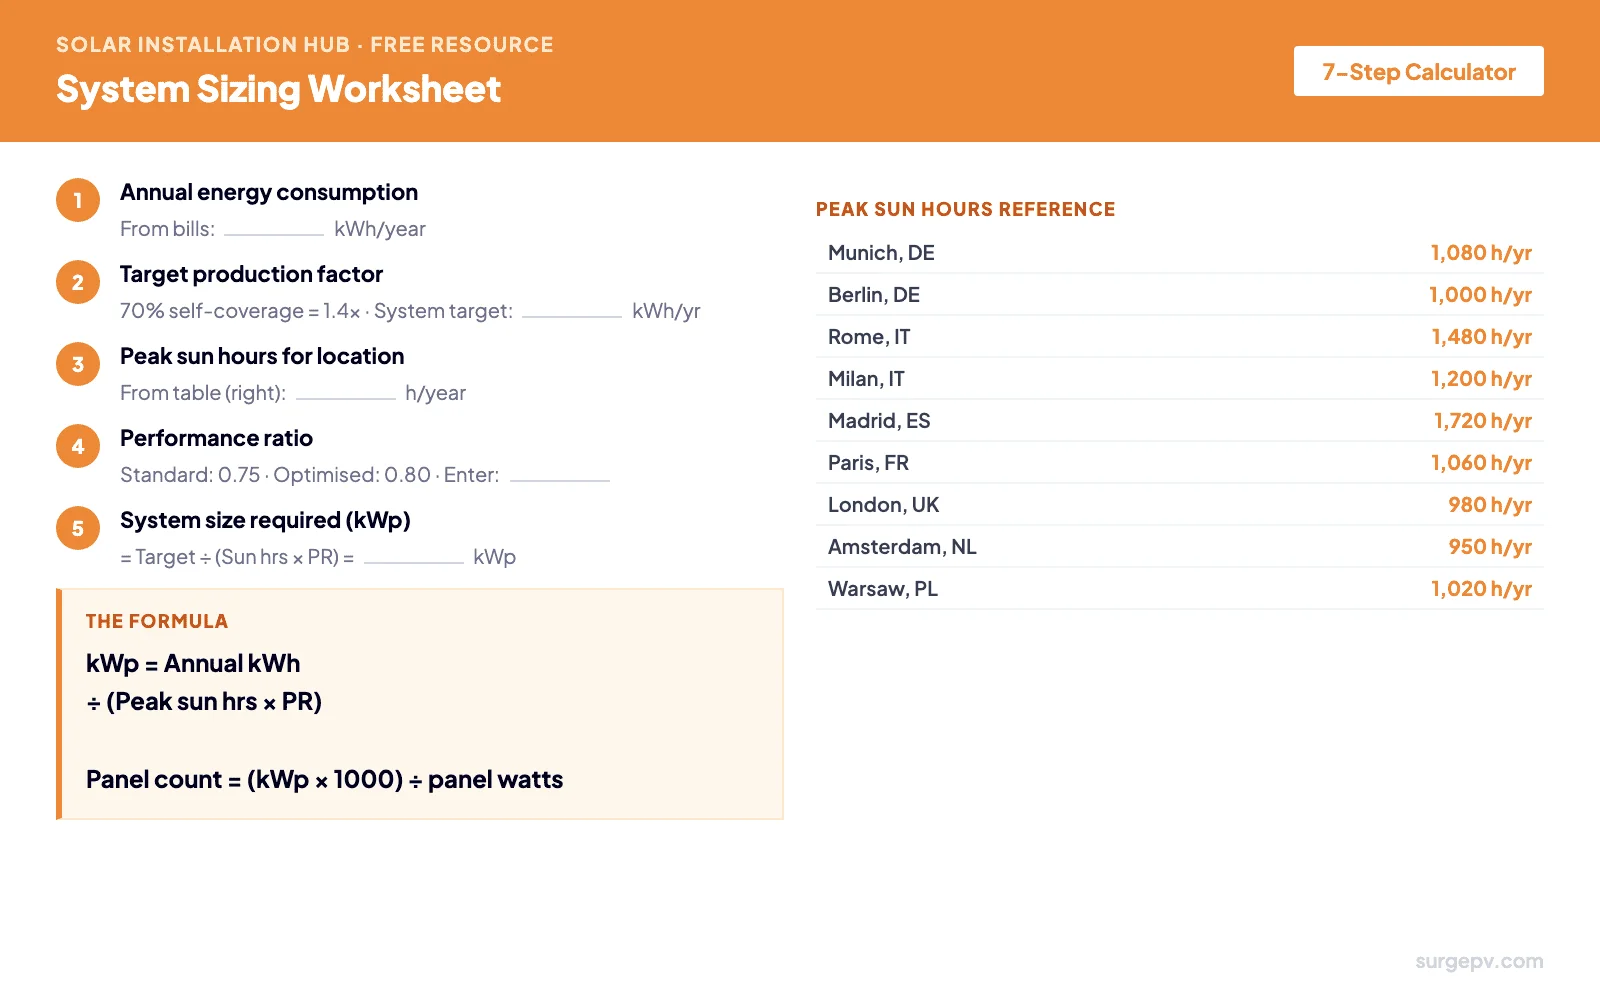
System Sizing Worksheet
The exact formula installers use - annual consumption, peak sun hours, performance ratio, kWp, and panel count. Includes a 9-city reference table.
View & Print →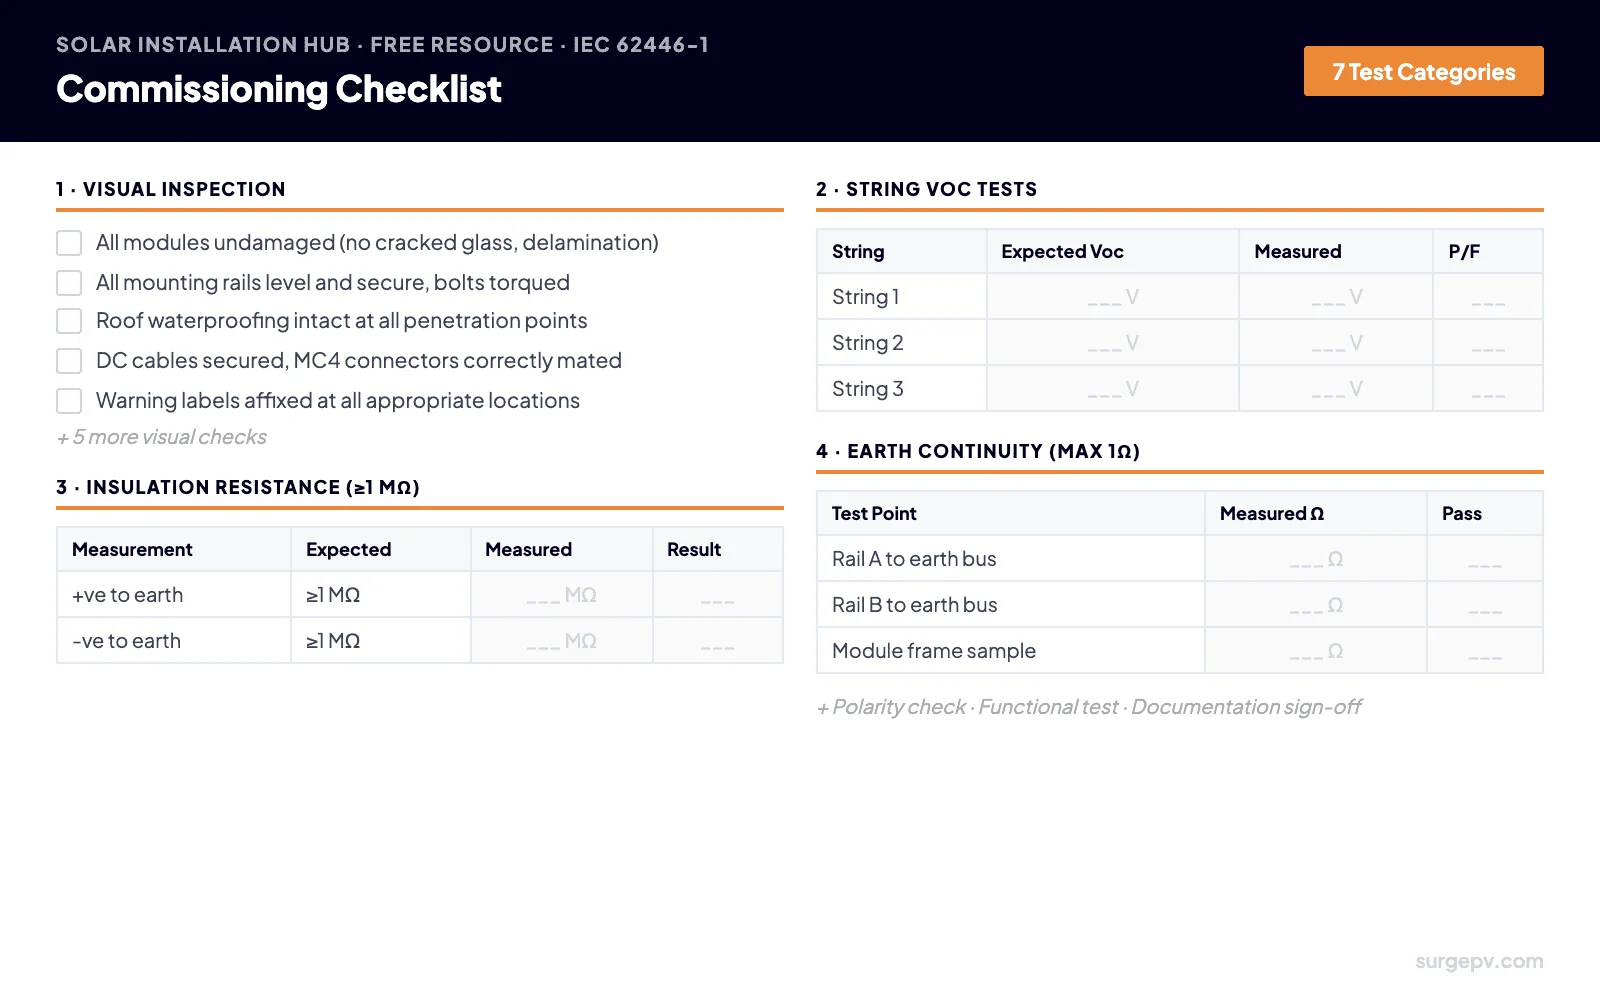
Commissioning Checklist
Visual inspection, string Voc tests, insulation resistance, earth continuity, polarity check, functional test, and documentation sign-off.
View & Print →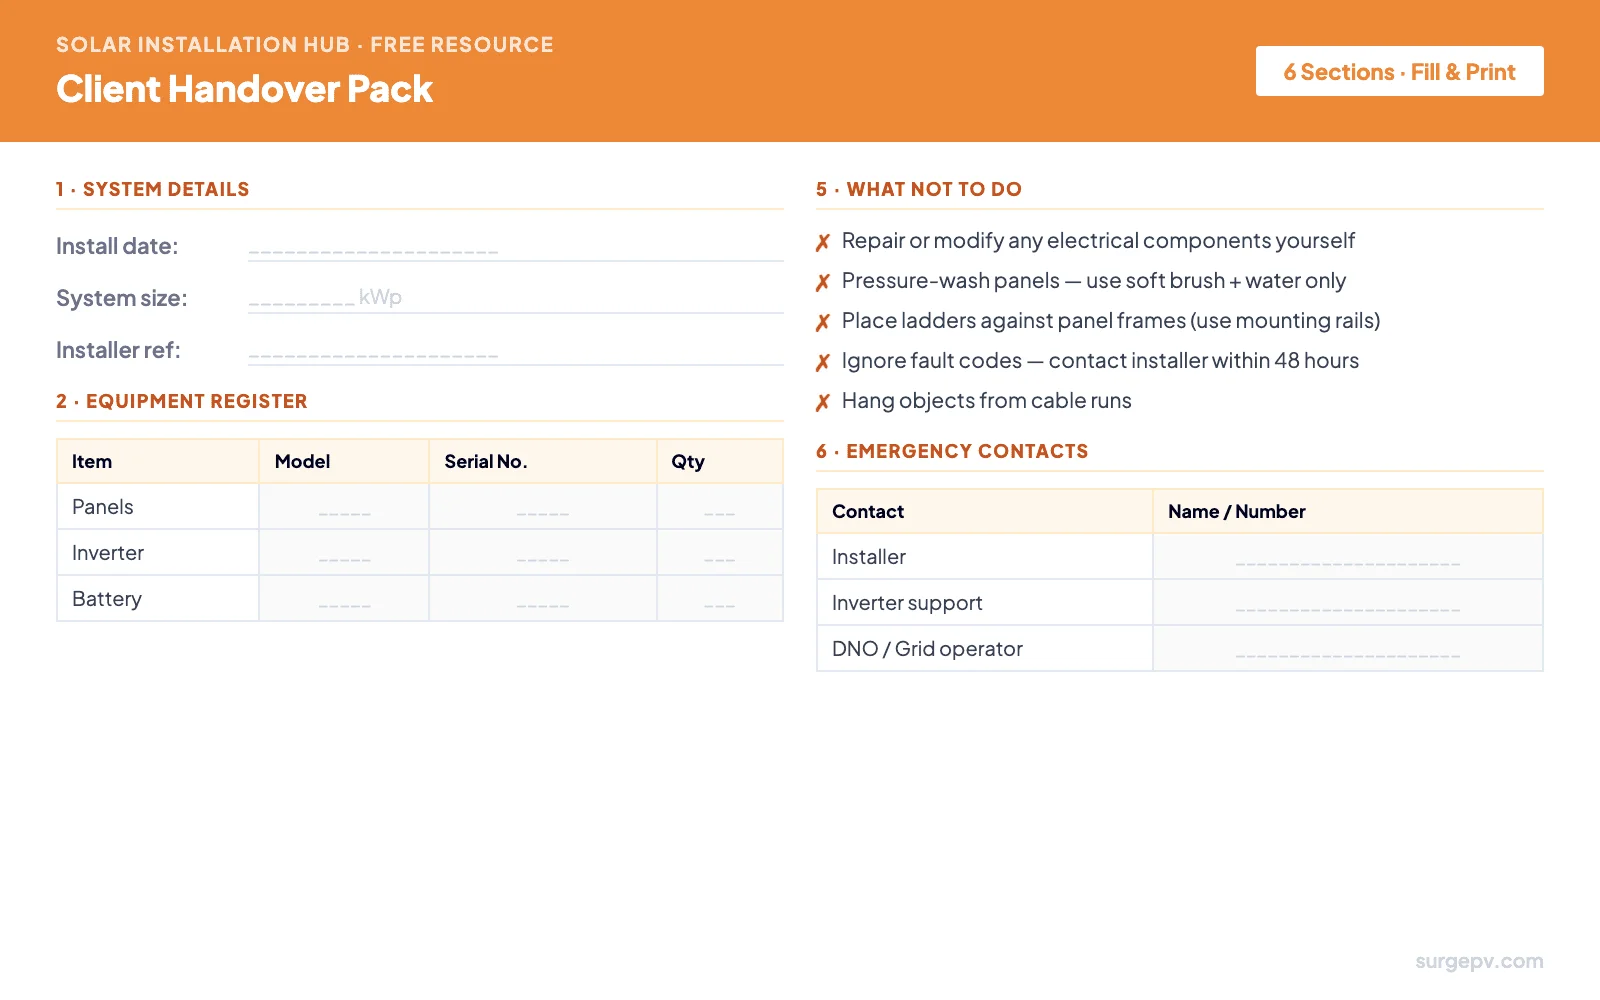
Client Handover Pack
Equipment register, warranty summary, monitoring setup guide, maintenance tasks, what not to do, and emergency contacts - all in one document.
View & Print →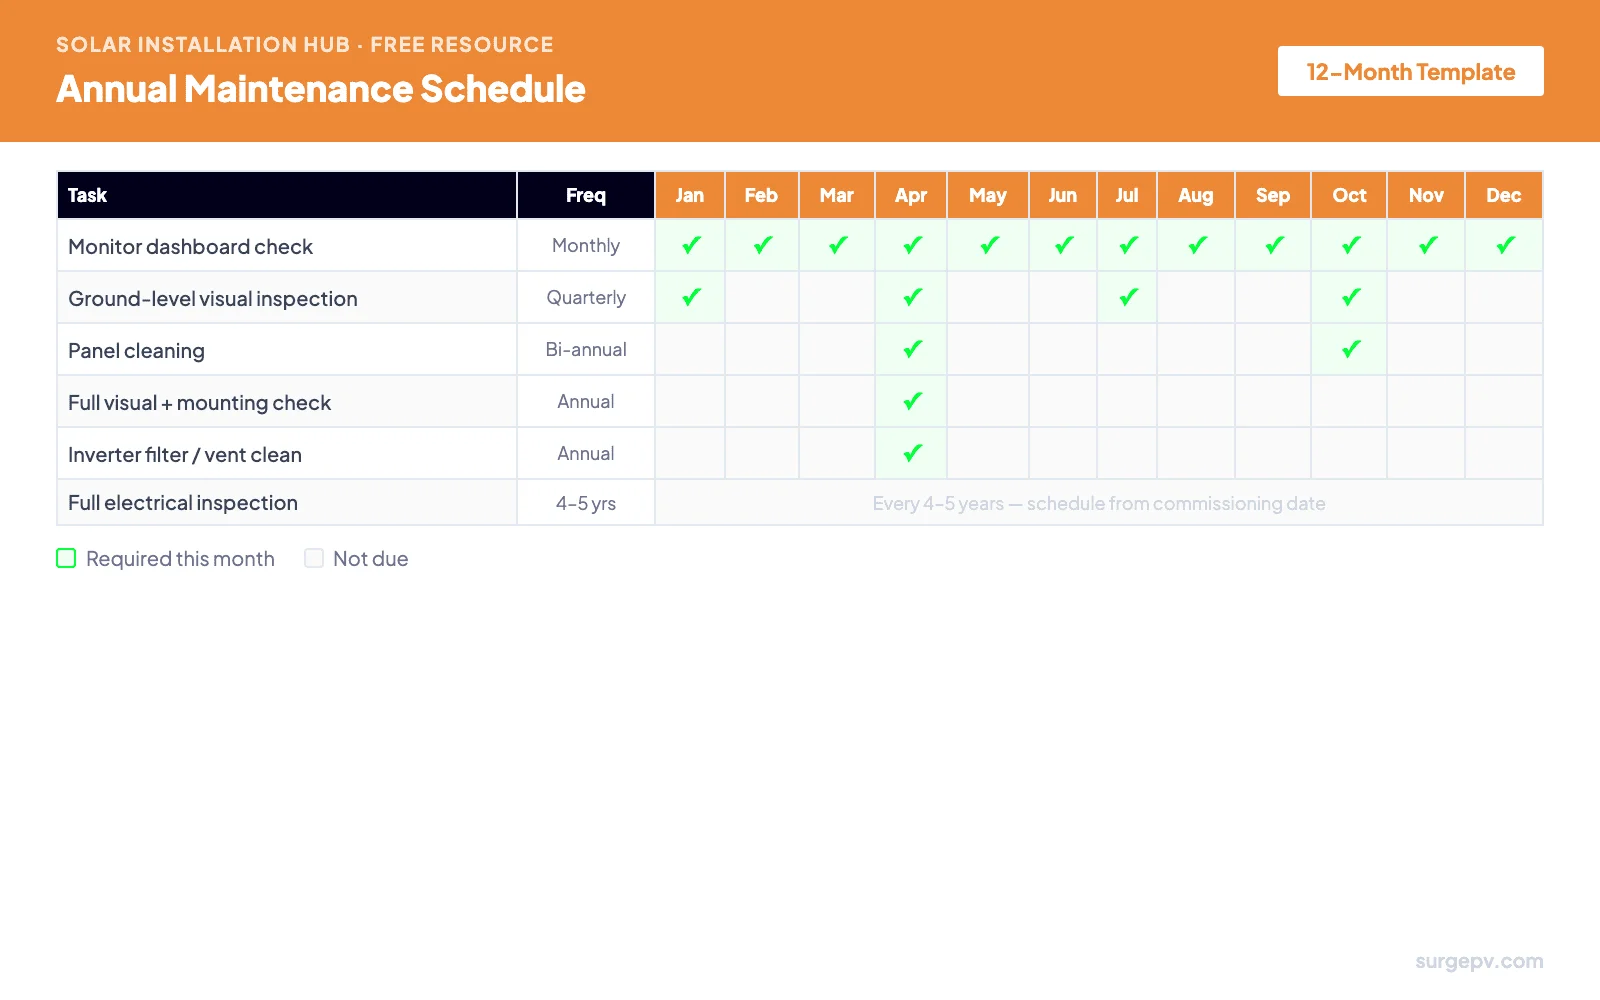
Annual Maintenance Schedule
Monthly, quarterly, bi-annual, and annual tasks in a single calendar. Hand it to customers at commissioning so they know exactly what to do each month.
View & Print →How to Use These Resources
Each resource maps to a specific phase of the installation workflow. Use them in sequence - the pre-installation checklist before any work begins, the roof scorecard during site assessment, the sizing worksheet during system design, the commissioning checklist before handover, and the handover pack and maintenance schedule at the customer handover meeting.
| Phase | Resource | Who uses it |
|---|---|---|
| Site assessment | Roof Assessment Scorecard | Installer, surveyor |
| System design | System Sizing Worksheet | Designer, installer |
| Pre-installation | Pre-Installation Checklist | Project manager, installer |
| Commissioning | IEC 62446 Commissioning Checklist | Qualified installer / electrician |
| Handover | Client Handover Pack | Installer, customer |
| Ongoing (customer) | Annual Maintenance Schedule | System owner |
For solar design software that automates the design stage - including system sizing, shading analysis, and proposal generation - SurgePV handles the digital workflow. These printable resources cover the on-site stages that software can't do for you.
Resource 1 - Solar Installation Pre-Start Checklist
50 items across 9 categories. Work through every category in order before any installation begins. A missed permit or an unverified string configuration can cost days of rework. This checklist exists so nothing gets skipped under time pressure.
Resource 2 - Roof Assessment Scorecard
Use this before any system design work. A roof that scores below 55 should not proceed to design until the problem is resolved - whether that's unexpected shading from a new extension, a structurally compromised roof section, or an orientation that makes the project uneconomic. This scorecard gives you a defensible, documented basis for your recommendation.
Pro Tip
Run this scorecard during the site visit, not at the desk. Orientation and shading data change with surrounding trees, new construction, and rooftop obstructions that don't appear on satellite imagery.
| Category | Max pts | Scoring criteria | Your score |
|---|---|---|---|
| Orientation | 25 | South ±15° = 25 · SE/SW ±30° = 20 · E/W facing = 12 · North ±45° = 5 | _____ / 25 |
| Pitch / Tilt | 20 | 30–35° = 20 · 20–45° = 15 · 10–55° = 10 · Flat (0–10°) = 7 | _____ / 20 |
| Shading (annual energy loss) | 25 | Under 2% = 25 · 2–5% = 20 · 5–15% = 12 · 15–30% = 5 · Over 30% = 0 | _____ / 25 |
| Structural condition | 20 | New or reroofed within 5 yrs = 20 · Good condition = 15 · Fair = 10 · Poor / unknown = 3 | _____ / 20 |
| Access & working space | 10 | Easy access all sides = 10 · One side restricted = 7 · Significantly restricted = 3 | _____ / 10 |
| Total Score | 100 | _____ / 100 |
Notes:
Resource 3 - System Sizing Worksheet
This is the same calculation solar software runs automatically - written out step by step so you can explain it to customers, cross-check software output, or size a system without a computer when needed. Chapter 3 of this hub covers the full theory behind each step.
| City | Peak sun hours/year | City | Peak sun hours/year |
|---|---|---|---|
| Munich, DE | 1,080 | Madrid, ES | 1,720 |
| Berlin, DE | 1,000 | Barcelona, ES | 1,640 |
| Hamburg, DE | 960 | Paris, FR | 1,060 |
| Rome, IT | 1,480 | Marseille, FR | 1,400 |
| Milan, IT | 1,200 | London, UK | 980 |
| Naples, IT | 1,580 | Manchester, UK | 900 |
| Amsterdam, NL | 950 | Warsaw, PL | 1,020 |
| Brussels, BE | 980 | Lisbon, PT | 1,760 |
kWp = _______ ÷ (_______ × _______) = ____________ kWp
Resource 4 - IEC 62446 Commissioning Checklist
IEC 62446-1:2022 specifies the minimum documentation and testing required before a PV system is handed to the end customer. Skipping any of these tests is not only a compliance failure - it's how undetected wiring faults, insulation breakdown, and reverse-polarity connections cause fires years later. This checklist covers all seven required test categories.
Important
This checklist is a reference guide, not a substitute for a full commissioning test report. All measured values must be recorded in a formal IEC 62446-compliant test report and signed by a qualified installer. In the UK, this must be an MCS-registered company. In Germany, a registered Elektrofachkraft.
Formula: Expected Voc = Panel Voc(STC) × number of panels in string × temperature correction factor. Test at open circuit (before connecting to inverter).
| String | No. of panels | Expected Voc | Measured Voc | Within 5%? | Pass / Fail |
|---|---|---|---|---|---|
| String 1 | ___ | ___ V | ___ V | Yes / No | ___ |
| String 2 | ___ | ___ V | ___ V | Yes / No | ___ |
| String 3 | ___ | ___ V | ___ V | Yes / No | ___ |
| String 4 | ___ | ___ V | ___ V | Yes / No | ___ |
Test voltage: 500 V DC. Short +ve and -ve before testing (test entire array positive conductors to earth, then negative conductors to earth). BIPV systems: ≥200 MΩ.
| Measurement | Test voltage | Minimum threshold | Measured value | Pass / Fail |
|---|---|---|---|---|
| +ve conductors to earth | 500 V DC | ≥1 MΩ | ___ MΩ | ___ |
| -ve conductors to earth | 500 V DC | ≥1 MΩ | ___ MΩ | ___ |
| Test point | Measured resistance | Pass (≤1 Ω)? |
|---|---|---|
| Mounting rail section A to main earth bus | ___ Ω | ___ |
| Mounting rail section B to main earth bus | ___ Ω | ___ |
| Mounting rail section C to main earth bus | ___ Ω | ___ |
| Sample module frame to main earth bus | ___ Ω | ___ |
Perform BEFORE connecting strings to inverter. A reverse-polarity string will immediately damage many inverter models.
Resource 5 - Client Handover Pack
A professional handover document serves two purposes: it protects the customer (they have everything they need to maintain the system over 25 years) and it protects you (a signed document recording system condition at commissioning is your primary defence against future warranty disputes). Fill this in, print two copies, and have the customer sign both - one for them, one for your project file.
| Item | Manufacturer | Model | Serial Number(s) | Qty |
|---|---|---|---|---|
| Solar panels | ___________ | ___________ | ___________ | ___ |
| Inverter | ___________ | ___________ | ___________ | ___ |
| Battery (if fitted) | ___________ | ___________ | ___________ | ___ |
| Mounting system | ___________ | ___________ | N/A | ___ |
| Monitoring device | ___________ | ___________ | ___________ | 1 |
| Component | Warranty type | Duration | Expires | Claim contact |
|---|---|---|---|---|
| Solar panels | Product warranty | ___ years | ___ | ___________ |
| Solar panels | Performance warranty | ___ years | ___ | ___________ |
| Inverter | Parts & labour | ___ years | ___ | ___________ |
| Battery (if fitted) | Capacity warranty | ___ years | ___ | ___________ |
| Workmanship | Installer warranty | ___ years | ___ | ___________ |
What to monitor: Check your dashboard once a month. Your system should produce roughly these amounts (kWh) on sunny days depending on season. If monthly production drops more than 15% vs the same month last year, contact your installer.
| Jan | Feb | Mar | Apr | May | Jun | Jul | Aug | Sep | Oct | Nov | Dec |
|---|---|---|---|---|---|---|---|---|---|---|---|
| ___ | ___ | ___ | ___ | ___ | ___ | ___ | ___ | ___ | ___ | ___ | ___ |
| Contact | Name | Phone | Email / Hours |
|---|---|---|---|
| Your installer (primary) | ___________ | ___________ | ___________ |
| Inverter support line | ___________ | ___________ | ___________ |
| DNO / Grid operator | ___________ | ___________ | 24 hours |
| Emergency electrician | ___________ | ___________ | ___________ |
Resource 6 - Annual Maintenance Schedule
Hand this to your customer at the commissioning meeting. A system owner who knows what to look for every month will catch problems early - and call you rather than a competitor when something needs attention. See Chapter 10 of this hub for the full maintenance guide with detailed explanations of each task.
| Task | Frequency | Jan | Feb | Mar | Apr | May | Jun | Jul | Aug | Sep | Oct | Nov | Dec |
|---|---|---|---|---|---|---|---|---|---|---|---|---|---|
| Check monitoring dashboard - compare to same period last year | Monthly | ✓ | ✓ | ✓ | ✓ | ✓ | ✓ | ✓ | ✓ | ✓ | ✓ | ✓ | ✓ |
| Ground-level visual inspection - panels, wiring, no debris or bird nests | Quarterly | ✓ | ✓ | ✓ | ✓ | ||||||||
| Panel cleaning - soft brush, purified water, no detergent | Bi-annual | ✓ | ✓ | ||||||||||
| Inspect visible DC cable runs for damage, UV degradation, or chafing | Bi-annual | ✓ | ✓ | ||||||||||
| Full visual inspection - mounting hardware, bolts, corrosion, sealants | Annual | ✓ | |||||||||||
| Inverter cooling vents / air filter - clean if dusty or blocked | Annual | ✓ | |||||||||||
| Export annual monitoring data - archive as CSV for warranty reference | Annual | ✓ | |||||||||||
| Full electrical inspection by qualified electrician - Voc, IR, earthing tests | Every 4–5 yrs | Schedule from commissioning date - Year 4–5, Year 9–10, Year 14–15, Year 19–20 | |||||||||||
System commissioned: _______________ Next electrical inspection due: _______________
Installer contact for service: _____________________________________________
Design the System Before the Installation Begins
Every checklist above starts with a completed system design. SurgePV handles the full design workflow - roof modeling, panel layout, shading analysis, string configuration, energy simulation, and professional proposals - in one platform used by solar installers across Europe.
Book a Free DemoNo commitment required · 20 minutes · Live project walkthrough
Key Takeaways
- A pre-installation checklist is the most effective way to prevent costly mid-installation problems - skipped permits and unverified string configurations are the most common causes of delays
- The roof scorecard gives you a defensible, documented basis for recommending or not recommending solar on a specific roof
- IEC 62446-1 commissioning tests are not optional - they are the legal minimum before handover in most European jurisdictions
- A signed client handover document is your primary defence against future warranty disputes
- Customers who receive the maintenance schedule are more likely to report problems early - and call you first
Frequently Asked Questions
Can I use these solar installation checklists on commercial projects?
Yes. All six resources work for both residential and commercial projects. Commercial projects may require additional steps - larger systems often need a DNO pre-application, structural load calculations, and extended permit timelines - but the core checklist categories apply to every installation. For commercial systems above 50 kWp, add categories for protection relay settings, AC busbar design, and earth fault monitoring.
Is the commissioning checklist compliant with IEC 62446?
The checklist covers the tests required by IEC 62446-1:2022 - visual inspection, string Voc verification, insulation resistance, earth continuity, polarity check, and functional testing. Cross-reference with the current published standard and your local certification body's requirements, as additional tests may be required in specific jurisdictions. In the UK, MCS requirements add further documentation obligations.
How do I print these resources as a PDF?
Click the "Print / Save as PDF" button under any resource. Your browser's print dialog opens. Select "Save as PDF" (Chrome) or "Microsoft Print to PDF" (Edge) as the destination. Set margins to "Minimum" or "None" for best results. The page is formatted to print cleanly on A4 or US Letter paper.
What score means a roof is not suitable for solar?
On the Roof Assessment Scorecard, a score below 55 means a specialist assessment is required before any design work begins. Scores below 40 indicate the project should not proceed without resolving the root cause - typically severe shading that cannot be mitigated, a structurally compromised roof, or an orientation so poor that the system would never generate a positive return.
Where can I find peak sun hours data for my location?
The sizing worksheet includes a reference table for 16 European cities. For any unlisted location, use the EU PVGIS tool - enter your coordinates and it returns annual irradiance data for any location in Europe, Africa, and Asia. The "H(i)" figure in the results (in kWh/m²/year) is your peak sun hours figure for this worksheet.
Continue Learning
These resources complement the full hub content. If a specific item on a checklist is unclear, the relevant chapter has the detailed explanation:
- Chapter 2: Roof Assessment - the theory behind the scorecard categories
- Chapter 3: System Sizing - full explanation of the sizing formula
- Chapter 7: Installation Steps - each checklist category expanded to a full process guide
- Chapter 9: Monitoring & Commissioning - IEC 62446 test procedures in full detail
- Chapter 10: Maintenance - the full annual maintenance guide behind the schedule template
About the Contributors

CEO & Co-Founder · SurgePV
Keyur Rakholiya is CEO & Co-Founder of SurgePV and Founder of Heaven Green Energy Limited, where he has delivered over 1 GW of solar projects across commercial, utility, and rooftop sectors in India. With 10+ years in the solar industry, he has managed 800+ project deliveries, evaluated 20+ solar design platforms firsthand, and led engineering teams of 50+ people.