
Installing solar panels is now faster, cheaper, and more reliable than it has ever been. Global installed capacity passed 2 terawatts in 2026. Costs have fallen more than 90% since 2010. In most of Europe and large parts of Asia and North America, solar is the cheapest source of new electricity generation.
This chapter covers the full picture: how solar panels convert sunlight into electricity, what components make up a complete system, the three main system types, and what the installation process looks like from first assessment to first kilowatt-hour. Later chapters go deep on each stage - roof assessment, system sizing, panel selection, permitting, and maintenance.
What you'll learn in this chapter
- How the photovoltaic effect converts sunlight to electricity
- The 5 main components of a solar PV system
- Grid-tied, off-grid, and hybrid systems compared
- The 6-step installation journey
- How residential and commercial installs differ
- What solar installation costs in 2026 across Europe
How Solar Panels Generate Electricity
Solar panels work through the photovoltaic (PV) effect - a property of certain semiconductor materials that generate an electric current when exposed to light. Here's the process in plain terms:
- Photons hit the silicon cell. Sunlight carries energy in the form of photons. When these photons strike the silicon in a solar cell, they knock electrons loose from their atoms.
- The p-n junction creates directional flow. A solar cell is built from two layers of silicon with different electrical properties - a p-type layer and an n-type layer. The boundary between them (the p-n junction) creates an internal electric field that pushes freed electrons in one direction, creating a flow of current.
- DC electricity is produced. This electron flow is direct current (DC) electricity. One cell produces about 0.5–0.6 volts.
- Cells in series form a panel. A typical 400W panel contains 60–72 cells connected in series. More cells in series = higher voltage.
- The inverter converts DC to AC. Your home and the grid run on alternating current (AC). The inverter handles this conversion at 96–99% efficiency.
Key Takeaway
Solar panels don't need direct sunlight - they need light. On overcast days, output drops to 10–25% of rated capacity, but the panels still produce power. Germany, one of Europe's cloudiest countries, has more installed solar per capita than almost anywhere on Earth.
Why Panel Temperature Matters
Counterintuitively, solar panels produce less power on hot days. As cell temperature rises above 25°C, output drops - typically 0.3–0.5% for every degree above that. A panel rated at 400W at 25°C might produce only 360W when the cell temperature reaches 60°C on a hot summer afternoon. This is why the temperature coefficient appears on every panel datasheet, and why proper mounting with air gap under the panels is important in warm climates.
The 5 Components of a Solar PV System
A complete solar installation includes five categories of equipment. Understanding each one helps you evaluate quotes, ask the right questions, and spot poor-quality specifications.
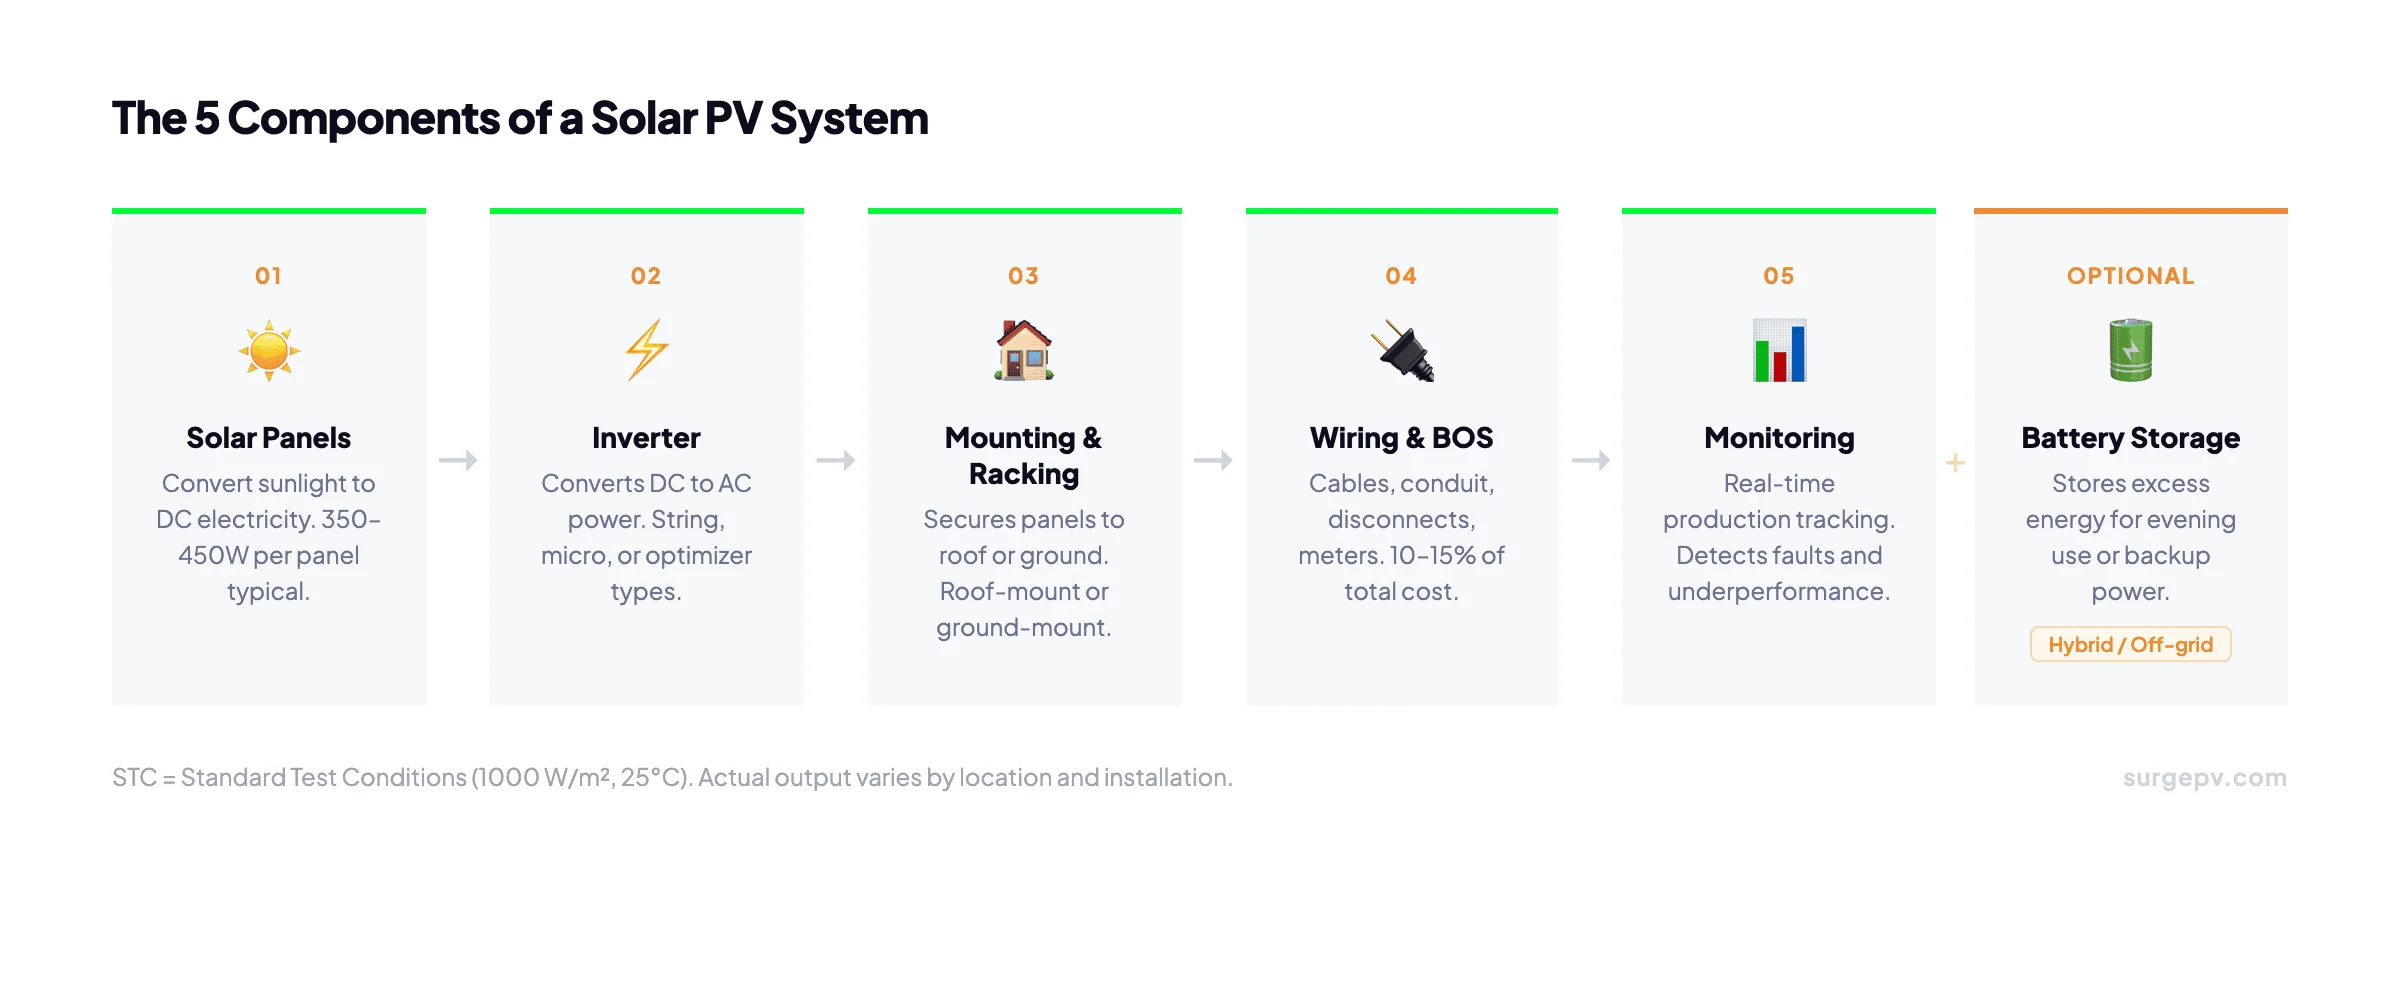
1. Solar Panels (Modules)
The panels are the most visible part of the system. They come in three main technologies:
- Monocrystalline silicon - highest efficiency (20–23%), black appearance, premium cost. The standard choice for residential installs where roof space is limited.
- Polycrystalline silicon - lower efficiency (16–18%), blue speckled appearance. Less common now as monocrystalline prices have dropped.
- Thin-film (CdTe, CIGS) - lower efficiency, flexible, performs better in diffuse light and high temperatures. Mainly used in utility-scale projects.
For residential installs in Europe, monocrystalline panels in the 400–450W range are the practical default. Physical dimensions are typically 1.7m × 1.0m - relevant for calculating how many fit on your available roof area.
2. Inverter
The inverter converts DC power from the panels into AC power for the building. There are three main types:
- String inverter - one central inverter handles an entire string (series chain) of panels. Most cost-effective for simple roofs with uniform orientation. If one panel is shaded, output drops for the whole string.
- Microinverter - one small inverter per panel. Each panel operates independently, so shading on one panel doesn't affect the others. Best for complex roofs or roofs with partial shade. Higher upfront cost.
- Power optimizer + string inverter - DC optimizers on each panel maximize individual panel output, then send it to a central string inverter. A middle-ground option that reduces the string effect at lower cost than full microinverters.
3. Mounting & Racking
The mounting system holds the panels to the roof or ground. Roof-mount systems use rails attached to the roof structure with waterproofed penetrations. Flat-roof systems use either ballasted frames (weighted down, no penetrations) or penetrating mounts. Ground-mount systems use posts driven into the ground and can be oriented at any angle.
Racking must be engineered for local wind and snow loads - this isn't a place to cut costs. The racking is what keeps the panels on the roof in a storm.
4. Wiring & Balance of System (BOS)
Balance of system covers everything that isn't a panel or inverter: DC wiring between panels, AC wiring from inverter to the main electrical panel, conduit, disconnects, combiner boxes, overcurrent protection, grounding, and the production meter. BOS typically accounts for 10–15% of total system cost but is critical for safety and code compliance.
5. Monitoring System
Most modern inverters include a Wi-Fi module that connects to a cloud monitoring portal. This lets you track daily, monthly, and annual energy production, view real-time output, and receive alerts if the system underperforms. Third-party monitoring platforms can aggregate data from mixed inverter brands - useful for installers managing many customer systems.
Grid-Tied, Off-Grid, and Hybrid Systems
The three system types differ mainly in how they handle the relationship between solar generation, battery storage, and the utility grid.
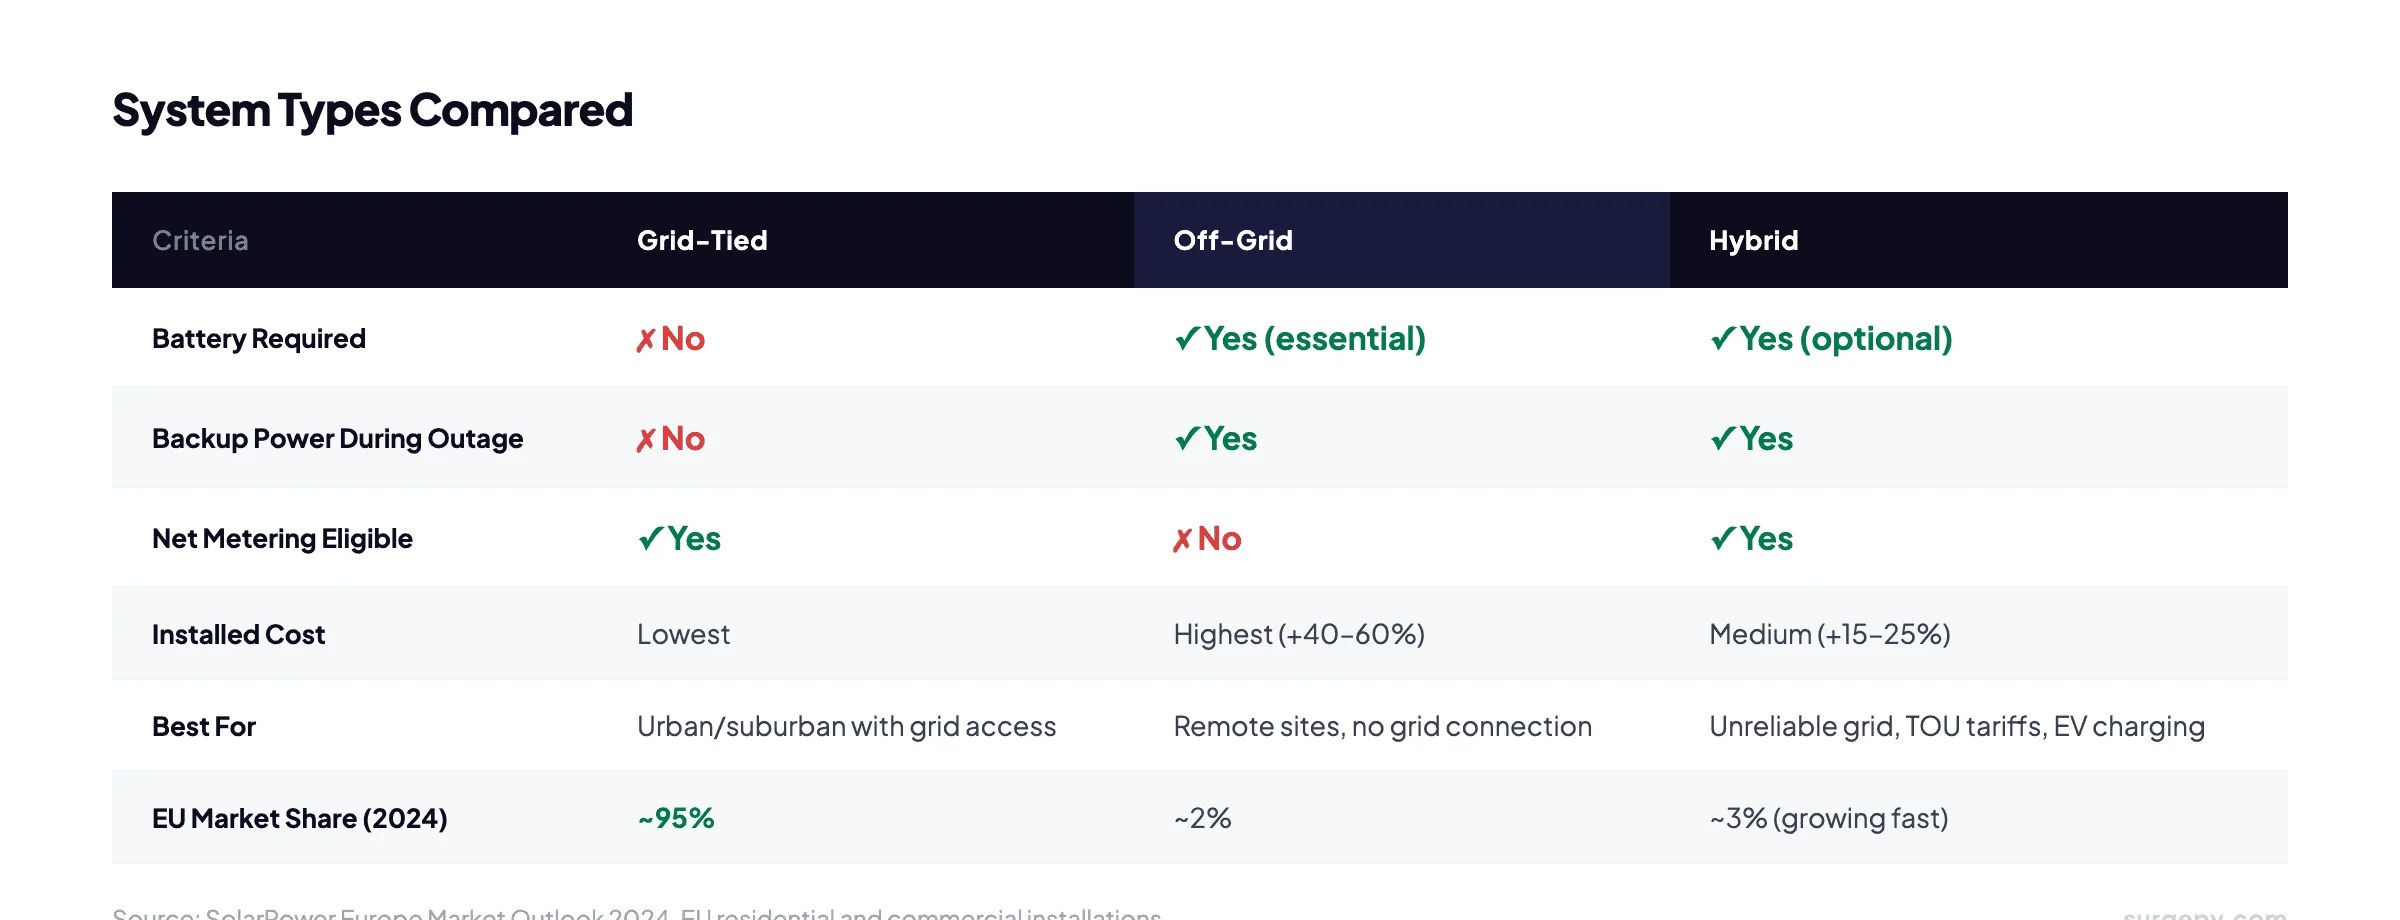
Grid-Tied (Most Common)
Grid-tied systems connect the solar installation directly to the utility grid. When production exceeds consumption, excess electricity flows back to the grid and the owner receives a credit (net metering). When production is lower than consumption - at night, for example - the building draws from the grid as normal.
Grid-tied systems account for over 95% of residential and commercial solar installations in Europe. They are the simplest, cheapest, and most maintenance-free option. The trade-off: when the grid goes down, a standard grid-tied system shuts off automatically for safety (anti-islanding protection). You lose power even though your panels are generating.
Off-Grid
Off-grid systems have no connection to the utility grid. All power must come from the solar array and battery bank. They are most common in rural or remote locations where grid connection is impractical or prohibitively expensive. Off-grid design is significantly more complex - you must size the battery bank to cover all nighttime consumption plus several days of low-irradiance weather.
Hybrid
Hybrid systems combine a grid connection with battery storage. Batteries charge during the day and provide power in the evening or during a grid outage. Hybrid systems are growing fast, driven by falling battery prices, time-of-use electricity tariffs, and increasing grid instability in some markets. They cost 15–25% more than a grid-tied-only system but provide energy resilience that many customers now want.
The Solar Installation Journey: From Assessment to Switch-On
A solar installation follows a consistent six-step process. The timeline varies - mostly based on how long permitting takes in your jurisdiction - but the steps are the same for every project.
Step 1: Site Assessment
Evaluate the site's solar potential. This means checking the roof orientation and pitch, identifying shading sources (trees, chimneys, neighboring buildings), verifying structural capacity, understanding the customer's electricity consumption, and determining the optimal system size. A thorough site assessment prevents expensive redesigns and customer disappointment later.
Step 2: System Design
Using the site data, design the system - panel layout, string configuration, inverter selection, wiring routes, and estimated annual energy production. Good solar software generates accurate 3D roof models, runs hour-by-hour shade simulations, and produces bankable energy estimates. This is where solar design software like SurgePV cuts design time from hours to minutes. See the full solar installation hub for chapter-by-chapter detail on each step.
Step 3: Permits & Approvals
Most residential solar installations require building permits, electrical permits, and a utility interconnection application. Timelines vary widely - from 2 weeks in streamlined jurisdictions to 3 months or more in slower ones. Commercial projects often require additional approvals. Chapter 8 covers permits and grid connection in detail.
Step 4: Physical Installation
The installation crew mounts the racking, installs panels, runs wiring, mounts the inverter, and connects to the main electrical panel. A typical residential system takes 1–3 days. Larger commercial systems take longer. Weather delays are common, which is why scheduling buffer time is standard practice.
Step 5: Inspection & Grid Connection
An electrical inspector verifies that the installation meets code. Once approved, the utility company connects the system and installs or programs a net metering meter. This step can add 1–4 weeks to the timeline depending on the utility's schedule.
Step 6: Commissioning & Monitoring Setup
Power on the system, verify production against design estimates, configure the monitoring portal, and walk the customer through how to read their system data. Good commissioning documentation protects both the installer and the customer if issues arise later.
Pro Tip
The single biggest cause of installation delays is incomplete permit packages. Use software that generates permit-ready drawings automatically - it removes the most common bottleneck from the process.
Design Solar Installations Faster with SurgePV
From address to permit-ready design in under 10 minutes. See how it works.
Book Free Demo20 minutes · Live walkthrough · No commitment
Residential vs Commercial Installation
The physics is the same, but residential and commercial installations differ in scale, complexity, permitting, and financial structure.
| Factor | Residential | Commercial |
|---|---|---|
| Typical system size | 4–15 kWp | 50 kWp – several MWp |
| Design complexity | Low - one roof, one meter | High - multiple roof faces, large arrays, string design |
| Permitting | Standard building + electrical permits | May require structural engineering, utility studies, environmental review |
| Financial model | Monthly savings, payback period, loan/lease | ROI, IRR, MACRS depreciation, tax credits |
| Typical timeline | 4–12 weeks contract to switch-on | 3–12 months |
| Installation time | 1–3 days | Weeks to months |
Residential design can be handled entirely within a modern solar software platform. Commercial projects often need additional structural analysis, detailed shade modeling, and custom financial models. The gap is closing as platforms like SurgePV add commercial-grade capabilities - but the project management and customer dynamics are still fundamentally different.
What Does a Solar Installation Cost? (2026 Data)
Installed costs vary by country, system size, component choices, and installer margin. The figures below are average all-in costs for a standard residential grid-tied system, per kilowatt-peak installed.
| Country | Average Installed Cost per kWp | Typical 5 kWp System |
|---|---|---|
| Germany | €1,200–1,500 | €6,000–7,500 |
| Italy | €1,300–1,600 | €6,500–8,000 |
| Spain | €1,000–1,300 | €5,000–6,500 |
| UK | £1,200–1,500 | £6,000–7,500 |
| France | €1,200–1,500 | €6,000–7,500 |
Source: SolarPower Europe Market Outlook 2024. Costs have fallen 90% since 2010 and continue to decline, though more slowly than in previous years.
These figures cover panels, inverter, mounting, wiring, and installation labor. They do not include battery storage, which typically adds €3,000–6,000 for a 10 kWh residential battery. Use our generation and financial tool to model payback periods and ROI for specific projects.
Key Takeaway
At current electricity prices and installation costs, a 5 kWp residential system in Germany, Italy, or Spain typically pays back in 6–9 years - with a system lifetime of 25–30 years. That's 15–20 years of near-free electricity after payback.
Frequently Asked Questions
How are solar panels installed on a house?
Installing solar on a house follows six steps: site assessment, system design, permit applications, physical installation (mounting, panels, inverter, wiring), grid connection, and commissioning. The physical installation on the roof typically takes 1–3 days. The full process from contract to switch-on usually takes 4–12 weeks, with most of that time waiting for permit approvals. Chapter 7 of this hub covers the step-by-step installation process in full detail.
How long does solar panel installation take?
The roof work takes 1–3 days for a residential system. However, the full process from signing a contract to having a working system connected to the grid typically takes 4–12 weeks. Most of that time is permit processing and utility paperwork, not installation work. Commercial systems take considerably longer - often 3–6 months for the permitting and design stages alone.
Do solar panels work without direct sunlight?
Yes. Solar panels generate electricity from diffuse light, not just direct sunlight. On overcast days, output drops to roughly 10–25% of rated capacity depending on cloud thickness. Panels still work in winter and in cloudy climates - they just produce less. Germany averages about 1,000–1,200 peak sun hours per year and remains one of the world's top solar markets. Output is lower than in southern Spain or Italy, but systems still make strong economic sense at German electricity prices.
Ready to Design Your First Solar Installation?
SurgePV handles every step - from roof modeling to permit-ready drawings to customer proposals.
Book Free DemoNo credit card · Full access · Unlimited projects
About the Contributors

CEO & Co-Founder · SurgePV
Keyur Rakholiya is CEO & Co-Founder of SurgePV and Founder of Heaven Green Energy Limited, where he has delivered over 1 GW of solar projects across commercial, utility, and rooftop sectors in India. With 10+ years in the solar industry, he has managed 800+ project deliveries, evaluated 20+ solar design platforms firsthand, and led engineering teams of 50+ people.