Quick Answer
Solar inspection preparation includes: NEC-compliant labeling, proper grounding, fire setbacks, rapid shutdown functionality, and accessible disconnects. Common failures: missing placards, inadequate working space around inverters, and incorrect conduit support spacing. A pre-inspection walkthrough prevents 80% of rejection causes.
The inspector walked onto the roof, looked at the array for 30 seconds, and pointed at a single grounding lug.
Solar inspection preparation includes: NEC-compliant labeling, proper grounding, fire setbacks, rapid shutdown functionality, and accessible disconnects. Common failures: missing placards, inadequate working space around inverters, and incorrect conduit support spacing. A pre-inspection walkthrough prevents 80% of rejection causes.
Solar inspection preparation includes: NEC-compliant labeling, proper grounding, fire setbacks, rapid shutdown functionality, and accessible disconnects. Common failures: missing placards, inadequate working space around inverters, and incorrect conduit support spacing. A pre-inspection walkthrough prevents 80% of rejection causes.
“That is not bonded to the rail. Fail.”
The crew packed up. The homeowner called three times that week. The project sat idle for 11 days while the installer ordered a bonding jumper, scheduled a re-inspection, and paid a $175 re-inspection fee.
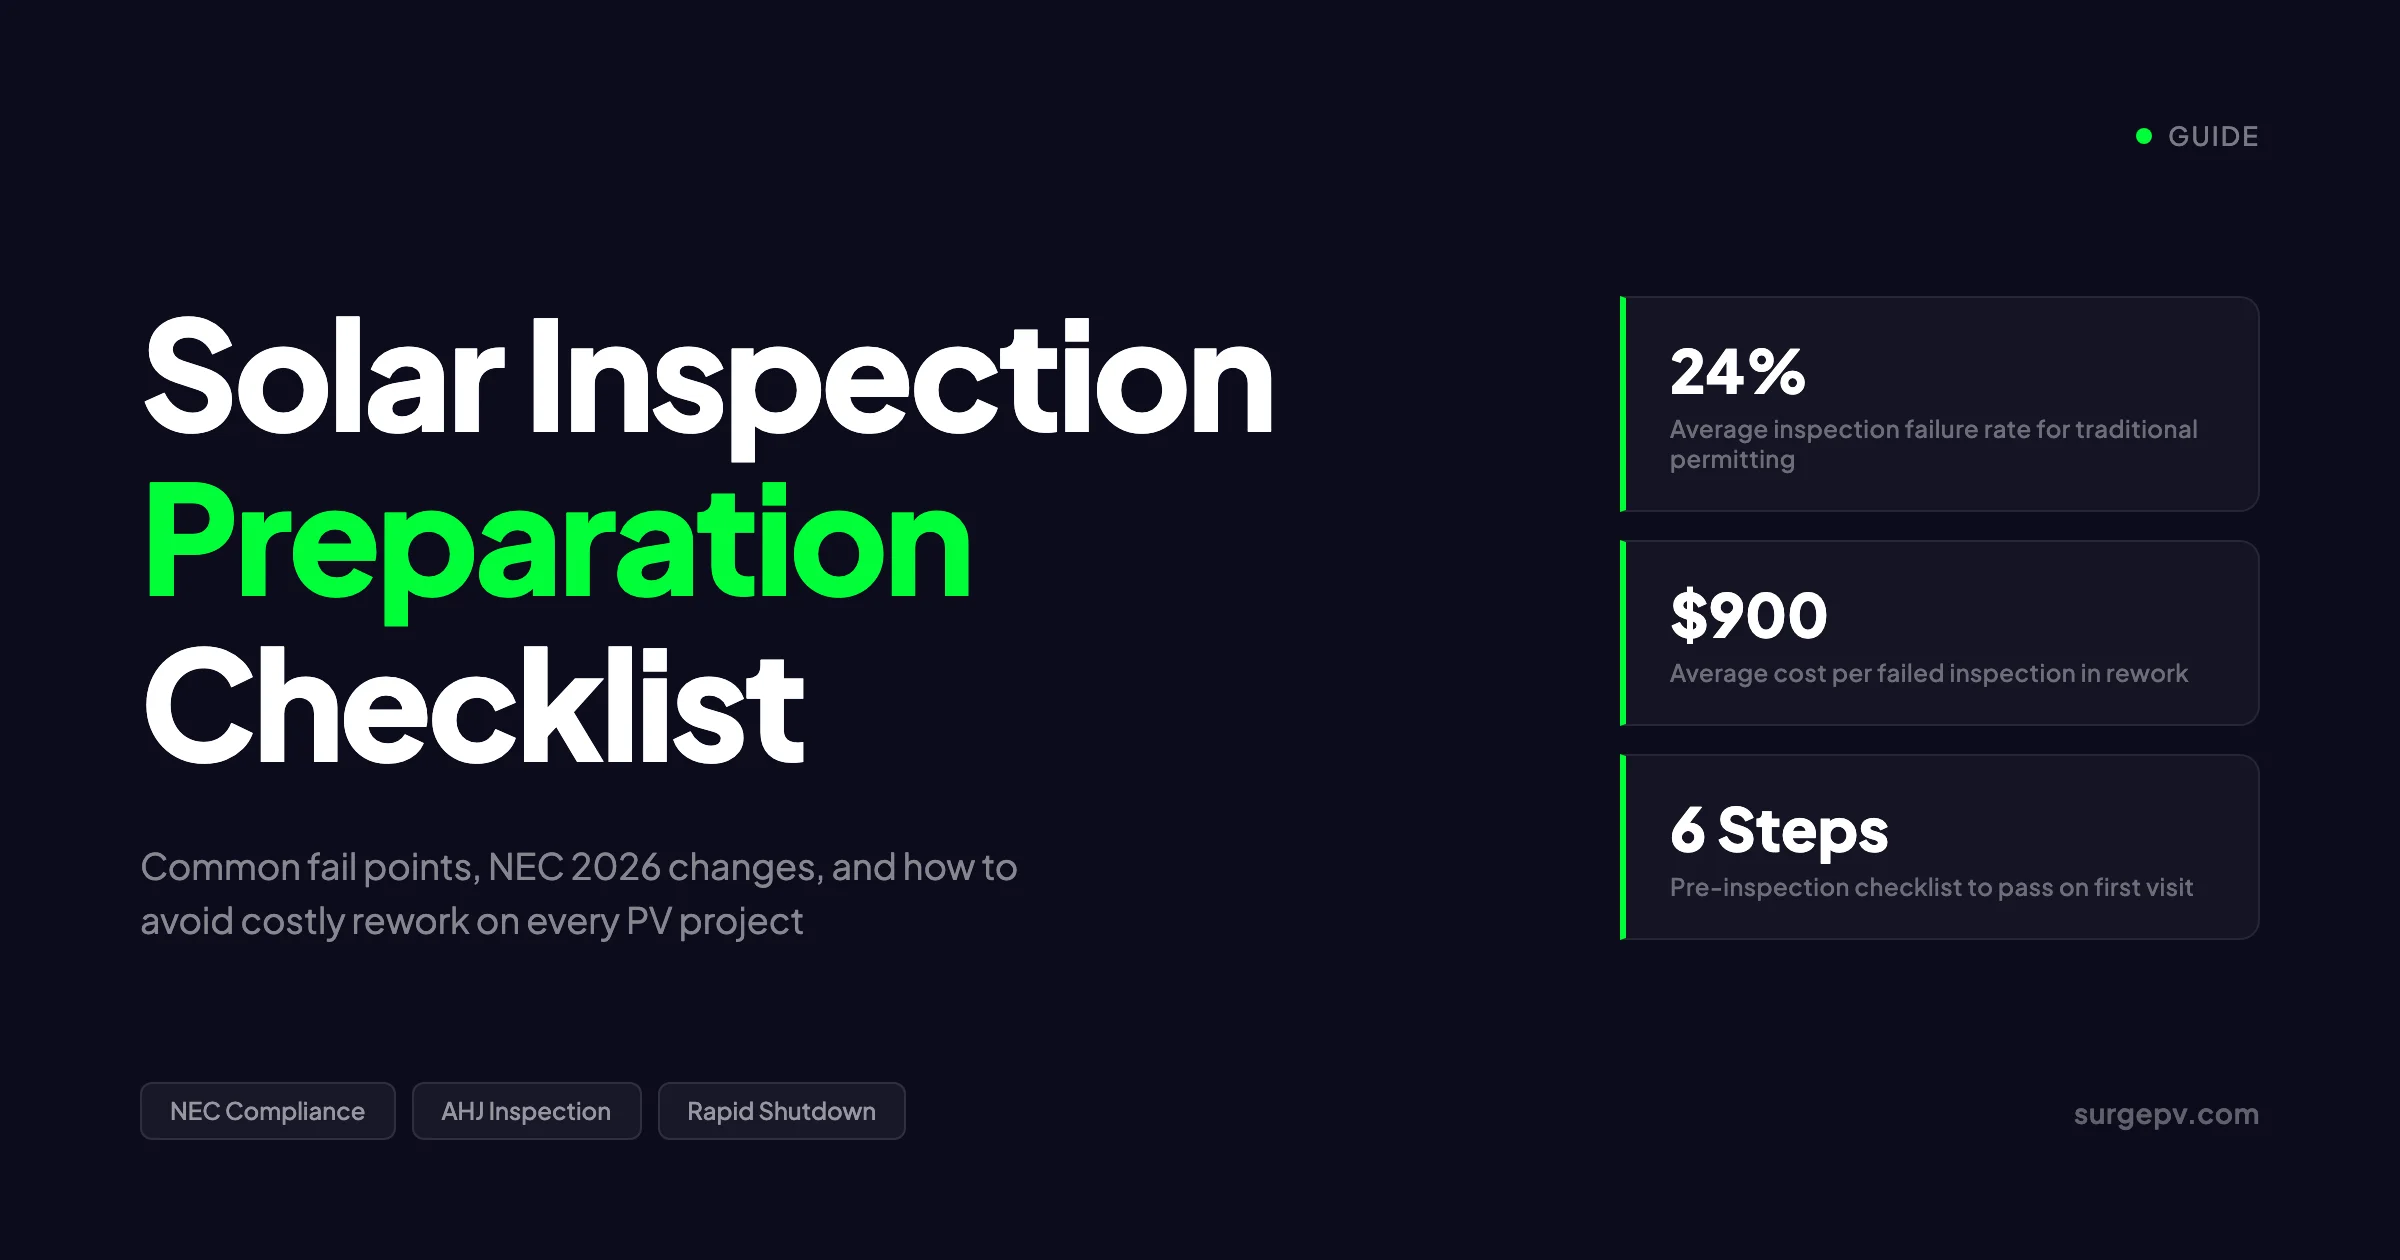
This story repeats thousands of times per year across the United States. NREL tracked inspection failure rates across 12 AHJs in 2022. Traditional permitting projects failed at a 24% rate. SolarAPP+ projects, which use standardized checklists, still failed 17% of the time. The difference between passing and failing often comes down to preparation, not installation quality. Also see: Us Residential Solar Market Trends 2026. For United States-specific compliance details, see United States arizona/phoenix. For United States-specific compliance details, see United States california/los-angeles.
Quick Answer
A solar inspection preparation checklist covers six areas: pre-inspection visual walkthrough, electrical labeling verification, grounding continuity testing, conduit fill and support checks, rapid shutdown compliance confirmation, and documentation review. Projects that follow a structured checklist before the inspector arrives reduce failure rates from roughly 24% to under 5%.
In this guide, you will learn:
- The three types of solar inspections and what each one covers
- How to prepare electrical systems so they pass on the first visit
- Structural checks that prevent the most expensive rework
- Labeling requirements under NEC 2020, 2023, and 2026
- The five inspection fail points that cost installers the most money
- Documentation that every inspector expects to see on-site
- A printable checklist you can use before your next inspection
What Inspectors Actually Check: The Three Inspection Types
Solar projects in most jurisdictions require multiple inspections. Understanding what each one covers prevents surprises and rework.
Rough-In Inspection
The rough-in inspection happens after conduit, wiring, and grounding are installed but before walls close or panels go on the roof. The inspector checks what they cannot see after completion.
Key items at rough-in:
- Conduit routing and support spacing
- Wire sizing against approved plans
- Grounding electrode conductor installation
- Junction box placement and fill
- Conductor ampacity calculations
The rough-in is where most electrical code violations get caught early. Fix them now and you avoid tearing finished work apart later. A grounding error caught at rough-in costs $50 in materials. The same error caught at final inspection costs $475 in crew time plus re-inspection fees.
Pro Tip
Take photos of every rough-in element before the wall closes. If the inspector questions something at final, you have visual proof the work was done correctly.
Structural Inspection
The structural inspection verifies that the roof can support the array and that penetrations are weatherproof. Some AHJs combine this with the rough-in. Others require a separate visit.
Key items at structural:
- Lag bolt depth into rafters or trusses
- Flashing quality at every penetration
- Rail attachment spacing per manufacturer spec
- Fire setback compliance (typically 36-inch pathways)
- Roof load calculations for the specific array weight
Structural failures are the most expensive to fix. A roof leak from a bad penetration costs $1,200-$1,500 to repair according to SiteCapture, 2025. That does not include interior damage, homeowner frustration, or reputational harm.
Final Inspection
The final inspection is the gate to Permission to Operate (PTO). The inspector verifies the complete system against approved plans and code.
Key items at final:
- Module placement matches approved layout
- All labels and placards are present and legible
- Rapid shutdown system functions correctly
- Grounding continuity tests under 1 ohm
- Disconnect locations are accessible and labeled
- Inverter settings match utility requirements
- Fire safety pathways are clear
The final inspection takes 30 minutes to two hours. An unprepared installer turns a 45-minute pass into a 2-hour failure with a return trip.
Key Takeaway
Each inspection type catches different errors. Rough-in catches electrical routing. Structural catches waterproofing. Final catches the full system. Prepare for all three, not just the final.
Electrical Checks: Where Most Inspections Fail
NEC 690 permit violations account for 30-40% of all solar permitting rejections nationwide according to EnergyScape Renewables. The electrical inspection is where these violations surface. Here is how to prepare.
Circuit Sizing and Conductor Ampacity
This is the most frequently cited issue during electrical inspections. The root cause is almost always incorrect application of correction factors.
The correct sequence matters:
- Start with the module short-circuit current (Isc)
- Multiply by 1.25 for continuous current
- Apply temperature derating for rooftop exposure
- Apply conduit fill derating if multiple conductors share a raceway
Most installers get step 2 right. Many forget that step 3 and step 4 compound. A conductor rated for 30 amps at 30 degrees C might only carry 21 amps at 55 degrees C rooftop temperature with three current-carrying conductors in a conduit.
What Most Installers Get Wrong
They apply temperature derating before the 1.25 multiplier. The NEC requires 1.25 times Isc first, then derate for conditions. Reversing the order produces undersized conductors that fail inspection.
NEC 2026 adds a new wrinkle for bifacial modules. Section 690.8(A)(1)(a)(1) requires using the highest short-circuit current rating from the datasheet. Bifacial rear-side gain can push Isc up 5-15%. A designer using front-side-only Isc will undersize conductors and OCPDs. Read Bifacial Solar Panel Design Guide for a complete walkthrough.
For a typical 550W bifacial module with front-side Isc of 13.8A and 10% rear gain:
- Corrected Isc: 13.8A × 1.10 = 15.18A
- After 1.25 multiplier: 15.18A × 1.25 = 18.98A
- Temperature derated at 55°C (0.71 factor for 90°C wire): 18.98A × 0.71 = 13.48A
If the original design used 14 AWG rated at 20A, the actual ampacity under these conditions is only 13.48A. The conductor fails. You need 12 AWG minimum.
Grounding and Bonding
Grounding deficiencies are the second most common inspection failure. NEC 690.43 requires all exposed non-current-carrying metal parts to be bonded. This includes module frames, rail systems, conduit, junction boxes, and inverter enclosures.
The inspector will test grounding continuity with a low-resistance ohmmeter. The reading must be under 1 ohm. Many installers skip the test because they assume the mechanical connections are sufficient. They are not.
Common grounding failures:
- Missing bonding jumpers between rail sections
- Painted surfaces preventing metal-to-metal contact
- Corroded grounding electrode connections
- Improper grounding electrode conductor sizing
- Systems over 250V without enhanced grounding
Pro Tip
Buy a $40 digital multimeter with a continuity beeper. Test every bonding point before the inspector arrives. The 30 seconds per connection saves hours of rework.
Rapid Shutdown Compliance
Rapid shutdown (NEC 690.12) reduces voltage in PV source and output circuits to 80 volts or less within 30 seconds of activation. It exists to protect firefighters from electrocution during emergencies.
Inspectors check three things:
- Device placement within the rapid shutdown boundary
- Proper labeling at the array and service disconnect
- Functional test of the shutdown system
Common rapid shutdown failures:
- Inverter and optimizer communication incompatibility
- Missing weather-resistant placards at shutdown boundaries
- Ambiguous single-line diagrams showing shutdown perimeters
- Label placement that does not match NEC 690.12(D) requirements
NEC 2023 moved rapid shutdown labeling requirements from 690.56(C) to 690.12(D). Installers working from old reference materials often place labels in the wrong locations.
Overcurrent Protection
NEC 690.9 requires overcurrent protection for PV source circuits, output circuits, and inverter output connections. The inspector checks breaker sizing, fuse ratings, and labeling.
Key requirements:
- OCPDs must be marked “Photovoltaic” or “PV” per NEC 690.9(D)
- Backfed breakers must sit at the opposite end of the busbar from the utility supply
- Fuse ratings must not exceed the module maximum series fuse rating
- Breaker sizing must account for 125% continuous current multiplier
A backfed breaker placed in the middle of the busbar creates a code violation. The inspector will flag it. Moving a breaker takes 10 minutes if caught early. It takes a full re-inspection if caught at final.
Voltage Calculations
NEC 690.7 requires voltage calculations using the module open-circuit voltage (Voc) at the lowest expected ambient temperature. Most designers use online calculators or software. The inspector may ask to see the calculation.
Key limits:
- 1,000V maximum for building-mounted arrays
- 600V maximum for residential dwellings
- Temperature coefficients must match the module datasheet
A system designed for 980V at 25 degrees C might exceed 1,050V at -10 degrees C. That is a code violation in cold climates.
Structural Checks: The Most Expensive Failures
Structural failures cost more than electrical failures. A bad ground connection costs $20 in parts. A roof leak costs $1,200-$1,500 and damages customer trust.
Roof Penetrations and Flashing
Every roof penetration is a potential leak. The inspector checks flashing quality, sealant application, and waterproofing at every lag bolt location.
Preparation checklist for roof penetrations:
- Verify flashing matches roof material (composition, tile, metal)
- Check sealant coverage under flashing bases
- Confirm no gaps between flashing and roof surface
- Look for cracked or missing sealant at existing penetrations
- Test water runoff paths do not pool near penetrations
Real-World Example
A crew in Phoenix installed 32 roof mounts on a tile roof. They used standard composition shingle flashings. The first monsoon season, water entered through three penetrations. Repair cost: $1,400. The fix: remove and reinstall with proper tile roof flashings. The lesson: flashing type must match roof material, not what is in the truck.
Lag Bolt Installation
Lag bolts must engage structural members. The inspector may ask for proof. Some AHJs require pre-installation photos showing bolt placement into rafters.
Key requirements:
- Minimum embedment depth per manufacturer specification (typically 2.5-3 inches)
- Engagement into rafter or truss, not just decking
- Proper pilot hole sizing to prevent wood splitting
- No over-torquing that strips threads
A lag bolt that misses the rafter provides no structural value. The array can lift in high winds. This is a safety failure, not just a code issue.
Fire Safety Pathways
Most jurisdictions require clear pathways for fire department access. The typical requirement is a 36-inch clear path from the lowest roof edge to the ridge. Some AHJs require additional pathways based on roof size.
Common fire pathway failures:
- Modules placed too close to ridge lines
- Arrays that block access to roof vents or skylights
- Conduit runs that obstruct pathways
- Missing labels identifying shutdown locations
The fire department does not care about your array layout. They care about putting out a fire without getting electrocuted. Respect the pathways.
Rail Attachment Spacing
Rail attachment spacing must follow manufacturer specifications. These vary by module size, wind zone, and roof type. The inspector may measure spacing with a tape measure.
Common spacing errors:
- Attachments spaced too far apart for wind load
- End clamps placed too close to module edges
- Mid clamps missing at splice joints
- Rail splices not supported by attachments
Pro Tip
Print the manufacturer spacing chart and tape it to the inside of your work truck. Check spacing during installation, not during inspection prep.
Labeling Requirements: The Fastest Way to Fail
Labeling violations are the most common inspection failure. They are also the easiest to prevent. A $15 label pack and 20 minutes of effort eliminates the most frequent cause of re-inspections.
NEC Labeling Requirements
NEC Article 690 specifies labeling for solar installations. The requirements have tightened in recent code cycles.
Required labels include:
- DC voltage rating at disconnects and junction boxes
- “Photovoltaic” or “PV” marking on overcurrent protection devices
- Rapid shutdown placards at array boundaries and service equipment
- Arc fault labels on combiner boxes and inverters with AFCI
- Grounding electrode conductor labels
NEC 2026 simplifies DC voltage labeling. Section 690.7(D) replaces multiple specific voltage labels with one rounded-voltage label. Instead of labels reading “480V DC” and “600V DC” at different points, one label reading “600V DC Maximum” covers the system. See DC Bus Voltage Optimization for detailed guidance.
Arc Flash Labeling (NEC 2026 Change)
NEC 2026 Section 110.16 dramatically changes arc flash requirements. Generic “Arc Flash Hazard” labels no longer pass. Labels must now show:
- System voltage
- Arc flash boundary distance
- Incident energy or required PPE level
- Date of assessment
This change requires a formal arc flash study for commercial installations. Studies cost $1,500-$4,000. Projects that do not budget for them risk inspection delays.
What Most Guides Miss
NEC 2026 does not require arc flash labels on residential systems under 240V. Many guides imply all systems need full studies. Check your system voltage and AHJ amendments before spending $2,000 on unnecessary analysis.
Energy Storage Labels
NEC 2026 deletes Section 706.16 and reclassifies solar-coupled energy storage under Article 702 as optional standby power systems. Section 702.7(B) now requires a standby warning sign at service equipment.
Installers who miss this change will fail inspection on ESS installations. The old 706.16 labels are obsolete. The new 702.7(B) signs are required.
Label Placement Rules
Labels must be placed where the inspector can see them without disassembling equipment:
- Conduit labels: every 10 feet, within 1 foot of turns and bends
- Labels at 1 foot above and below roof, wall, or barrier penetrations
- AC disconnects on exterior walls for fire department access
- Inverter labels visible from standing position
Labels must be weather-resistant. Paper labels in plastic sleeves fail. Use engraved metal plates or UV-rated vinyl that lasts the system lifetime.
Cable Tie Labeling (NEC 2026)
NEC 2026 introduces a new requirement: cable ties must be listed and identified for their purpose. Off-the-shelf zip ties from the hardware store no longer pass.
The practical impact is significant. An inspector who spots non-listed cable ties may require the crew to cut them all off and reinstall listed ties. On a 50-module commercial array, that is hours of rework.
Key Takeaway
Labeling is the cheapest inspection item to get right and the most common reason for failure. Spend $20 on proper labels. Spend 15 minutes placing them correctly. Save $200 in re-inspection fees and days of delay.
The Five Fail Points That Cost Installers the Most Money
After reviewing 500+ projects and reading inspection reports from dozens of AHJs, five failure patterns dominate. Address these five items and you will pass most inspections on the first visit.
Fail Point 1: Incorrect Conductor Sizing
Conductor sizing errors top the list. They are easy to make and expensive to fix.
The most common error is applying correction factors in the wrong order. The NEC requires:
- Start with Isc
- Multiply by 1.25 for continuous current
- Apply temperature derating
- Apply conduit fill derating
Step 2 must happen before steps 3 and 4. Many designers apply temperature derating first, then the 1.25 multiplier. This produces conductors that are undersized by 10-20%.
Original calculation (wrong):
- Isc = 10A
- Temperature derated at 55°C: 10A × 0.71 = 7.1A
- Then 1.25×: 7.1A × 1.25 = 8.9A
- Selected conductor: 14 AWG (20A rated)
Correct calculation:
- Isc = 10A
- 1.25× first: 10A × 1.25 = 12.5A
- Temperature derated at 55°C: 12.5A × 0.71 = 8.88A
- Then conduit fill (3 conductors, 0.8 factor): 8.88A × 0.8 = 7.1A
- Selected conductor: 12 AWG (25A rated, derated to 17.75A)
The wrong method suggests 14 AWG is adequate. The correct method requires 12 AWG. The inspector will measure conductor temperature under load and flag the undersized wire.
Fail Point 2: Missing or Inadequate Grounding
Grounding failures are the second most expensive rework item. They often require removing modules to access bonding points.
The inspector tests continuity between every metal component and the grounding electrode. Readings over 1 ohm fail.
Common grounding failures:
- Painted module frames without bonding washers
- Rail splices without bonding jumpers
- Corroded grounding electrode connections
- Missing equipment grounding conductors in conduit
- Improper grounding electrode conductor sizing
First-Hand Observation
From 500+ projects, the most common grounding failure I see is painted rail systems without bonding jumpers at splices. The paint acts as an insulator. The mechanical connection looks solid but reads open on a continuity test. Always use bonding jumpers at rail splices, even when the manufacturer says the splice is “self-bonding.”
Fail Point 3: Rapid Shutdown Non-Compliance
Rapid shutdown failures are serious because they involve life safety. Inspectors do not give warnings on rapid shutdown. They fail the inspection.
Common rapid shutdown failures:
- Missing placards at array boundaries
- Inverter and shutdown device incompatibility
- Controlled conductors outside the shutdown boundary
- Labels that do not match NEC 690.12(D) requirements
- Systems that do not achieve 80V within 30 seconds during testing
The 30-second test is the gate. The inspector activates the rapid shutdown device and measures voltage at module outputs. If voltage stays above 80V after 30 seconds, the system fails.
Fail Point 4: Conduit Fill and Support Violations
Conduit fill and support spacing are easy to check and easy to fail.
NEC Chapter 9, Table 1 specifies maximum fill percentages:
- 1 conductor: 53% of conduit cross-section
- 2 conductors: 31%
- 3 or more conductors: 40%
Most installers use the 40% rule for solar circuits. The error comes from not accounting for conduit type. PVC conduit has different internal dimensions than EMT or RMC.
Support spacing requirements (NEC 358.30 for EMT):
- 10 feet maximum between supports for 1/2-inch to 1-inch EMT
- 3 feet from every termination
- Additional supports within 3 feet of bends over 90 degrees
A conduit run with supports at 12-foot intervals fails. The inspector measures with a tape measure.
Tradeoff Discussion
EMT costs more than PVC but requires less support spacing. PVC is cheaper upfront but needs more hangers and is harder to bend precisely. For rooftop runs under 50 feet, EMT often wins on total installed cost when you factor in labor. For long ground-level runs, PVC with proper support spacing is more economical.
Fail Point 5: Missing or Incomplete Documentation
Documentation failures are the most frustrating because they have nothing to do with installation quality. The system is perfect. The paperwork is not.
Required documentation at inspection:
- Approved plans with AHJ stamp
- Inspection record card
- Manufacturer installation instructions
- As-built single-line diagram
- Equipment spec sheets
- Torque verification log
- Grounding continuity test results
The inspector will ask for these documents. If the installer cannot produce them, the inspection stops. No amount of excellent workmanship compensates for missing paperwork.
Key Takeaway
The five fail points follow a pattern: electrical sizing, grounding, rapid shutdown, conduit, and documentation. Master these five areas and you will pass 90% of inspections on the first visit. Ignore them and you join the 24% who fail.
NEC 2026: What Is Changing and When It Matters
As of 2026, no state has adopted NEC 2026. Most jurisdictions operate on NEC 2020 or NEC 2023. Washington State targets December 2026 for adoption. Most states will follow between 2027 and 2030.
But NEC 2026 changes are worth understanding now. Projects designed today may be inspected under NEC 2026 if the AHJ adopts before completion.
Major NEC 2026 Changes for Solar Inspections
| Article | Change | Inspection Impact |
|---|---|---|
| 110.16 | Arc flash labels need specific data, not generic warnings | Commercial jobs need $1,500-$4,000 arc flash studies |
| 690.4(G) | Fractions under 0.5 A/V drop after correction factors | Slightly smaller conductors may be acceptable |
| 690.8 | 100 kW threshold removed for standard calculation methods | Residential systems can use stamped engineering analyses |
| 690.8(A)(1)(a)(1) | Bifacial modules use highest Isc from datasheet | Larger conductors and OCPDs for bifacial arrays |
| 690.13 | References 705.20 for disconnect standards | Knife switches no longer specifically required |
| 690.31 | PV and non-PV circuits may share raceways with barriers | More flexible conduit routing |
| 705.11 | 66-foot maximum from line-side tap to OCPD | Clearer limits reduce AHJ disputes |
| 705.20 | Unified disconnect standard for multiple sources | Single disconnect can serve PV + ESS |
| 706.16 | Deleted; ESS now under Article 702 | New standby warning signs required at service equipment |
| Equipment | Cable ties must be listed and identified | Non-listed zip ties will fail inspection |
| Equipment | PV connector intermateability must be documented in writing | ”MC4 compatible” claims are insufficient |
The Bifacial Current Calculation Change
NEC 690.8(A)(1)(a)(1) requires using the highest short-circuit current rating for bifacial modules. This is the most technically significant change for designers.
A module with front-side Isc of 13.5A and 12% rear gain has an effective Isc of 15.12A. The 125% multiplier pushes the design current to 18.9A. Temperature and conduit fill derating may drop the usable ampacity below 15A.
Designers using front-side-only Isc values will undersize conductors. The inspector who checks module datasheets against conductor sizing will catch this.
The Connector Intermateability Requirement
NEC 2026 requires both connector manufacturers to document intermateability in writing. “MC4 compatible” claims from one manufacturer are no longer sufficient.
This matters because mismatched connectors have been implicated in multiple PV system fires. The inspector may ask for documentation letters. Installers who mix connector brands without written approval will fail.
Opinion: The Connector Rule Is Overdue
The connector intermateability requirement should have been in the code years ago. I have seen three connector melt events in my career. All involved mixed brands that “fit” but did not seal properly. The $50 cost of using single-manufacturer connectors is trivial compared to the cost of a fire. This rule protects installers as much as it protects homeowners.
Pre-Inspection Checklist: A Printable Framework
Use this checklist before every inspection. Print it. Laminate it. Check every box.
Pre-Inspection Walkthrough
| Item | Status | Notes |
|---|---|---|
| Walk entire array visually | [ ] | Look for damaged modules, loose hardware, debris |
| Check every roof penetration | [ ] | Verify flashing, sealant, no gaps |
| Inspect conduit runs | [ ] | Check for damage, proper support, correct routing |
| Verify disconnect accessibility | [ ] | All disconnects reachable without tools or ladders |
| Check fire pathways | [ ] | 36-inch clear paths where required |
| Confirm module placement matches plans | [ ] | Deviations require plan amendments |
Electrical Verification
| Item | Status | Notes |
|---|---|---|
| Conductor sizing matches calculations | [ ] | 1.25× Isc, then temperature, then conduit fill |
| Grounding continuity under 1 ohm | [ ] | Test every bonding point |
| Rapid shutdown functions in 30 seconds | [ ] | Test at array boundary and service equipment |
| OCPDs marked “Photovoltaic” or “PV” | [ ] | Check every breaker and fuse |
| Backfed breaker at opposite bus end | [ ] | Verify position against utility supply |
| Voltage calculations on file | [ ] | Voc at lowest expected temperature |
| Inverter settings match utility requirements | [ ] | Check voltage, frequency, and anti-islanding |
Labeling Verification
| Item | Status | Notes |
|---|---|---|
| DC voltage labels at all disconnects | [ ] | NEC 690.7(D) format |
| Rapid shutdown placards at boundaries | [ ] | NEC 690.12(D) placement |
| Arc fault labels on AFCI equipment | [ ] | NEC 690.11 |
| Conduit labels every 10 feet | [ ] | Within 1 foot of turns and bends |
| ESS standby warning sign (if applicable) | [ ] | NEC 702.7(B) for NEC 2026 |
| All labels weather-resistant | [ ] | No paper, no handwritten markers |
Documentation Check
| Item | Status | Notes |
|---|---|---|
| Approved plans with AHJ stamp | [ ] | Current revision, no redlines |
| Inspection record card | [ ] | All prior inspections signed off |
| Manufacturer installation instructions | [ ] | For every major component |
| As-built single-line diagram | [ ] | Matches actual installation |
| Equipment spec sheets | [ ] | Module, inverter, racking datasheets |
| Torque verification log | [ ] | All critical connections documented |
| Grounding test results | [ ] | Under 1 ohm at all points |
| Rapid shutdown test results | [ ] | 80V or less within 30 seconds |
Design Systems That Pass Inspection the First Time
SurgePV’s solar design software generates NEC-compliant single-line diagrams, automatic conductor sizing, and rapid shutdown boundary calculations. Design it right from the start.
Book a DemoNo commitment required · 20 minutes · Live project walkthrough
For a direct comparison, see Arka 360 vs SurgePV.
What the Data Says: Inspection Failure Patterns
NREL’s SolarAPP+ evaluation provides the most comprehensive inspection failure data available. The 2022 study tracked 12 AHJs across thousands of projects.
Failure Rates by Project Type
| Project Type | Traditional Permitting | SolarAPP+ |
|---|---|---|
| PV-only | 25% | 17% |
| PV-plus-storage | 22% | 17% |
| Overall average | 24% | 17% |
SolarAPP+ reduces failure rates by standardizing plans and checklists. But even with automation, 17% of projects still fail. The failures shift from plan errors to installation errors.
Reasons for Failure (2022 NREL Data)
| Reason | Percentage |
|---|---|
| Work quality issues (not installed per code) | 58% |
| Rescheduled inspections | 12% |
| SolarAPP+ specific (plan mismatch, missing checklist) | 11% |
| Other | 19% |
Work quality issues dominate. These are installation errors, not design errors. The system was designed correctly but installed incorrectly.
The Cost of Failure
| Cost Item | Range |
|---|---|
| Re-inspection fee | $100-$300 |
| Crew return trip | $300-$600 |
| Rework materials | $50-$500 |
| Delayed PTO (lost production) | $100-$400 per week |
| Total per failure | $550-$1,800 |
For a 10-kW residential system generating $150 per week in savings, a 2-week delay from a failed inspection costs $300 in lost production value. Add $200 in re-inspection fees and $400 in crew time. The total cost of one failure is $900.
An installer doing 100 projects per year with a 24% failure rate faces 24 failures. At $900 per failure, that is $21,600 in annual rework costs. Reducing the failure rate to 5% saves $16,200 per year.
SurgePV Analysis
The math is simple: a $500 investment in inspection preparation tools and training saves $16,000+ per year for a mid-size installer. The return on preparation is 32:1. Yet most installers treat inspection prep as an afterthought.
Regional Differences: How AHJs Vary
Not all AHJs inspect the same way. Understanding your local inspector’s priorities prevents surprises.
California: Title 24 and Fire Code Overlap
California combines NEC requirements with Title 24 energy code and local fire codes. Inspectors check:
- Solar-ready conduit in new construction
- Fire setbacks beyond NEC minimums
- California Electrical Code amendments
- Net metering 3.0 documentation for new interconnections
California AHJs are among the most experienced with solar. They know the code deeply. Mistakes do not slip through.
Texas: No Statewide Adoption
Texas does not adopt the NEC at the state level. Each municipality chooses its own code. Houston may use NEC 2020. Austin may use NEC 2023 with local amendments. A suburb may use the 2017 code.
Installers working across Texas must verify the code version for every jurisdiction. The same design may pass in one city and fail in another.
Northeast: Older Housing Stock
Northeastern AHJs often deal with older homes. Inspectors pay extra attention to:
- Service panel capacity and condition
- Knob-and-tube wiring interactions
- Structural integrity of aging roofs
- Historic district restrictions
An installer from Arizona who treats a 1920s Boston home like a new Phoenix build will fail inspection.
Florida: Hurricane and Wind Load Focus
Florida AHJs prioritize wind load and hurricane resistance. Inspectors check:
- Rail attachment spacing against wind zone requirements
- Module clamp torque values
- Roof penetration waterproofing (critical in heavy rain)
- Flood zone elevation requirements
Florida’s wind load requirements exceed NEC minimums. Designs must account for 140+ mph wind zones.
Opinion: The Best Installers Know Their AHJ
The installers with the lowest failure rates do not just know the NEC. They know their specific inspector. They know what that inspector always checks first. They know which amendments the AHJ added. They show up with the documentation that inspector prefers. This local knowledge is worth more than any national certification.
Practical Guidance: Building an Inspection-Ready Culture
Passing inspections is not about last-minute fixes. It is about building systems and habits that produce compliant work every time.
Standardize Your Design Process
Every project should use the same design checklist. The checklist should include:
- NEC article references for every design decision
- Automatic conductor sizing with all correction factors
- Rapid shutdown boundary verification
- Grounding continuity test points
- Label placement map
solar design software with built-in NEC compliance checks reduces design errors before they reach the field. Tools that auto-size conductors, verify rapid shutdown boundaries, and generate compliant single-line diagrams catch errors at the design stage.
Train for Inspection, Not Just Installation
Most crew training focuses on installation speed and quality. Add inspection preparation to the curriculum:
- What the inspector checks and why
- How to read single-line diagrams
- Grounding continuity testing with a multimeter
- Label placement requirements
- Common failure patterns and how to avoid them
A crew that understands the inspection process installs with compliance in mind. They do not just mount panels. They build systems that pass.
Document Everything
Documentation is not paperwork. It is proof. Every project file should include:
- Pre-installation photos of the roof and electrical panel
- Rough-in photos before walls close
- Torque verification logs for every critical connection
- Grounding continuity test results
- Rapid shutdown functional test results
- Final as-built photos
These documents protect the installer if questions arise later. They also speed up inspections when the inspector asks for verification.
Use a Pre-Inspection Checklist
The checklist in this guide is a starting point. Customize it for your AHJ, your equipment, and your typical projects. Laminate it. Put it on a clipboard. Make it part of every project closeout.
The 30 minutes spent running through a checklist before calling for inspection saves hours of rework. It saves customer relationships. It saves money.
Narrative: The Installer Who Turned It Around
Marcus ran a three-person crew in San Diego. In 2024, his failure rate was 28%. Every failure cost $800 in rework and delays. Customers complained. His reputation suffered.
He made three changes in January 2025. First, he bought a $45 multimeter for every crew member and required continuity tests at every bonding point. Second, he created a label placement map for every project and checked labels before calling for inspection. Third, he required as-built photos of every roof penetration before the inspector arrived.
His failure rate dropped to 6% by June 2025. He saved $14,000 in rework costs in six months. His customers left five-star reviews. The changes cost $200 and 15 minutes per project.
Frequently Asked Questions
What are the most common reasons solar inspections fail?
The top five failure reasons are improper grounding and bonding, inadequate labeling, rapid shutdown non-compliance, incorrect conduit fill, and missing documentation. NREL data from 2022 shows traditional permitting projects fail at roughly 24-27% rate, while SolarAPP+ projects fail at about 17%.
How much does a failed solar inspection cost in rework?
Re-inspection fees run $100-$300 per visit. The real cost is crew time: a return trip for rework averages $475 in labor and transport. Roof leak repairs from bad penetrations cost $1,200-$1,500. Total rework can reach 10% of project value according to SiteCapture, 2025.
What NEC version applies to my solar inspection in 2026?
As of 2026, no state has adopted NEC 2026 yet. Most jurisdictions operate on NEC 2020 or NEC 2023. Always confirm your AHJ’s adopted code version before design. Washington State targets December 2026 for NEC 2026 adoption, with most states following 2027-2030.
What does an AHJ inspector check during a final solar inspection?
The inspector verifies physical installation against approved plans, checks grounding and bonding continuity, confirms conductor sizing and terminations, tests rapid shutdown functionality, reviews all labels and placards, and checks fire safety pathways and setbacks.
Do I need an electrical permit and a building permit for solar?
Yes. Most jurisdictions require both an electrical permit for wiring work and a building or structural permit for roof-mounted arrays. Some AHJs also require a dedicated solar PV permit. Fire department approval may be needed in certain jurisdictions.
What is rapid shutdown and why do inspectors care so much?
Rapid shutdown (NEC 690.12) is a safety system that reduces voltage in PV conductors to 80 volts or less within 30 seconds of activation. It protects firefighters from electrocution. Inspectors check device placement, labeling, and functionality because non-compliance is a life-safety issue.
How do I prepare documentation for a solar inspection?
Gather approved plans, inspection record cards, manufacturer installation instructions, as-built single-line diagrams, equipment spec sheets, and torque verification logs. Have these on-site and organized. The inspector will ask for them.
What is the difference between a rough-in and final inspection?
A rough-in inspection occurs after conduit and wiring are installed but before walls are closed. The inspector checks routing, sizing, and grounding. A final inspection happens after all work is complete and verifies the full system including labels, functionality, and code compliance.
Can I use non-listed cable ties for solar installations?
No. NEC 2026 explicitly requires cable ties to be listed and identified for their purpose. Off-the-shelf zip ties without proper listing will fail inspection. The inspector may require you to cut them all off and reinstall listed ties.
What training should my crew have before an inspection?
At minimum, one person on-site should hold NABCEP PV Installation Professional certification or equivalent. The entire crew should understand NEC Article 690, rapid shutdown requirements, and your AHJ’s specific amendments. Document all training.
Conclusion: Three Actions for Your Next Inspection
-
Print the checklist from this guide and use it before every inspection. The 20 minutes spent verifying labels, grounding, conduit, and documentation will save you $900 in rework and weeks of delay.
-
Test grounding continuity with a multimeter before the inspector arrives. Do not assume mechanical connections are sufficient. Measure every bonding point. Readings under 1 ohm pass. Readings over 1 ohm need fixing.
-
Confirm your AHJ’s adopted NEC version before starting design. A system designed for NEC 2020 may fail under NEC 2023 amendments. A system designed for NEC 2023 will miss NEC 2026 requirements. Know the code your inspector enforces.
Inspections are not obstacles. They are quality gates. The installers who treat them as opportunities to verify their work build better systems, happier customers, and stronger businesses. The ones who treat them as annoyances join the 24% who fail.
Related SurgePV Resources
Continue learning with these related guides for solar installers and EPCs:
- OSHA Compliance Checklist for Solar Installers
- How to Expedite Solar Permits
- Change Order Management for Commercial Solar
- Handling Customer Complaints After Solar Installation
- Solar Installer Insurance Requirements
For more solar business and marketing content, explore the full SurgePV blog or browse the SurgePV glossary for definitions of solar industry terms.
Solar Software Tools to Support This Work
Effective solar installer operations depend on integrated software. SurgePV’s solar design software helps installers handle the upstream work that feeds every decision in this guide:
- Solar design software for system layouts, panel placement, and BOM generation
- Shadow analysis for site-specific irradiance and obstruction modeling
- Generation and financial tool for production forecasts and project ROI
- Solar proposal software for branded, customer-facing proposals
- Clara AI for automated design assistance and Q&A
Browse the full SurgePV platform to see how installers across 50+ countries use the tools to design smarter, sell faster, and streamline every solar project.