A crew in Minneapolis arrived at 7:00 AM in mid-January. The air temperature read -18°C. The roof was clear of snow but the asphalt shingles were stiff as cardboard. The lead installer, Marcus, checked his torque wrench. It read 15% low. The batteries in his drill were at half charge after 20 minutes outside. By 10:30 AM, the crew had completed three panel mounts. In July, the same crew would have finished twelve.
This is the reality of winter solar installation. The work does not stop. But everything changes.
This guide covers the electrical, structural, safety, and operational adjustments that separate a professional cold-weather install from a warranty claim waiting to happen. You will learn how NEC 690.7 voltage calculations shift in sub-zero conditions, why OSHA treats an icy roof as a different hazard category, which sealants simply will not cure below freezing, and how to set customer expectations when a five-day summer job stretches to eight in February.
In this guide you will learn:
- How to calculate cold-weather voltage rise per NEC 690.7 and size strings correctly
- Why conductor ampacity needs temperature correction on cold rooftops
- OSHA fall protection rules for snow-covered and icy roofs
- Material limits: sealants, MC4 plastics, lag bolts, and torque tools in freezing conditions
- How to schedule crews around daylight, temperature, and weather thresholds
- When to delay work and when to proceed with modified procedures
- Productivity realities and how to communicate winter timelines to customers
Quick Answer
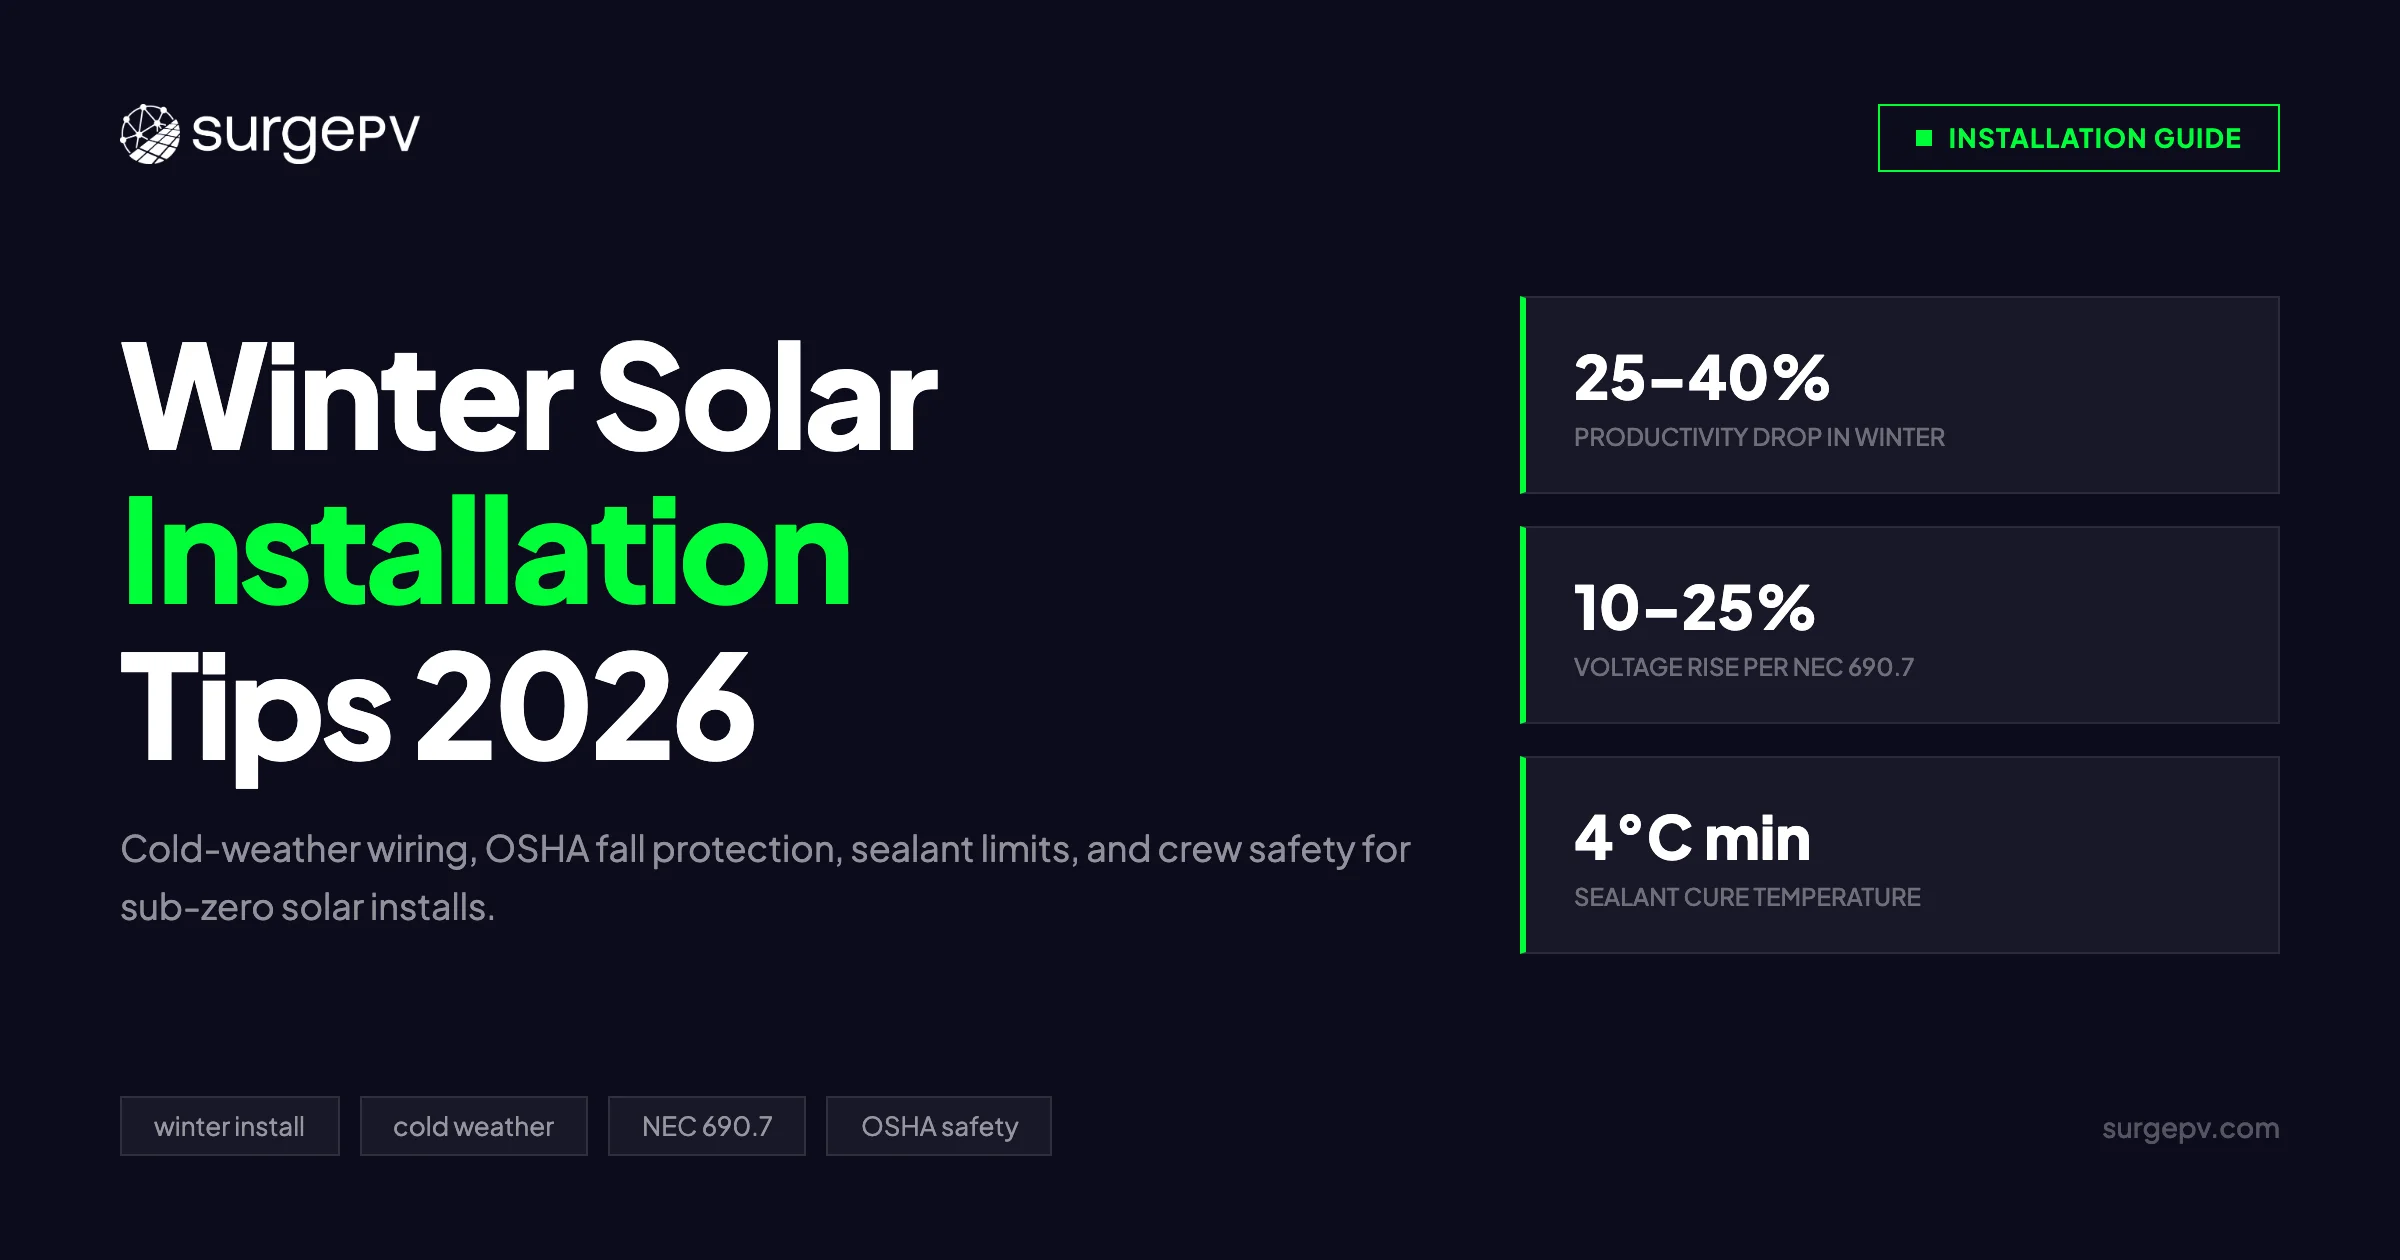
Winter solar installation demands three adjustments: electrical (NEC 690.7 voltage rise calculations using ASHRAE extreme minimum temperatures), safety (OSHA 1926.501 fall protection plus ice-specific PPE), and material (sealants need 4°C minimum to cure, MC4 plastics turn brittle below -20°C, and lag bolts risk splitting frozen wood). Most winter projects take 25% to 40% longer than summer equivalents due to shorter daylight, reduced dexterity, and weather delays.
Key Takeaways
- Panel voltage rises 10% to 25% in extreme cold. NEC 690.7 requires string sizing using the lowest expected ambient temperature, not STC ratings.
- OSHA 1926.501 mandates fall protection at 6 feet. Snow and ice multiply the hazard. Work stops when roofs are unsafe to walk.
- Butyl and standard silicone sealants need 4°C (40°F) minimum to cure. Low-temperature silicone rated to -20°C is the only field-applicable option below freezing.
- Winter construction productivity drops 25% to 40% due to shorter days, bulky clothing, material handling delays, and weather stoppages.
- MC4 connector plastics become brittle below -20°C. Handle gently. Pre-warm to 10°C when possible.
- Lag bolts into frozen wood risk splitting. Pre-drill with oversized pilot holes. Re-torque after thaw cycles.
Cold-Weather Voltage Rise and NEC 690.7
Solar panels produce their highest voltage when it is coldest. This is not a minor effect. A crystalline silicon module with a temperature coefficient of -0.33% per degree Celsius will see its open-circuit voltage (Voc) — the voltage measured across the panel terminals with no load connected — rise by roughly 16% when the cell temperature drops from 25°C STC to -23°C.
NEC 690.7 addresses this directly. The code requires that the maximum photovoltaic system voltage be calculated using the lowest expected ambient temperature at the installation site. It offers three methods, in order of accuracy:
- The module manufacturer’s stated Voc temperature coefficient from the datasheet
- NEC Table 690.7(A) correction factors
- The ASHRAE extreme annual mean minimum design dry bulb temperature
The ASHRAE method is the professional standard. It uses statistically derived expected low temperatures, not absolute record lows. As the NABCEP PV Installation Professional Resource Guide notes, record lows are overly conservative. The ASHRAE value falls midway between the record low and the average low for a location.
Here is what that means in practice:
| Location | ASHRAE Extreme Min (°C) | Typical Module Voc at 25°C | Corrected Voc at ASHRAE Min | Voltage Rise |
|---|---|---|---|---|
| Minneapolis, MN | -29°C | 45.5V | 54.9V | +20.7% |
| Denver, CO | -22°C | 45.5V | 53.6V | +17.8% |
| Toronto, ON | -22°C | 45.5V | 53.6V | +17.8% |
| Stockholm, SE | -22°C | 45.5V | 53.6V | +17.8% |
| Fairbanks, AK | -47°C | 45.5V | 58.3V | +28.1% |
For a string of 20 modules, the difference between STC and Fairbanks conditions is 256 volts. An inverter rated for 1,000V maximum DC input would be exceeded. The inverter would log an overvoltage fault. The warranty would be void.
The calculation is simple. Multiply the module Voc at STC by the correction factor:
Voc_cold = Voc_STC × [1 + βVoc × (T_low - 25)]Where βVoc is the temperature coefficient (as a decimal, e.g., -0.0033 for -0.33%/°C) and T_low is the ASHRAE extreme minimum temperature in degrees Celsius.
Pro Tip
Always keep corrected string voltage at least 5% to 10% below the inverter’s absolute maximum DC rating. This accounts for module mismatch, measurement tolerance, and the remote possibility of a morning colder than the ASHRAE design value. Use our string sizing guide for extreme climates to verify your calculations.
For a direct comparison, see Arka 360 vs SurgePV.
The highest voltages occur on cold, clear mornings at dawn. The cells have cooled overnight. The first sunlight hits the panels at low angle, producing Voc before the cells warm. This is the condition that drives the maximum system voltage. It is also the condition most likely to surprise an installer who sized strings using summer data.
For more on string sizing fundamentals, see our solar panel stringing guide.
Conductor Sizing for Cold Ambient Temperatures
Voltage is not the only electrical concern in winter. Conductor ampacity — the maximum current a wire can carry without exceeding its temperature rating — also needs attention.
NEC 690.8 requires two enhancement factors for solar circuits. First, 125% of the module short-circuit current (Isc). Second, another 125% for continuous loads, which photovoltaic circuits always are. The combined multiplier is 1.56. A module with 10A Isc needs conductors sized for 15.6A minimum before any temperature correction.
Then comes the temperature correction. NEC 310.16 provides ampacity tables at 30°C ambient. For rooftop installations, the code adds temperature adders. A raceway installed within 7/8 inch of the roof surface gets a 33°C adder. In summer, this means an effective ambient of 63°C. The correction factor for a 90°C-rated conductor at 63°C is roughly 0.73. The 15.6A requirement becomes 21.4A after dividing by 0.73. You need 12 AWG instead of 14 AWG.
In winter, the ambient temperature drops. The correction factor improves. A conductor that is adequate in summer is more than adequate in winter from a thermal standpoint. But the physical handling changes. Wire insulation becomes stiff and brittle below -20°C. Bending radius requirements are harder to meet. Pulling wire through conduit takes more force.
The practical rule: size conductors for the worst-case summer ampacity. Then handle them gently in winter.
| Condition | Effective Ambient | 90°C Conductor Correction Factor | Result for 10A Isc Module |
|---|---|---|---|
| Summer, rooftop raceway | 63°C | 0.73 | Need 21.4A ampacity → 12 AWG |
| Winter, rooftop raceway at -10°C | 23°C | 1.0 | Need 15.6A ampacity → 14 AWG |
| Extreme cold at -30°C | -30°C | 1.15 | Need 13.6A ampacity → 14 AWG |
The summer condition always governs. Winter does not reduce conductor size requirements. It only changes how the wire feels in your hands.
What Most Guides Miss
Most articles on cold-weather solar focus on voltage rise and ignore the physical handling of conductors. PV wire with XLPE insulation rated to -40°C is standard, but the bending radius at that temperature is roughly 2× the summer value. A 10 AWG conductor that bends easily in July resists sharply in January. Pre-form loops indoors when possible. Allow extra cable length at each junction box to reduce strain.
OSHA Fall Protection on Snow-Covered and Icy Roofs
OSHA 1926.501 is the most frequently cited standard in construction. For solar installers working on roofs, it is also the most important.
The rule is simple: fall protection is required at 6 feet or more above a lower level. For steep roofs over 4:12 pitch, personal fall arrest systems (PFAS) are mandatory. For low-slope roofs, guardrails, safety nets, or warning line systems with safety monitoring are acceptable alternatives.
Winter adds layers of hazard that the standard text does not fully capture. Snow hides skylights, vents, and roof edges. Ice reduces traction to near zero. Wind at roof level is stronger than at ground level. Cold metal surfaces conduct heat away from hands and feet faster than air alone.
OSHA Publication 3966, specifically addressing rooftop snow removal, states what every installer should internalize: employers must plan ahead for safe snow removal, limit workers on roofs when possible, and provide fall protection equipment in good working condition.
The practical hierarchy for winter roof work:
- Do not access the roof if snow or ice is present. Clear the roof first. Use snow rakes, draglines, or aerial lifts from below.
- Inspect the roof surface after clearing. Snow hides damage. Ice dams may have compromised shingles. Structural load from snow accumulation must be verified.
- Use PFAS on all pitched roofs in winter. Warning line systems are inadequate on icy surfaces. A worker can slide under a warning line.
- Anchor lifelines to structural members verified by a competent person. Roof anchors installed for summer work may not withstand the dynamic loads of a slip-and-fall on ice.
- Have a rescue plan. OSHA 1926.502(d)(20) requires it. A worker suspended in a harness in cold weather can develop suspension trauma in 15 minutes.
Pro Tip
Ice cleats strap onto boots and provide metal teeth that bite into ice. They are not a substitute for fall protection. They are a supplement. Use them. Also place traction mats at ladder bases and along the roof access path. A slip at the transition from ladder to roof is the most common winter fall point.
The OSHA standard does not specify a temperature cutoff. It specifies hazard assessment. A competent person must evaluate the roof condition each day. If the surface is unsafe, work stops. No exceptions. The cost of a one-day delay is trivial compared to a fall injury.
Lag Bolt Installation in Frozen Wood
The lag bolt is the workhorse of residential solar mounting. A 5/16-inch by 3-1/2-inch stainless steel lag bolt into a rafter provides the pullout strength that keeps panels on the roof through wind, snow, and time. See Solar Racking Design Guide for detailed guidance.
Frozen wood changes the equation.
When wood freezes, moisture inside the cell walls forms ice crystals. These crystals expand and separate fibers. A lag bolt driven into frozen wood encounters less uniform density. The threads cut through ice-weakened fibers. The result is reduced initial pullout strength and a higher risk of splitting along the grain.
The National Roofing Contractors Association (NRCA) flashing guidelines, referenced in the NABCEP PV Certification Study Guide, do not explicitly address frozen wood. But the principles are clear: roof attachments must be installed per manufacturer instructions, and the installer is responsible for verifying pullout strength and shear capacity.
Best practices for cold-weather lag bolt installation:
- Pre-drill with an oversized pilot hole. Standard pilot hole diameter for a 5/16-inch lag in softwood is 7/32 inch. In frozen wood, use a 1/4-inch bit. This reduces the wedging force that causes splitting.
- Clear chips completely. Frozen chips are harder to eject. A clogged hole increases insertion torque and splitting risk. Withdraw the bit frequently.
- Use stainless steel only. Galvanized coatings can micro-crack in the high torque of frozen-wood insertion. Stainless 18-8 or 316 is standard for solar.
- Lubricate threads with a cold-weather anti-seize compound. This reduces friction and insertion torque.
- Re-torque after thaw cycles. The first warm spell may reveal loosening as ice melts and wood compresses. Schedule a re-torque inspection for spring.
| Wood Condition | Pilot Hole Size (for 5/16” lag) | Insertion Torque | Pullout Strength |
|---|---|---|---|
| Dry, room temperature | 7/32” | Normal | 100% rated |
| Frozen softwood | 1/4” | +30% to 50% | 70% to 85% rated |
| Frozen hardwood | 1/4” to 17/64” | +50% to 80% | 60% to 75% rated |
If the roof structure is engineered trusses rather than solid lumber, the risk is different. Metal connector plates at truss joints can be brittle in extreme cold. Avoid drilling near these plates. Consult a structural engineer if the mounting location is within 6 inches of a truss joint.
For a deeper look at roof structural considerations, read our guide on rooftop solar structural assessment.
Sealant and Adhesive Temperature Limits
A watertight roof penetration is non-negotiable. In winter, achieving it is harder than most installers expect.
Standard butyl tape and neutral-cure silicone sealants need a minimum application temperature of 4°C (40°F) to cure properly. Below that threshold, the chemical cross-linking reaction slows or stops entirely. The sealant remains tacky indefinitely. It does not form a cohesive bond to the substrate. Water can migrate underneath.
This is not a recommendation. It is a material limit. The data is on every manufacturer’s datasheet.
| Sealant Type | Min Application Temp | Cure Time at 25°C | Cure Time at 5°C | Behavior Below Min Temp |
|---|---|---|---|---|
| Standard butyl tape | 4°C (40°F) | Immediate tack | Tacky but weak | No adhesion, no seal |
| Neutral-cure silicone (standard) | 4°C (40°F) | 24 hours skin | 72+ hours skin | No cure, remains liquid |
| Low-temp silicone (alkoxy/oxime) | -20°C (-4°F) | 24 hours skin | 48 hours skin | Slow cure, reduced bond |
| Two-part epoxy | 0°C (32°F) | 8 hours | 24 hours | No cure below 0°C |
| Polyurethane sealant | 5°C (41°F) | 24 hours | 72+ hours | No cure, bubbles form |
The options for sub-zero installation are limited. Low-temperature silicone formulations, typically alkoxy or oxime cure systems, can be applied to -20°C. They cure more slowly and achieve lower ultimate bond strength than standard grades, but they do cure. Two-part epoxies are an option at 0°C, though they are rarely used for solar flashing due to rigidity.
Real-World Example
A crew in Buffalo, New York installed flashing on a December afternoon when the temperature was 2°C. They used standard silicone. The next morning, a cold front dropped temperatures to -12°C. The sealant had not skinned over. Ice formed on the uncured surface. In spring, three of twelve penetrations showed water staining in the attic. The crew returned in April, removed the failed sealant, and re-applied. The callback cost exceeded the original labor charge for those three mounts.
The practical rule: if the temperature is below 4°C and falling, do not apply sealant. If the temperature is below 4°C and rising, use low-temperature silicone and verify the cure window. If the temperature will not exceed 4°C for the next 48 hours, postpone the penetration sealing until conditions improve.
Some installers carry portable tent heaters or heat guns to warm the immediate work area. This works for small areas but is impractical for full arrays. The substrate temperature matters more than the air temperature. A roof deck at 0°C will not warm sufficiently with a heat gun to enable standard silicone curing.
MC4 Connector Handling in Cold Weather
MC4 connectors are the standard for DC solar connections. They are rated for -40°C to +85°C operation. But the rating addresses electrical performance, not mechanical durability.
The plastic housing is typically polyamide (PA, nylon). At -20°C, PA loses significant impact strength. At -40°C, it approaches its glass transition zone. The locking tabs that secure the connector pair become brittle. A firm click that works in September can snap the tab in January.
The EPDM rubber seals inside MC4 connectors also stiffen in cold. These seals provide the IP67 waterproof rating. A hardened seal does not compress fully. The connection may pass a visual inspection but fail a water ingress test.
Best practices for cold-weather MC4 handling:
- Pre-warm connectors to 10°C when possible. Store them indoors until needed. Warm plastic has normal ductility.
- Mate connectors slowly and squarely. Do not force the locking mechanism. If resistance is high, stop and check alignment.
- Do not disconnect MC4s below -20°C unless necessary. The unmating force is higher when plastics are cold. The risk of tab breakage increases.
- Inspect seals before every connection. Replace any seal that feels hard or cracked.
- Support cables to prevent strain on the connector body. Cold-stiffened cable pulls harder on the connector housing.
Pro Tip
Carry spare MC4 connector bodies and seals in an inside jacket pocket. Body heat keeps them warm and flexible. A warm connector mates smoothly even when the cable is cold-stiffened. The 30 seconds of pre-warming prevents a 30-minute field repair.
Some manufacturers now offer cold-climate MC4 variants with modified PA grades or PBT housings that retain flexibility to -40°C. These cost 15% to 20% more but are worth the investment for installations in climates where winter work is routine.
Winter PPE: Beyond the Standard Kit
Standard solar PPE includes a hard hat, safety glasses, gloves, harness, and lanyard. Winter demands additions.
Insulated boots with aggressive tread. Standard work boots have soles designed for dry surfaces. Winter soles need deep lugs and a rubber compound that stays flexible below -20°C. Some installers add strap-on ice cleats for roof transitions. The boots must also accommodate the harness leg straps without creating pressure points.
Layered clothing that works with a harness. A harness worn over a bulky winter jacket rides up and shifts. The chest strap may not sit at sternum level. The leg straps may not tighten properly. The solution is a harness-compatible jacket with slimmer cut, or layering thin insulating pieces under a standard harness. Never modify harness geometry to fit over clothing.
Chemical hand warmers inside gloves. Cold hands lose dexterity. A solar installer needs fine motor control for wire stripping, connector mating, and small tool handling. Chemical warmers in glove pockets maintain finger temperature without the bulk of insulated mittens. Rotate warmers every 4 hours.
Face protection for wind chill. At -15°C with 20 km/h wind, the effective temperature is -24°C. Exposed skin can freeze in 30 minutes. A balaclava or face mask protects without fogging safety glasses. Anti-fog lens coating is essential.
High-visibility outer layer. Winter days are dim. Overcast skies, early sunsets, and snow glare reduce visibility. A hi-vis jacket over the harness ensures the worker is seen by ground crew and equipment operators.
| PPE Item | Summer Standard | Winter Addition | Purpose |
|---|---|---|---|
| Footwear | Work boots | Insulated boots + ice cleats | Traction, warmth, frostbite prevention |
| Hand protection | Standard gloves | Gloves + chemical warmers | Dexterity maintenance |
| Head/face | Hard hat + glasses | Hard hat + balaclava + anti-fog | Wind chill protection |
| Body | Standard shirt/harness | Layered system, harness-compatible | Core temperature, harness fit |
| Visibility | Standard | Hi-vis outer layer | Dim light visibility |
OSHA 1926.95 requires employers to provide protective equipment suitable for the hazards. In winter, the hazard profile changes. The PPE must change with it.
Equipment Cold-Soak: Tools, Torque Wrenches, and Batteries
Tools left in a truck overnight in sub-zero temperatures do not work the same way in the morning.
Torque wrenches use springs or strain gauges to measure force. Springs stiffen in cold. The calibration shifts. A torque wrench that reads 15 Nm in a warm shop may read 12 Nm or 18 Nm at -15°C, depending on the mechanism. The error is not predictable. The solution: store torque wrenches indoors. Warm them before use. Re-calibrate at the start of each winter season.
Cordless drill batteries are lithium-ion. Their capacity drops sharply below 0°C. At -15°C, a fully charged battery may deliver 50% of its rated cycles. The internal resistance increases, reducing peak current. A drill that drives a lag bolt in 3 seconds in summer may need 8 seconds in winter, further draining the battery. Carry batteries in an inside pocket. Swap every hour.
Hydraulic crimpers use hydraulic fluid that thickens in cold. Below -10°C, some fluids approach their pour point. The tool requires more force to operate. Pre-warm hydraulic tools indoors or use low-temperature hydraulic fluid rated to -40°C.
Digital multimeters use LCD screens that respond slowly in cold. Below -10°C, display refresh rates drop. Some meters shut off automatically when internal temperature falls below their operating range. Keep meters in a warm pocket between readings.
| Tool | Cold Effect | Mitigation |
|---|---|---|
| Torque wrench | Calibration drift ±15% to 20% | Store warm, re-calibrate seasonally |
| Li-ion batteries | 50% capacity loss at -15°C | Carry warm, swap hourly |
| Hydraulic crimpers | Fluid thickening, slow operation | Use low-temp fluid, pre-warm |
| Digital multimeters | Slow LCD, auto-shutoff | Keep in warm pocket |
| Sealant guns | Stiff sealant, high extrusion force | Warm cartridges before use |
Crew Productivity: The 25% to 40% Winter Reality
Winter construction is slower. The data is consistent across studies.
Research on cold-weather construction productivity, cited in industry analysis and academic studies, shows a clear pattern. Below 10°C, productivity drops approximately 1% per degree. At 0°C, the decline is roughly 10%. Below -7°C, losses reach 25% to 50%, depending on wind, precipitation, and task type.
For solar installation specifically, the factors compound:
Daylight hours. At 40°N latitude, December delivers 9 hours of daylight versus 15 hours in June. The usable window is shorter still. Morning dew or frost delays start times. Afternoon shadows from low sun angles cut the effective work period. A crew that works 10 hours in July works 7 hours in December. Also see: Us Residential Solar Market Trends 2026. For United States-specific compliance details, see United States arizona/phoenix. For United States-specific compliance details, see United States california/los-angeles.
Clothing bulk. Winter gear adds weight and restricts movement. A harness over a winter jacket changes how the installer reaches, bends, and kneels. Gloves reduce fine motor control. Every task takes longer.
Material handling. Panels are cold to the touch. Metal rails and clamps are colder. Cables are stiff. Sealants need warming. The physical interaction with materials is slower and more deliberate.
Weather delays. Rain, snow, and high wind stop roof work. In many climates, winter brings more unpredictable weather. A five-day forecast that shows clear skies can change in 24 hours. Buffers must be built into schedules.
Warm-up breaks. OSHA recommends warm-up breaks in cold conditions. A 10-minute break every hour in a heated vehicle or trailer adds up. For a 7-hour day, that is 70 minutes of non-productive time.
| Factor | Summer Impact | Winter Impact | Time Loss |
|---|---|---|---|
| Daylight hours | 15 hours available | 9 hours available | -40% available time |
| Clothing bulk | Light, unrestricted | Heavy, restricted | -10% to 15% task speed |
| Material handling | Normal | Cold, stiff materials | -10% task speed |
| Weather delays | Rare | Frequent | -1 to 2 days per week |
| Warm-up breaks | Minimal | 10 min/hour | -14% of shift time |
The combined effect is a 25% to 40% increase in calendar days for the same scope of work. A five-day residential install in June becomes seven to eight days in January. This is not poor planning. It is physics.
SurgePV Analysis
Based on project data from northern climate installations, the productivity curve is non-linear. Above 5°C, the loss is gradual. Below 0°C, it accelerates. The breakpoint is not the temperature itself but the combination of temperature, wind, and surface condition. A dry roof at -5°C with no wind is workable. A wet roof at -2°C with 30 km/h wind is not. Installers who track daily productivity against weather conditions can build accurate forecasting models for their region.
Daylight Scheduling and Weather Thresholds
Effective winter scheduling requires understanding three thresholds: temperature, wind, and precipitation.
Temperature threshold. Most installers set a hard stop at -18°C (0°F). Below this, material handling becomes impractical. Sealants cannot be applied. Battery life is severely reduced. Human cold stress risk rises. Some crews stop at -10°C for residential work, where the ratio of roof time to total time is high.
Wind threshold. Wind chill amplifies cold effects. At -10°C with 30 km/h wind, the effective temperature is -18°C. Wind also creates safety hazards on roofs. Panels act as sails when unsecured. Tools and small parts blow away. A common wind cutoff is 40 km/h sustained for roof work.
Precipitation threshold. Snow, freezing rain, and sleet make roofs impassable. Even light snow obscures surface hazards. The rule is simple: no roof access during precipitation. Wait for clearing and inspection.
| Condition | Threshold | Action |
|---|---|---|
| Air temperature | Below -18°C | Stop all outdoor work |
| Air temperature | -10°C to -18°C | Modified procedures, shorter shifts |
| Wind speed | Above 40 km/h sustained | No roof work |
| Wind chill | Below -20°C | Stop work regardless of air temp |
| Precipitation | Any snow, ice, freezing rain | No roof access until cleared |
| Roof surface | Ice or snow cover | Clear and inspect before access |
| Visibility | Below 100m | Stop work |
The daily schedule should be front-loaded. Start at first light. Work through the warmest part of the day. Stop before the temperature drops in late afternoon. In December at 45°N, this means starting at 8:00 AM and finishing by 3:00 PM. The last hour of daylight is for cleanup and tool inventory, not roof work.
Design Solar Projects for Any Season
SurgePV’s solar design software lets you model shading, string sizing, and structural loads for winter conditions before your crew steps on the roof. Get accurate voltage calculations, snow load assessments, and 3D roof layouts in minutes.
Book a DemoNo commitment required · 20 minutes · Live project walkthrough
Customer Expectations and Timeline Transparency
The most common source of winter installation disputes is not the work itself. It is the gap between customer expectation and winter reality.
Homeowners who received a quote in October expect installation in November. They do not understand that the crew scheduled for their job is the same crew that lost three days to a snowstorm on the previous job. They do not know that a five-day install becomes eight in January. They have not been told that sealant curing may require a return visit.
Transparency before the contract is signed prevents disputes after.
Set the timeline with a weather buffer. Quote a range, not a fixed date. “Installation typically takes 5 to 7 days. In winter, we add a 3-day weather buffer. Your project is scheduled for January 15 to 25.” This frames the buffer as professional planning, not uncertainty.
Explain material limitations upfront. “Sealants need temperatures above 4°C to cure. If we encounter a cold snap during your installation, we may need to return in spring to verify and touch up sealant at roof penetrations. This is included in your warranty.” This turns a potential callback into a planned service visit.
Communicate proactively when delays occur. A text message on the morning of a weather delay takes 30 seconds. It prevents a homeowner from taking a day off work for an installation that is not happening. The communication cost is negligible. The trust benefit is substantial.
Document winter-specific conditions in the contract. Include language about weather delays, temperature-dependent material curing, and the possibility of spring follow-up inspections. This is not defensive contracting. It is honest contracting.
When to Delay vs. Proceed: A Decision Framework
Not every cold day is a work day. The decision to proceed or delay should be systematic, not gut-based.
Use this framework at the start of each winter workday:
Step 1: Check the weather. Temperature, wind, precipitation, and forecast for the next 48 hours. If any parameter exceeds the threshold, stop.
Step 2: Inspect the roof. From the ground first, then from a ladder. Look for ice dams, snow load, and visible damage. If the roof is unsafe, stop.
Step 3: Verify material readiness. Are sealants rated for today’s temperature? Are batteries charged and warm? Is the torque wrench calibrated? If any material is inadequate, stop or substitute.
Step 4: Confirm crew condition. Has everyone had adequate rest? Is anyone showing signs of cold stress? A fatigued crew on an icy roof is an accident waiting to happen.
Step 5: Assess the task. Can today’s work be done from the ground or a lift? Can sealant work be deferred? Can the crew focus on indoor tasks like inverter mounting or electrical rough-in? Sometimes partial progress is better than full exposure.
| Decision | Conditions | Rationale |
|---|---|---|
| Proceed normally | Dry roof, temp above 5°C, wind under 30 km/h | Standard winter work conditions |
| Proceed with modifications | Dry roof, temp 0°C to 5°C, wind under 40 km/h | Use low-temp materials, shorter shifts, more breaks |
| Partial work only | Ground tasks possible, roof unsafe | Mount inverters, run conduit, prep materials |
| Delay to next day | Precipitation, ice, wind over 40 km/h | Safety first, no exceptions |
| Delay to next week | Extended cold snap below -15°C | Material limits, crew welfare, quality risk |
The most expensive decision is usually the one that prioritizes speed over safety. A one-week delay costs labor and overhead. A fall injury costs a worker’s health, OSHA fines, insurance increases, and reputational damage. The math is not close.
Roofing System Damage Risk in Freezing Temperatures
Solar installation involves walking on, drilling into, and sealing a roof that was not designed for foot traffic. In summer, asphalt shingles flex and self-seal. In winter, they become brittle.
Asphalt shingles at -10°C have roughly half the flexural strength they have at 20°C. A footstep that dents slightly in July cracks in January. The granule surface loosens more easily. The self-sealing strip along the shingle edge does not re-adhere after disturbance. Every footfall on a cold asphalt roof causes more damage than the same footfall in warm weather.
Metal roofs are less vulnerable to foot traffic damage but more hazardous to walk on. Metal becomes slippery at temperatures near freezing. Condensation forms on the surface even when the air is dry. Snow slides off metal roofs in sheets, creating a falling hazard below.
Tile roofs (clay or concrete) are always risky. In cold weather, the risk increases. Tiles are brittle at any temperature. A dropped tool that bounces in summer shatters in winter.
EPDM and TPO membrane roofs used on commercial buildings become stiff below -10°C. Walking on a cold membrane can cause creasing or cracking at seams. The membrane manufacturer should be consulted before winter work.
Mitigation strategies:
- Use roof ladders or crawl boards. Distribute weight across multiple shingles. Never step directly on shingles on a cold roof if avoidable.
- Minimize foot traffic. Stage materials at the access point. Use hoists or pulleys to move equipment rather than carrying it across the roof.
- Inspect after completion. Walk the roof from the ground with binoculars. Look for cracked shingles, displaced granules, or damaged flashing. Document the condition.
- Coordinate with the roofing contractor. If the roof is under warranty, the roofing manufacturer may require notification before solar installation. Some warranties are voided by unapproved foot traffic.
For more on designing around roof conditions, see our guide on designing solar around roof obstructions.
Inverter Cold Start Considerations
Inverters are the brains of the system. They also have temperature limits.
Most string inverters are rated for -10°C to +40°C ambient operation. Some outdoor-rated models extend to -25°C. Below the minimum operating temperature, the inverter will not start. It may display an error code or simply remain in standby.
The issue is not just the inverter. It is the inverter’s internal components. Power semiconductors (IGBTs or MOSFETs) have temperature-dependent switching characteristics. Capacitors have reduced capacitance at low temperatures. Control boards may not boot reliably below their rated range.
SMA Solar Technology specifies -25°C as the minimum ambient for standard inverters without heaters. With the optional O3 Night heating system, operation extends to -40°C. The heater keeps internal components above -25°C during standby. Below -37°C ambient, the inverter goes to standby and waits.
Solis inverters activate LowTemp.AMB protection below -25°C. The inverter enters standby until the ambient temperature rises above the threshold.
Fronius inverters are rated to -20°C for most models. The Symo series includes cold-weather variants rated to -40°C with an external heater kit.
| Manufacturer | Standard Min Temp | Extended Min Temp | Cold Weather Option |
|---|---|---|---|
| SMA | -25°C | -40°C | O3 Night heater |
| Solis | -25°C | -25°C | Built-in protection |
| Fronius | -20°C | -40°C | External heater kit |
| SolarEdge | -20°C | -40°C | HD-Wave cold climate |
| Huawei | -25°C | -40°C | SmartLogger heater |
For cold-climate installations, verify the inverter’s minimum operating temperature against the ASHRAE extreme minimum for the site. If the site sees -30°C, a -25°C inverter is inadequate without a heater. The heater adds cost and complexity but prevents startup failures on the coldest mornings.
Battery inverters and charge controllers have similar limits. Lithium-ion batteries themselves should not be charged below 0°C. Charging a frozen battery can cause lithium plating and permanent capacity loss. Battery systems in cold climates need heated enclosures or indoor installation.
Myth-Busting: What Most People Get Wrong About Winter Solar
Several misconceptions persist about winter solar installation and performance. Correcting them saves money and prevents errors.
Myth 1: Solar panels do not work in winter. Panels work better in cold weather. The temperature coefficient of power means output increases as temperature drops. A panel at 0°C produces roughly 10% more power than the same panel at 25°C, assuming equal irradiance. The problem is not panel performance. It is shorter days, lower sun angles, and snow cover. The panels themselves are more efficient in cold air.
Myth 2: Snow on panels is always bad. Snow blocks light and reduces output to near zero. But snow also cleans the panel surface as it melts and slides off. The albedo effect — reflection from snow on the ground — can increase rear-side gain on bifacial modules by 5% to 15%. And panels mounted at steeper angles shed snow naturally. The net annual impact of snow is negative, but it is not catastrophic. See Bifacial Solar Panel Design Guide for detailed guidance.
Myth 3: Winter installation voids warranties. No major panel manufacturer voids warranties based on installation season. Warranties cover defects in materials and workmanship, not the calendar date of installation. However, improper handling in cold weather — dropping a brittle panel, over-torquing a cold frame bolt — can cause damage that is not covered. The season does not void the warranty. The handling does.
Myth 4: You should wait until spring to install. Waiting has costs. The homeowner loses months of production. The installer loses revenue in the off-season. In many markets, spring queues are long. A winter installation that captures the March equinox production ramp is worth more than a spring installation that starts in May. The decision should be based on conditions and crew capability, not calendar prejudice.
Myth 5: All sealants work the same in cold weather. They do not. Standard silicone and butyl fail below 4°C. Low-temperature formulations exist but cost more and cure slower. Using the wrong sealant in winter is one of the most common causes of roof leaks in solar installations. The material specification matters as much as the installation technique.
A Tale from the Field: The Calgary Array
In February 2024, a crew led by installer Dave Chen began a 12 kWp residential installation in Calgary, Alberta. The ASHRAE extreme minimum for Calgary is -32°C. The design used 30 modules in two strings of 15, connected to a SolarEdge HD-Wave inverter with 1,000V maximum DC input.
The module Voc at STC was 41.3V. The temperature coefficient was -0.29%/°C. At -32°C, the corrected Voc was:
41.3V × [1 + (-0.0029) × (-57)] = 41.3V × 1.1653 = 48.1V per moduleFifteen modules in series: 722V. Well within the 1,000V limit. The design was sound.
The installation took 9 days instead of the typical 5. Three days were lost to a cold snap that hit -28°C. The crew could not apply sealant. They focused on rail mounting and module placement during the cold days. They returned for electrical and sealing when temperatures rose to -5°C.
One lesson emerged. The torque wrench, calibrated in September, read 12% high at -15°C. Dave noticed the discrepancy when a rail bolt felt tighter than usual. He checked the wrench against a calibration standard in his warm truck. The error was confirmed. He switched to a click-type wrench stored indoors and brought it out only for immediate use.
The system was commissioned in March. First-year production tracked 8% above PVWatts estimates. The cold weather boosted efficiency. The steep tilt angle, chosen partly for snow shedding, also improved winter performance. The homeowner was satisfied. The crew added a winter calibration check to their standard procedure.
The Calgary array illustrates a principle: winter installation is not about enduring hardship. It is about adapting procedures to conditions and capturing the benefits that cold weather provides.
Tools & Further Reading
Continue exploring related SurgePV resources:
Frequently Asked Questions
Can solar panels be installed in winter?
Yes. Solar panels can be installed in winter when temperatures stay above material limits. Butyl sealants need 4°C (40°F) minimum to cure. Lag bolts into frozen wood risk splitting. OSHA requires fall protection at 6 feet on any roof, and icy surfaces demand extra precautions or work delays.
What temperature is too cold to install solar panels?
Most manufacturers specify installation above -20°C (-4°F) for module handling. Sealants fail below 4°C (40°F). Inverters typically need -10°C (14°F) to start. The practical cutoff is 0°C (32°F) for roof work, since ice makes surfaces unsafe regardless of equipment ratings.
Does cold weather affect solar panel voltage?
Yes. Panel voltage rises as temperature drops. A module with 45.5V open-circuit voltage at 25°C can reach 52.7V at -23°C. NEC 690.7 requires designers to calculate maximum voltage using the lowest expected ambient temperature, typically the ASHRAE extreme annual mean minimum.
How much longer does a winter solar installation take?
Winter projects typically take 25% to 40% longer than summer equivalents. Daylight shrinks to 8 to 9 hours in December at 40°N latitude. Cold reduces manual dexterity. Material handling slows. OSHA prohibits work on icy roofs, causing weather delays that do not exist in warm months.
What PPE do solar installers need for winter roof work?
Beyond standard hard hats, harnesses, and safety glasses, winter roof work needs insulated boots with aggressive tread or ice cleats, layered clothing that allows harness fit, chemical hand warmers inside gloves, and traction mats at ladder bases. OSHA 1926.95 requires employers to provide protective equipment suitable for the hazards.
Can you drill into frozen wood for solar mounting?
You can, but you should not. Ice crystals in wood fibers cause splitting during drilling. Pre-drilling with an oversized pilot hole reduces the risk. The National Roofing Contractors Association recommends waiting for temperatures above freezing when possible. If unavoidable, use stainless steel lag bolts and re-torque after thaw cycles.
What happens to MC4 connectors in freezing temperatures?
MC4 connectors are rated to -40°C, but the polyamide plastic housing becomes brittle below -20°C. The locking tabs can snap during mating or unmating. EPDM rubber seals harden and lose compression. Handle connectors gently in cold weather. Pre-warm them to 10°C if possible.
Should solar installation crews work in snow?
No. OSHA 1926.501 requires fall protection at 6 feet, and snow-covered roofs hide skylights, vents, and edges. Snow also adds 20 to 50 pounds per square foot of load. The safest practice is to clear snow, inspect the roof surface, verify structural capacity, and then proceed only with full fall protection.
How do you size solar wires for cold temperatures?
NEC 690.8 requires conductor ampacity at 125% of short-circuit current times another 125% for continuous loads, giving a 1.56 multiplier before temperature correction. NEC 310.16 temperature correction factors apply at the effective ambient temperature, which includes rooftop adders of 33°C for raceways near the roof surface.
What sealant works for solar installations in cold weather?
Standard butyl tape and silicone sealants need 4°C (40°F) to cure properly. Below that, they do not adhere or form a watertight seal. For cold-weather work, use low-temperature silicone rated to -20°C application. Some two-part epoxies cure at 0°C. Always verify the manufacturer temperature specification before application. Solar proposal software generates professional quotes in minutes.