Quick Answer
Every recommendation here matches what we apply on actual residential projects across our 50+ country portfolio at Heaven Green Energy. Clay tile fractures under bending stress above roughly 300–400 N (terracotta roof tile EN 1304 tested values). A solar panel hook that bears on the tile surface concentrates wind-load force at a single point and cracks the tile within months. 2.
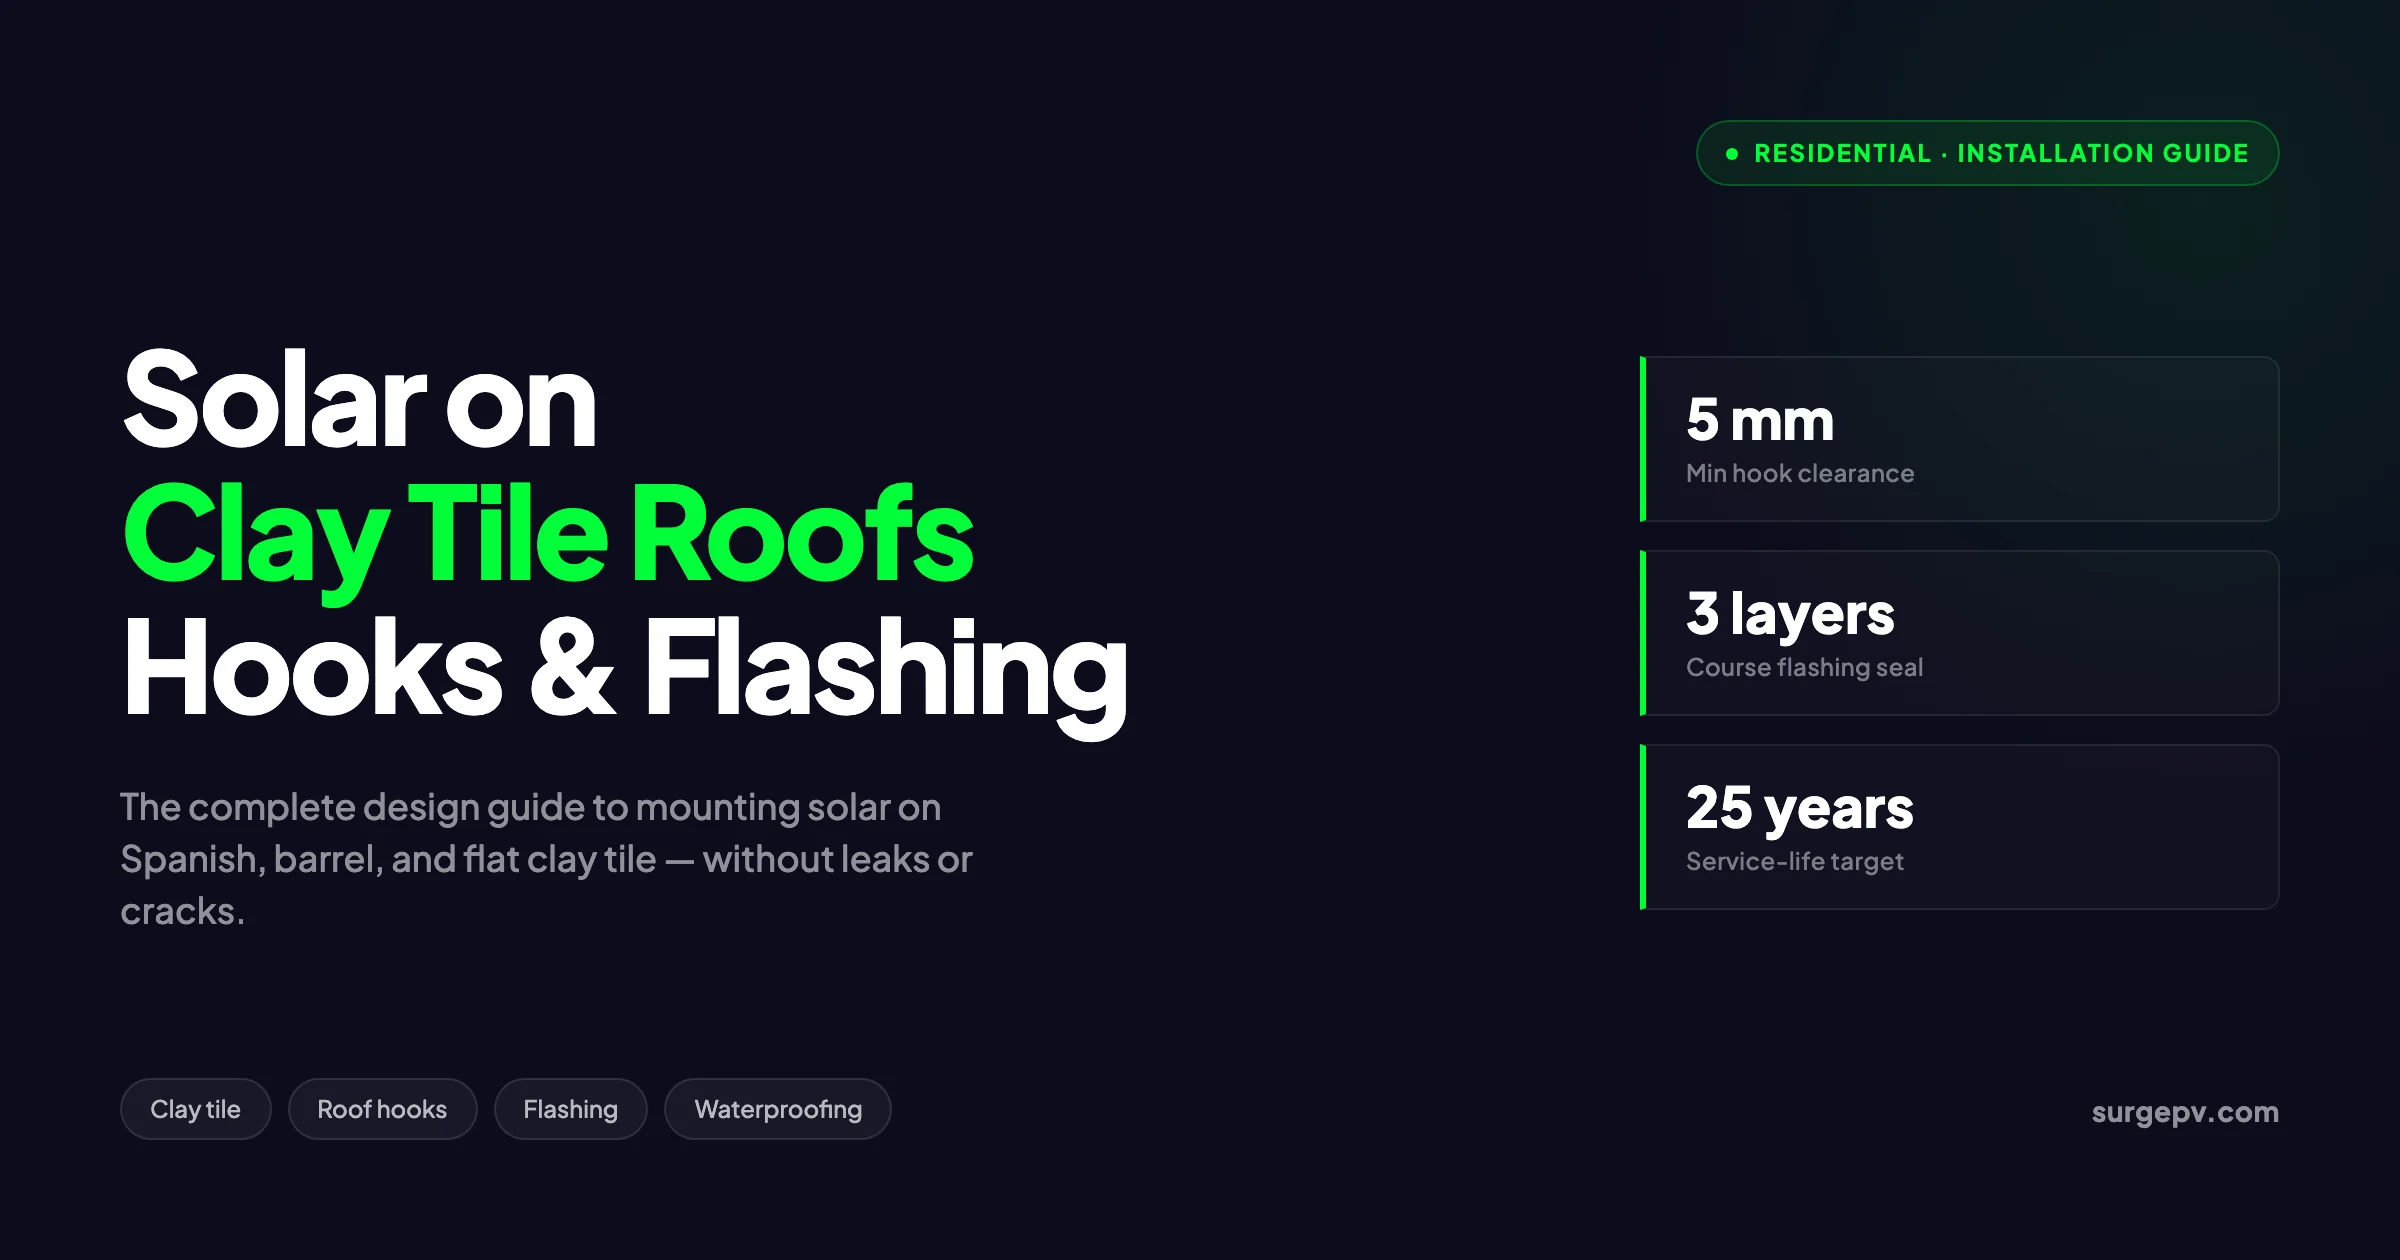
Clay tile roofs cover roughly 40 percent of homes in Southern Europe, 25 percent in California, and the majority of new builds across Australia, Spain, Italy, Portugal, and Mediterranean coastal markets. Every one of those roofs is a viable solar host, but only when the installer respects how clay actually behaves under load. Get the hook profile wrong, skip the three-course flashing, or pressure-mount a barrel tile, and the roof leaks within two winters. Also see: solar panel ROI in Italy. Also see: Spain net metering. Also see: European Solar Tax Credits.
Every recommendation here matches what we apply on actual residential projects across our 50+ country portfolio at Heaven Green Energy. Clay tile fractures under bending stress above roughly 300–400 N (terracotta roof tile EN 1304 tested values).
This guide walks through the full design and installation sequence for clay tile solar — hook selection, flashing systems, waterproofing standards, structural load checks, AHJ requirements, and the PE-stamped documentation needed to keep both the roof warranty and the installer’s liability intact. Every recommendation here matches what we apply on actual residential projects across our 50+ country portfolio at Heaven Green Energy.
TL;DR — Clay Tile Solar in 2026
Clay tile solar adds $0.30–$0.60 per watt to install cost versus shingle, takes 30–50 percent longer per crew-day, and requires three-course flashing at every penetration. The hook must clear the tile by 5 mm without contact, hardware must be A2 or A4 stainless, and the entire attachment plan must be PE-stamped in most US states. Done right, a clay tile solar install lasts the full 25-year panel warranty without a single leak.
What this guide covers:
- The five clay tile profiles and which hook system fits each
- Three-course flashing, double flashing, and tile-replacement methods
- Structural load math for clay tile roofs (dead load, wind uplift, snow)
- Waterproofing standards and the materials that actually last 25 years
- AHJ and code requirements across major US, EU, and AU jurisdictions
- A field-tested installation sequence with the most common mistakes flagged
Why Clay Tile Roofs Need a Different Solar Approach
Asphalt shingles forgive bad workmanship. Clay tile does not. A shingle roof can absorb a misplaced lag screw or a sloppy flashing because the asphalt mat self-seals around small errors. Clay tile transfers every point load directly to the rafter and cracks under any mounting pressure that was not engineered into the layout. See Solar Racking Design Guide for detailed guidance.
Three properties drive the design difference:
- Brittleness. Clay tile fractures under bending stress above roughly 300–400 N (terracotta roof tile EN 1304 tested values). A solar panel hook that bears on the tile surface concentrates wind-load force at a single point and cracks the tile within months.
- Curved profile. Spanish S-tile, mission tile, pantile, and barrel tile all have curved ridges. A flat hook will not seat correctly. Standoff inconsistency leaves gaps that drive wind-borne rain into the underlayment.
- Underlayment dependency. The tile is decorative weather protection. The actual waterproof layer is the felt or synthetic underlayment beneath. Every penetration must seal to the underlayment, not the tile, or the roof leaks regardless of what the tile looks like from outside. For the latest details on Spain, see Hotel Solar + EV Charging Case Study.
This is why every professional design starts with the tile profile and underlayment system, not the panel layout. Using solar design software that captures roof type, tile profile, and rafter spacing during the site assessment phase prevents the most common mistake — designing a layout that physically cannot be installed without breaking tiles.
Pro Tip — Identify the Tile Before You Quote
Before sending a quote, photograph the roof from multiple angles and note the tile manufacturer, profile, and approximate age. Clay tiles older than 30 years lose tensile strength and require a higher breakage allowance (10–15 percent versus the 3–5 percent on newer tile). Quoting without this data leads to margin loss on every clay tile job.
The Five Clay Tile Profiles and Their Hook Requirements
Clay tile is not one product. It is a category that contains five distinct profiles, and each one requires a different hook geometry. Universal hooks marketed as “fits all tile” rarely fit any of them well.
1. Flat Clay Tile (Plain Tile)
Flat clay tile is the simplest profile — a rectangular slab with minimal curvature, common across the UK, France, and parts of Germany. Sizes are typically 265 mm × 165 mm with an overlap of 65–75 mm. Standard flat-base hooks work here, and the only design constraint is matching hook neck height to tile thickness (usually 12–15 mm). Also see: Germany solar subsidies. Also see: France solar feed-in tariffs.
Recommended hook types: K2 Tile Hook Standard, Schletter Speed Connect Universal, SunModo SunTile Flat.
2. Spanish S-Tile (Mission Tile, Two-Piece Tile)
Spanish S-tile combines a curved pan and a separate cover tile. This is the dominant profile across Spain, Portugal, Italy, California, and Florida. Hook design must match the wave pattern, with the hook arm passing through the gap where the cover tile meets the pan tile. For the latest details on Italy, see [Commercial Rooftop Solar Case Study Italy](/blog/commercial-solar-rooftop-case-study-italy-warehouse).
Recommended hook types: K2 Tile Hook Spanish, Schletter Tile Hook S, IronRidge FlashFoot Tile, SunModo SpanTile.
The most common error on S-tile is using a hook designed for cover-only seating, then watching the cover tile slide downhill under thermal cycling. The hook must support the cover tile in its installed position without restricting natural expansion.
3. Barrel Tile (Mission Style, Half-Pipe)
Barrel tile is a single-piece hollow half-cylinder profile, common in Spanish colonial architecture, Mediterranean retrofits, and high-end California custom homes. The barrel profile makes hook seating particularly difficult — the hook must clear the curved ridge while bearing on the rafter beneath.
Recommended hook types: K2 Tile Hook Roma, Schletter Eco05 Roma, Mibet Barrel Tile Hook, SR Solar Barrel Adjustable.
The standard approach on barrel tile is to remove the tile entirely, install the hook on the rafter, and either reinstall the tile cut around the hook neck or install a tile-replacement flashing. Cutting tile to fit is acceptable when done with a wet diamond saw — dry cutting causes microfractures that propagate into full breaks within 12 months.
4. Pantile (S-Profile Single-Piece)
Pantile is a single-piece S-shaped profile common across the Netherlands, Belgium, Germany, and Eastern Europe. Different from Spanish S-tile in that the wave is integrated into a single tile rather than two separate pieces. For Germany-specific information, see Community Solar Projects Germany. See Community Solar Business Model for detailed guidance. For Europe-specific compliance details, see Europe solar compliance.
Recommended hook types: K2 Tile Hook Pantile, Schletter Rapid2+, FixGrid Pantile, Renusol VarioSole+ Pantile.
5. Interlocking Concrete Tile (Often Mis-Identified as Clay)
Many roofs marketed or assumed as “clay tile” are actually interlocking concrete tile from manufacturers such as Boral, Eagle Roofing, MCA, or Monier. Concrete tile is heavier (about 4.5 lb/ft² versus 3.5 lb/ft² for clay), more impact-resistant, and accepts a wider range of hooks.
Recommended hook types: standard tile hook for the matching profile (most concrete tile mimics clay profiles).
The first 10 minutes of any tile roof site assessment should be confirming whether the tile is actual clay or concrete that looks like clay. The waterproofing approach is similar but the structural calculations are not.
| Tile Profile | Typical Weight | Hook Compatibility | Breakage Allowance |
|---|---|---|---|
| Flat clay | 35–40 kg/m² | Standard flat hook | 3–5% |
| Spanish S-tile | 38–45 kg/m² | S-profile hook | 5–8% |
| Barrel/Mission | 45–55 kg/m² | Barrel hook + flashing | 8–12% |
| Pantile | 40–45 kg/m² | Pantile hook | 5–8% |
| Concrete tile | 50–60 kg/m² | Standard or universal | 3–5% |
Hook Selection: Five Criteria That Actually Matter
Hook marketing language is mostly noise. After installing solar across more than 50 countries, these are the five criteria we actually screen on every project.
1. Tile Clearance
The hook neck must clear the tile profile by at least 5 mm at every contact point. Zero clearance means the hook bears on the tile, which means the tile cracks under panel wind load. Measure this on the actual tile, not the manufacturer’s spec sheet — old roofs sag and the published clearance numbers do not account for cumulative sag.
2. Adjustable Height
Look for adjustable-neck hooks with at least 25 mm of vertical travel. Roof planes are never as flat as the design assumes, and a fixed-height hook on a wavy plane forces the rail into a stress curve that telegraphs into panel frame fatigue over 5–10 years.
K2 Tile Hook adjustable, Schletter Rapid2+ adjustable, and IronRidge FlashFoot Tile adjustable are the proven adjustable choices.
3. Stainless Steel Grade
Use A2 stainless (304-grade) for inland installs and A4 stainless (316-grade) for coastal installs within 5 km of saltwater. Galvanized hooks corrode in 8–12 years on coastal sites, and corrosion at the hook is the single most common cause of post-warranty roof failure.
4. Rafter Engagement
The hook base must engage the rafter, not just the deck. Most rafters are 38 mm × 89 mm (2x4) or 38 mm × 140 mm (2x6) with 400 mm or 600 mm spacing. The hook needs at least 80 mm of fastener engagement into the rafter, which means lag screws of 8 mm × 100 mm minimum.
Toe-nailing into the deck only is the second most common failure mode on tile roof solar — the deck pulls free under wind uplift, the hook tears out, and the panel becomes a projectile.
5. Wind Load Rating
The hook must carry the full wind uplift load for the design wind speed at the project location. ASCE 7-22 in the US, EN 1991-1-4 in Europe, and AS/NZS 1170.2 in Australia all require this calculation. A hook rated for 1.5 kN uplift may be insufficient in coastal Florida (Risk Category II, V_ult = 165 mph) where loads can exceed 2.0 kN per attachment point. For Australia-specific compliance details, see Australia comparisons/lgc-vs-stc.
This is where solar design software integrated with structural load calculations earns its keep. Manually checking wind load math for every clay tile project on a CAD-only workflow produces errors that show up as warranty claims three years later.
Three-Course Flashing: The Only Waterproofing That Works Long-Term
Three-course flashing is the industry-standard waterproofing method for solar penetrations on clay tile, and it is what most AHJs in California, Florida, Arizona, Texas, Spain, and Italy require by code. The technique seals the penetration to the underlayment — not the tile — which is the only seal that survives 25 years of thermal cycling.
The Three Courses
-
First course: asphalt roof cement. Apply a 4-inch-wide, 1/8-inch-thick band of asphalt roof cement (ASTM D4586 Type II) directly to the felt underlayment around the lag screw or hook base. The cement must be applied to clean, dry underlayment — any dust or debris breaks the bond.
-
Second course: reinforcing fabric. Press a 6-inch-wide piece of polyester or fiberglass reinforcing fabric (ASTM D1668 Type II) into the wet cement. The fabric provides tensile strength and prevents the cement from cracking under thermal expansion.
-
Third course: top coat asphalt cement. Apply a second 8-inch-wide, 1/8-inch-thick band of asphalt cement over the fabric, fully embedding the fabric and feathering the edges. This top coat is what actually sheds water — the bottom course is purely an adhesion layer.
The total flashed area is 8 inches wide and overlaps the underlayment on all sides by at least 4 inches. Done correctly, this seal is more waterproof than the original underlayment.
Why Single-Bead Caulking Fails
Polyurethane or silicone caulking applied around a lag screw fails within 3–5 years because clay tile roofs see surface temperature swings of 60°C+ between summer noon and winter night. The caulk hardens, cracks, and pulls away from the screw, and water then follows the screw thread directly into the roof deck. Three-course flashing survives because the asphalt cement remains flexible across the full thermal range.
Tile-Replacement Flashings as an Alternative
Tile-replacement flashings are the modern alternative to three-course. The installer removes the tile, installs a metal flashing pan that replaces the tile footprint, and mounts the hook on top of the pan. The flashing pan is typically aluminum or galvanized steel with a raised central boss that diverts water around the penetration.
Common products: IronRidge FlashFoot Tile, EcoFasten GreenFasten Tile, SunModo SunTile, K2 SingleHook with TileFlash adapter.
These systems are faster to install (15–20 minutes per attachment versus 30–40 minutes for three-course) and produce more consistent results across crews of varying skill levels. The downside is appearance — the flashing pan replaces the tile, so the visible result is a metal patch instead of matching tile. On heritage homes or homes with strict HOA covenants, three-course flashing under the original tile is preferred.
| Method | Install Time | Cost per Point | Visual Match | AHJ Acceptance |
|---|---|---|---|---|
| Three-course flashing | 30–40 min | $25–$45 | Excellent (tile preserved) | Universal |
| Tile-replacement flashing | 15–20 min | $35–$60 | Poor (metal visible) | Universal |
| Double flashing | 45–60 min | $40–$70 | Excellent | Most AHJs |
| Caulk only | 10 min | $5–$10 | Excellent | Rejected by most AHJs |
Structural Load Math for Clay Tile Solar
Clay tile roofs already carry 35–60 kg/m² of dead load before solar adds anything. A typical 400 W panel with frame, mounting, and conduit adds 12–15 kg/m² to the loaded panel area, plus another 0.5–1.0 kg/m² spread across non-panel roof area as point loads at hook locations.
The structural check has three parts: dead load, wind uplift, and snow load (where applicable).
Dead Load Check
Total dead load = tile weight + underlayment + sheathing + framing + solar
                = 45 + 5 + 8 + 6 + 13
                = 77 kg/m² (15.8 psf) for typical Spanish tile + solar
Most modern roof structures are designed for 15–20 psf dead load, leaving little margin. On older roofs (pre-1990), the structural engineer should review rafter sizing and may require sistering of rafters under panel arrays larger than 30 m².
Wind Uplift Check
Wind uplift is the dominant structural concern on clay tile solar. Panels act like wings under wind load, and the uplift force concentrates at the corner attachments where pressure coefficients are highest.
For a 7 kW residential system in ASCE 7-22 wind zone (V_ult = 130 mph, Risk Category II, exposure C):
- Roof zone 1 (interior): GCp = -1.0, design uplift ≈ 0.8 kPa
- Roof zone 2 (perimeter): GCp = -1.8, design uplift ≈ 1.4 kPa
- Roof zone 3 (corner): GCp = -2.6, design uplift ≈ 2.1 kPa
With panels spaced 1.0 m × 1.7 m and 4 attachment points per panel, corner panels see roughly 0.9 kN per attachment. Most quality tile hooks are rated 1.2–2.0 kN, leaving 30–55 percent safety margin.
The math is fundamentally similar to what we cover in our flat roof ballasted solar systems guide — the difference is that flat roof systems use ballast, while tile roof systems mechanically attach.
Snow Load Check
Above 35° latitude or in mountain regions, snow load drives the calculation. EN 1991-1-3 and ASCE 7-22 give snow load as:
Snow load on roof = Cs × Ce × Ct × Ct × PgFor Munich (Pg = 1.65 kPa), a 30° pitched clay tile roof with solar produces:
Roof snow load = 0.8 × 1.0 × 1.0 × 1.0 × 1.65 = 1.32 kPaPlus the dead load of solar (0.6 kPa), the total roof load reaches 1.92 kPa. This is within ASCE 7 allowable for typical 2x6 rafters at 600 mm centers, but it requires explicit calculation rather than assumption.
Run Clay Tile Load Calcs Without Spreadsheet Drama
SurgePV’s solar design software calculates dead load, wind uplift, and snow load for every clay tile project with ASCE 7, EN 1991, and AS/NZS templates built in. Generate the full PE-stamped attachment plan in 20 minutes instead of 4 hours.
Book a DemoNo commitment required · 20 minutes · Live project walkthrough
The Field-Tested Installation Sequence
Here is the actual installation sequence we run on every clay tile residential job. Deviations from this sequence are the source of nearly every callback we have seen.
Step 1: Pre-Installation Inspection
Walk the roof and document tile condition before touching anything. Photograph cracked, chipped, or moss-covered tiles. Note the tile manufacturer (often stamped on the underside), age, and replacement availability. Order at least 5 percent additional matching tiles before scheduling the install — backorders on heritage tile can run 4–6 months and stop the project.
Check the underlayment by lifting 3–4 tiles in different roof zones. If the underlayment is felt (30 lb tar paper) older than 15 years, recommend full underlayment replacement before solar. Modern synthetic underlayments (Owens Corning Deck Defense, GAF Deck-Armor) last 30+ years and are worth the upgrade investment.
Step 2: Mark Hook Locations
Snap a chalk line along each rafter that will host a hook. Use a stud finder calibrated for tile (most fail through tile — a hammer-tap acoustic check is more reliable on heritage homes). Mark the center of each hook with a grease pencil on the tile surface above the rafter.
Hook spacing is typically 1.0–1.2 m along the rail direction, with no more than one hook per panel side at the corner zones. The exact spacing comes from the wind uplift calculation.
Step 3: Lift the Tile
Use a tile lifter (approximately $80 from any roofing supply) to gently raise the cover tile or pan tile at each hook location. Place a small wood block under the lifted tile to hold it in position while you work.
Never pry tile up with a flat bar — concentrated pressure cracks the tile. Never lift more than 5–6 tiles at once on a working area, since unsupported tiles can shift downhill.
Step 4: Install Three-Course Flashing or Tile-Replacement Pan
If using three-course: brush the underlayment clean, apply asphalt cement, embed the reinforcing fabric, top-coat with asphalt cement. Let cure for 5 minutes before proceeding.
If using tile-replacement: cut the tile around the flashing pan footprint with a wet saw, install the pan onto the underlayment, seal the pan flange to the underlayment with butyl tape (3M 5354 or equivalent).
Step 5: Install the Hook
Position the hook over the rafter mark. Pre-drill the rafter with a 5 mm pilot hole to prevent splitting (especially important on older Douglas fir or pine rafters). Install the lag screw with an EPDM-bonded sealing washer below the hook base.
Torque to manufacturer spec (typically 18–25 Nm for 8 mm lag). Over-torque splits the rafter; under-torque leaves the connection vulnerable to fastener back-out under wind cycling.
Step 6: Reseat the Tile
Lower the lifted tile back into position. Confirm at least 5 mm clearance between the tile and the hook neck. If the tile contacts the hook, do not force it — adjust hook height or trim the tile with a wet saw to clear the neck.
This is the single most common workmanship error. A hook that pressure-loads the tile cracks within 3–6 months, often hidden under the next tile up. The first sign is a wet ceiling stain in the room below the array.
Step 7: Install Rails and Modules
Mount the rails to the hooks per manufacturer spec. Confirm rail level across the full array length — out-of-level rails introduce frame stress that voids panel warranties on most premium brands.
Install modules with the manufacturer-specified torque on every clamp (typically 6–8 Nm for standard 35 mm frame). Bond every module frame per NEC 690.43 or local code. Run continuous equipment grounding back to the inverter.
Step 8: Final Walkthrough and Documentation
Photograph every penetration, every flashing, and every torque-stamped fastener. Document tile breakage and replacement. Generate the as-built drawings and submit to the AHJ for final inspection.
Clean tile surface debris with a soft brush — never pressure wash a tile roof immediately after solar install, since the seal cures over 7–10 days and pressure water can drive moisture under the flashing.
AHJ and Code Requirements by Region
Code requirements for clay tile solar vary significantly by jurisdiction. Here are the major frameworks installers actually face.
United States
California (Title 24, CRC) requires PE-stamped attachment plans for any system over 30 modules, three-course flashing or equivalent at every penetration, and tile breakage replacement matching original profile. CALGreen requires 30 percent of new construction roof area to be solar-ready, which has driven most California tile manufacturers to publish solar mounting compatibility specs.
Florida (FBC, Miami-Dade NOA) requires high-velocity hurricane zone (HVHZ) approval for all attachments in Miami-Dade and Broward counties. Only NOA-listed mounting systems can be installed. The NOA test protocol (TAS 117) confirms wind uplift performance up to 200+ mph.
Texas (IRC + local amendments) generally requires stamped engineering for any tile attachment, with some Sun Belt jurisdictions (Austin, Dallas, San Antonio) requiring photographic documentation of every flashing.
Arizona (IRC + AZ amendments) requires tile manufacturer approval of attachment method on all warranty-active tile (typically tile less than 25 years old). Skipping this approval voids the tile warranty and shifts liability to the installer.
European Union
Spain (CTE DB-SE-AE) governs structural design including wind, snow, and seismic loads. Spanish clay tile solar generally requires hooks tested to UNE-EN 1991-1-4 with manufacturer documentation. CE marking is mandatory on all mounting components.
Italy (NTC 2018) requires structural verification for any modification to existing roof systems, including solar mounting. Heritage homes in historic centers require additional approvals from the Soprintendenza (regional heritage authority).
Germany (DIN 1991, DIN 4108) requires DIN-certified mounting systems and full structural verification by a Bauleiter (project engineer) on any installation over 30 m². Clay tile is less common in Germany but appears in southern regions (Bavaria, Baden-Württemberg).
Australia and New Zealand
Australia (AS/NZS 1170.2, AS/NZS 5033) governs wind load and PV system design. Cyclone-prone regions (above latitude -25°S in Queensland, Western Australia) require Region C/D wind ratings on all mounting hardware.
New Zealand (NZS 4541, AS/NZS 5033) requires similar verification, with additional seismic load considerations across the entire country.
A complete review of European policy and incentives interacts with these technical requirements — see our coverage of European solar incentives and the EU rooftop solar mandate for the regulatory context that drives mounting standard adoption.
Common Mistakes That Cause Roof Leaks
After 1+ GW of installations across 50 countries, these are the failures we see most often on clay tile solar callbacks.
Mistake 1: Caulk-Only Penetration Sealing
Replacing three-course flashing with polyurethane caulk because it is faster. The caulk hardens, cracks at year 3–5, and water follows the lag screw straight into the deck. The roof leaks before the panels are even paid off.
Fix: Mandate three-course flashing on every penetration. No exceptions, regardless of crew schedule pressure.
Mistake 2: Hook Profile Mismatch
Using a flat-tile hook on Spanish S-tile, or a barrel hook on flat clay. The hook either presses on the tile (cracking it) or leaves a gap (wind-driven rain ingress).
Fix: Maintain a hook inventory matched to the tile profiles common in your service area. Order hook samples from K2, Schletter, IronRidge, and SunModo and field-test them on common local tile.
Mistake 3: Skipping Tile Manufacturer Approval
Installing on warrantied tile without getting attachment approval in writing. The tile manufacturer voids the warranty when notified, and the homeowner now has an uncertified roof for the remaining warranty period.
Fix: Get attachment method approval in writing from the tile manufacturer before quoting. Most major manufacturers (Tejas Borja, La Escandella, Boral, Eagle Roofing, MCA, Monier) have published solar mounting approval programs and will respond within 48 hours.
Mistake 4: Under-Torquing or Over-Torquing Lag Screws
Installing lag screws with an impact driver and no torque limit. Over-torque splits the rafter (immediate failure under wind load). Under-torque leaves the screw vulnerable to back-out under cyclic loading.
Fix: Use a torque-limited driver on every lag screw. Document torque per manufacturer spec on the as-built drawing.
Mistake 5: Walking the Tile
Crew members walking on tile while installing causes hairline cracks that show up as leaks 6–12 months later. Most flat-tile profiles tolerate foot traffic at the lower third of each tile only; barrel and S-tile tolerate almost no foot traffic.
Fix: Use roof walking boards (foam-padded plywood, approximately $40 each) to distribute crew weight across multiple tiles. Train every crew member that direct foot traffic on tile is prohibited except at designated loading zones.
Mistake 6: Over-Spacing Hooks
Spacing hooks 1.5 m or more on the rail direction to save hardware cost. Wind uplift exceeds attachment capacity, the panel pulls free under sustained gusts, and the entire array becomes a liability claim.
Fix: Calculate hook spacing from the actual wind load, not from a generic spec sheet. Use solar design platform that integrates wind load math directly into the layout.
Mistake 7: Damaged Underlayment Left in Place
Installing solar over felt underlayment that is already failing (more than 20 years old, brittle, cracked). The solar install lasts longer than the underlayment, and replacing the underlayment requires removing the entire solar system 5–10 years later.
Fix: Inspect underlayment during the site assessment. Recommend underlayment replacement before solar on any roof with original felt over 20 years old. The cost of underlayment replacement is small compared to solar removal and reinstall.
Tile Breakage: Plan for It
Tile breakage on clay tile solar installs is normal. The question is not whether tiles will break, but how many and whether you have replacements ready.
Typical breakage rates:
- New flat clay tile (less than 5 years): 2–4 percent
- Mature flat clay tile (5–15 years): 4–6 percent
- Spanish S-tile: 5–8 percent
- Barrel tile: 8–12 percent
- Heritage tile (over 30 years): 10–15 percent
Plan to break this many tiles per project, not as a worst case but as a reasonable expectation. Order replacement tile (matching profile, manufacturer, color batch) before the install starts. Heritage tile especially — sourcing for older Tejas Borja or La Escandella batches can take 4–6 months and stop the project mid-install.
Cost of replacement tile is typically $2–$8 per tile for current production, and $15–$40 per tile for heritage or out-of-production profiles. Build this cost into the quote rather than absorbing it as margin loss.
Pro Tip — Photograph Every Tile Before You Lift It
Take a wide photo of each section before lifting tiles. If a tile cracks during install and you cannot remember the exact arrangement, the photo is the only reference for restoring the original pattern. Crews that skip this step end up with mis-matched repair zones that homeowners notice and complain about for years.
Cost Breakdown: Clay Tile Solar Versus Asphalt Shingle
Here is the actual cost delta for a 7 kW residential system installed on clay tile versus asphalt shingle, based on our cost data across the US, EU, and Australia.
| Cost Component | Asphalt Shingle | Clay Tile | Delta |
|---|---|---|---|
| Hardware (rails, clamps) | $1,200 | $1,200 | $0 |
| Mounting hooks/feet | $280 (28 attachments) | $560 (28 attachments) | +$280 |
| Flashing materials | $140 | $420 (three-course) | +$280 |
| Tile breakage allowance | $0 | $200 (5%) | +$200 |
| Labor (crew-days) | $2,400 (1 day, 4 crew) | $3,600 (1.5 days, 4 crew) | +$1,200 |
| Tile manufacturer approval | $0 | $150 (admin time) | +$150 |
| PE engineering stamp | $400 (basic) | $700 (full attachment plan) | +$300 |
| Total install cost | $4,420 | $6,830 | +$2,410 |
The $2,410 delta on a 7 kW system works out to $0.34 per watt — within the $0.30–$0.60 range we quote earlier. Pass this through to the homeowner as a transparent line item on the proposal. Most homeowners with clay tile roofs already understand that their roof is more expensive to work on, and they would rather see honest pricing than a low quote that produces conflict later.
For installer financial planning around residential margins, the breakdown in our solar installation cost breakdown post covers regional variances, and our solar installer profit margins post shows where clay tile premium fits into typical residential P&L structures.
Permit and Inspection Documentation
Clay tile solar requires more documentation than shingle solar. Every PE-stamped attachment plan we produce includes:
- Site plan with module layout, hook locations, and rafter centers marked
- Structural calculations showing dead load, wind uplift, and snow load with margin
- Hook specification sheet showing UL 2703 or equivalent listing, wind uplift rating, and corrosion grade
- Flashing detail drawing showing three-course flashing or tile-replacement pan with materials specified
- Tile manufacturer approval letter confirming attachment method does not void roof warranty
- Electrical single-line diagram with grounding and bonding paths
- AHJ compliance checklist confirming local code requirements (Title 24, FBC HVHZ, NEC 690, etc.)
- As-built photographs documenting every flashing and every torque-stamped fastener
This package typically runs 12–18 pages versus 6–8 pages for a shingle install. The extra pages are not bureaucracy — they are the documentation that protects the installer when a claim arrives years later. We have used these packages to defeat warranty claims that would have cost $10,000–$30,000 each in remediation.
Tools and Software for Clay Tile Solar Design
The right tools cut clay tile design time from 3–4 hours per project to 30–45 minutes. The right tools also produce documentation that survives AHJ review without revisions.
For solar design and layout: cloud solar design tool that captures tile profile, rafter spacing, and hook compatibility during the initial site assessment phase. This is what we use across all our residential projects at SurgePV. For a direct comparison, see Arka 360 vs SurgePV.
For shading and irradiance analysis: solar shadow analysis software that handles roof obstructions, surrounding buildings, and tree canopy across all four seasons.
For client-facing proposals: solar proposal software that converts the design into a homeowner-ready proposal with cost, savings, and ROI math.
For physical tools, every clay tile crew should carry:
- Tile lifter (Stortz, Rubi, or similar)
- Wet diamond saw (Bosch GMS or DeWalt with diamond blade)
- Torque-limited impact driver
- Roof walking boards (foam-padded plywood)
- Three-course flashing materials (asphalt cement, fabric, brushes)
- Replacement tile inventory (5–8 percent of project tile count)
- A4 stainless lag screws and EPDM-bonded washers
- Photo documentation kit (camera, marker, laser level)
Our full solar installation materials and tools checklist covers the broader install kit beyond what is tile-specific.
Conclusion: Three Action Items for Your Next Clay Tile Install
-
Match the hook to the tile profile, not to the spec sheet. Field-test K2, Schletter, IronRidge, and SunModo hooks on the actual tile profiles common in your service area. Build an inventory matched to those profiles and stop using “universal” hooks.
-
Mandate three-course flashing on every penetration, no exceptions. The 30-minute install time difference versus caulk pays for itself the first time a callback does not happen. Train every crew member to apply three-course correctly and inspect the work before tile reseat.
-
Get tile manufacturer approval in writing before quoting. Tejas Borja, La Escandella, Boral, Eagle Roofing, MCA, and Monier all have published solar approval programs. Two days of administrative work upfront protects the entire roof warranty for 25 years.
Frequently Asked Questions
Can you put solar panels on a clay tile roof?
Yes. Clay tile roofs are fully compatible with solar, but they require specific hardware: tile-profile hooks or tile-replacement flashings, three-course waterproofing at every penetration, and stainless or aluminum hardware rated for at least 25 years of service. Skipping any of these steps causes broken tiles or hidden leaks within the first 5 years.
What hooks are best for Spanish clay tile (S-tile or barrel tile) roofs?
Use S-shaped or contoured tile hooks with adjustable necks that match the undulating profile of Spanish clay. Universal hooks designed for flat concrete tile crack barrel tiles within months because the load transfers to the curved ridge instead of the rafter. Brands such as K2 Tile Hook, Schletter Rapid2+, IronRidge FlashFoot Tile, and SunModo SunTile are the proven choices for barrel and pantile profiles.
Do solar panels leak on tile roofs?
Properly installed solar panels do not leak on clay tile roofs. Leaks come from skipped flashing, single-bead caulking, or hooks that pressure-load the tile and crack it. The fix is three-course flashing, EPDM gaskets, and a hook that clears the tile by at least 5 mm without contact.
How much does it cost to install solar on a clay tile roof?
Expect $0.30–$0.60 per watt extra versus asphalt shingles in the United States, or €0.10–€0.20 per watt extra in the EU. The premium covers slower install speed, extra hardware, tile breakage allowance, and PE-stamped attachment plans. A 7 kW residential system runs roughly $2,100–$4,200 above the equivalent shingle install.
Will the solar installation void my roof warranty?
Not if the installer follows manufacturer specifications. Most clay tile manufacturers — Tejas Borja, La Escandella, Boral, MCA, Eagle Roofing — keep the warranty intact when penetrations use approved flashings and the installer is roofing-certified. Always get the attachment method approved in writing by the tile manufacturer before mounting.
How long does a clay tile solar install take?
About 30–50 percent longer than asphalt shingle. A 7 kW residential install that takes one day on shingle takes 1.5 to 2 days on clay tile because of careful tile lifting, three-course flashing, and slower hook placement. Plan labor budgets accordingly.
What is three-course flashing?
Three-course flashing is a waterproofing technique using asphalt roof cement, a polyester or fiberglass reinforcing fabric, and a second cement coat sealed directly to the felt underlayment beneath the tile. It is the industry-standard method for sealing solar penetrations on clay tile and is required by most AHJs in California, Florida, and Arizona.
Can I use rail-less mounting on clay tile roofs?
Rail-less systems such as IronRidge BX or APsystems Microrack work on flat concrete tile but are generally not recommended for barrel or S-tile clay because the panel cannot maintain consistent stand-off across the curved profile. Stick with rail-based mounting and tile-profile hooks for traditional clay roofs.