Quick Answer
Nearly all grid-tied residential solar systems installed after 2010 can accept battery storage through AC coupling, which works with any existing inverter brand. Utilities in California, Arizona, Nevada, and an expanding list of states charge peak rates of $0.40–$0.60 per kWh between 4 p.m. and 9 p.m.
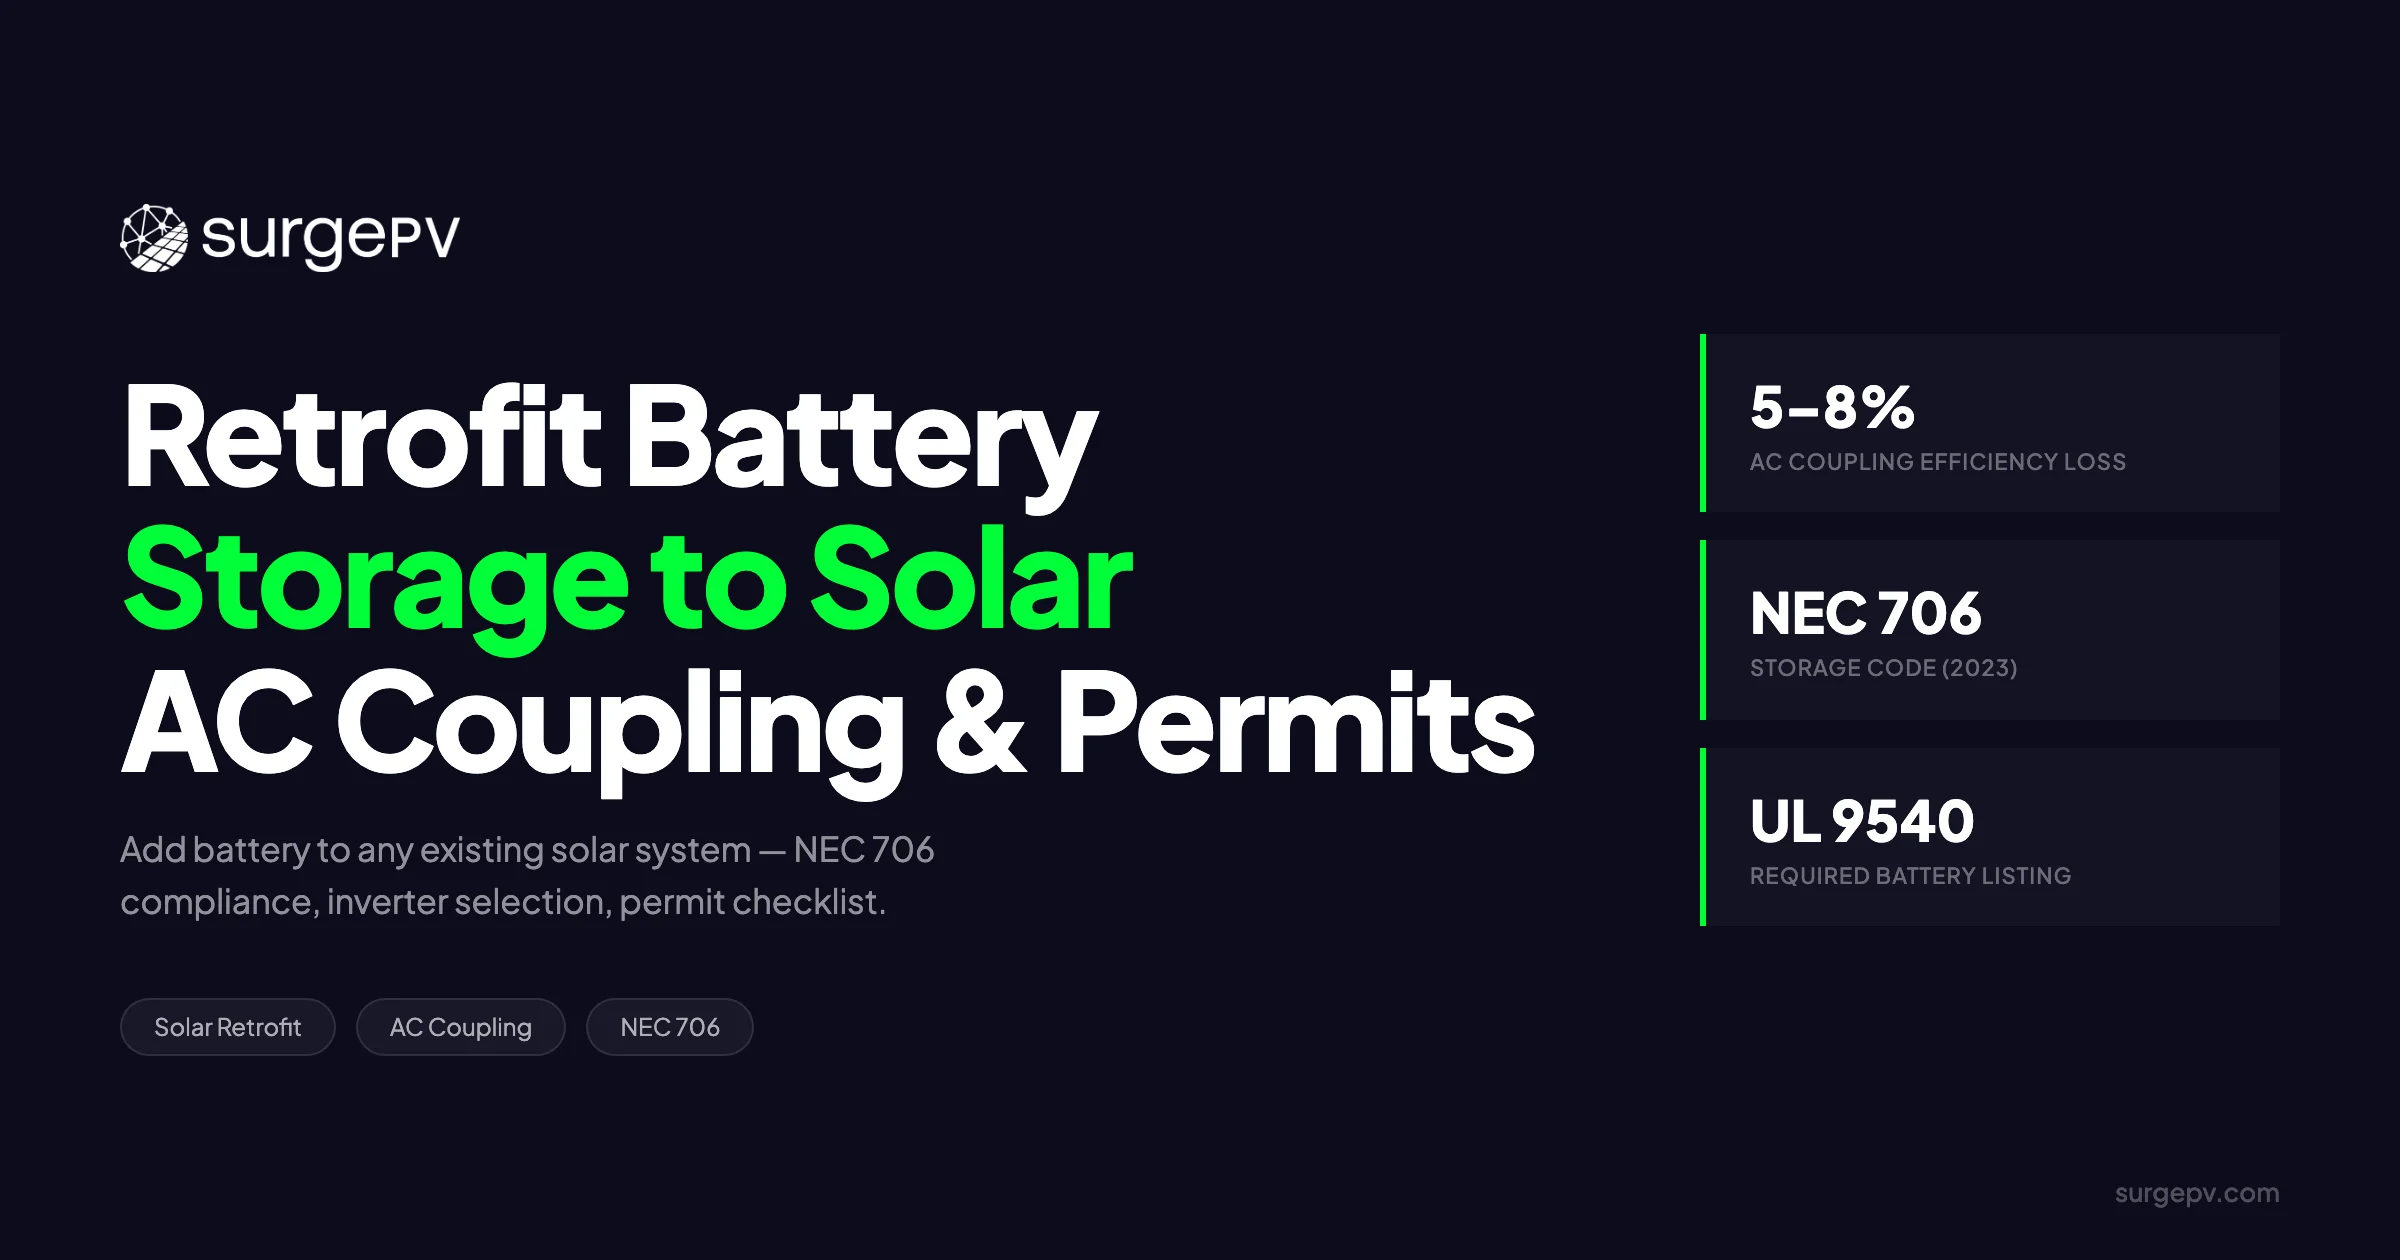
Homeowners with existing solar arrays are asking the same question: can I add a battery later without replacing everything? The short answer is yes. Battery retrofits are now a standard offering from most installers, driven by shifting net metering rules, time-of-use rate structures, and increasing demand for backup power. The technical path you choose—AC coupling or DC coupling—determines your cost, efficiency, and installation timeline. This guide breaks down exactly how each method works, which one fits your existing inverter, and what the National Electrical Code (NEC) and your local authority having jurisdiction (AHJ) will require before you can flip the switch.
Nearly all grid-tied residential solar systems installed after 2010 can accept battery storage through AC coupling, which works with any existing inverter brand. Utilities in California, Arizona, Nevada, and an expanding list of states charge peak rates of $0.40–$0.60 per kWh between 4 p.m. and 9 p.m. For more on this topic, see Adding Battery Storage Services.
TL;DR
Yes. Nearly every existing residential solar system can accept battery storage. AC coupling keeps your existing inverter and costs $10,000–$18,000 installed. DC coupling replaces the inverter with a hybrid unit and runs $14,000–$22,000. NEC 2023 Article 706 mandates a disconnecting means, an emergency shutdown function with an outside initiation device for dwellings, working space, and specific labeling. UL 9540A fire-test data is required by many AHJs. The real bottleneck is permitting and utility approval—plan for 4 to 10 weeks from contract to commissioning. Physical installation takes 1–2 days.
In this guide, you will learn:
- How to determine whether your existing inverter supports AC coupling, DC coupling, or both
- The exact round-trip efficiency penalty of AC coupling versus DC coupling—and what it costs you annually
- NEC 2023 Article 706 requirements for disconnecting means, working space, and system labeling
- Why UL 9540A fire propagation testing matters for permit approval and AHJ sign-off
- A complete permit checklist: building permit, electrical permit, and utility interconnection amendment
- Real cost ranges, hidden fees, and a realistic timeline from site assessment to permission to operate
Can You Add a Battery to an Existing Solar System?
Yes. Nearly all grid-tied residential solar systems installed after 2010 can accept battery storage through AC coupling, which works with any existing inverter brand. The main constraints are electrical panel capacity, available breaker space, and local utility interconnection rules. The solar panels themselves are rarely the limiting factor.
The decision to add storage is driven by four factors. First, time-of-use rate shifts. Utilities in California, Arizona, Nevada, and an expanding list of states charge peak rates of $0.40–$0.60 per kWh between 4 p.m. and 9 p.m. A battery lets you store midday solar production and discharge it during those expensive evening hours. Second, net metering revisions. NEM 3.0 in California slashed export compensation to roughly $0.05–$0.08 per kWh on average, making self-consumption far more valuable than selling back to the grid. Third, backup power demand. Grid outages from storms, wildfire PSPS events, or aging infrastructure have made resilience a primary buying motive. Fourth, grid instability. Voltage flicker and frequent outages in rural or high-growth areas push homeowners toward storage as a reliability tool.
Battery inverters, gateway controllers, and system controllers are now designed specifically for retrofit applications. solar software platforms model retrofit economics as a core feature, letting installers size batteries against actual load profiles and rate schedules in minutes rather than hours. Solar design software also verifies structural loads, conductor sizing, and interconnection compliance automatically. The hardware ecosystem has matured to the point where mixing brands is standard practice: a Tesla Powerwall can sit behind a SolarEdge string inverter, or an Enphase IQ Battery can pair with a legacy Fronius system, provided the AC coupling is engineered correctly.
That said, certain system constraints can block a retrofit. A 100-amp main panel with no available breaker spaces will require an upgrade before any battery can be connected. Federal Pacific or Zinsco panels, known for defective breakers, are rejected by most installers and AHJs. Roof-mounted inverters that have exceeded their rated 10–12 year lifespan may need replacement anyway, changing the economics toward DC coupling. Some utilities, particularly in Hawaii and parts of the Northeast, impose interconnection restrictions on storage systems that export power or lack advanced inverter certification.
Warranty implications are generally minimal. PV module warranties remain intact when you add a battery. Inverter warranties may require manufacturer notification if DC coupling replaces the unit, but the warranty itself remains intact. Check your original installation contract for installer workmanship clauses—some cover the full system only if the original contractor performs the retrofit. A site assessment covers four elements: load analysis to size the battery, existing inverter model verification to confirm compatibility, breaker space audit to identify panel constraints, and a structural review of the roof or ground area where the battery will sit.
AC Coupling vs. DC Coupling for Retrofits
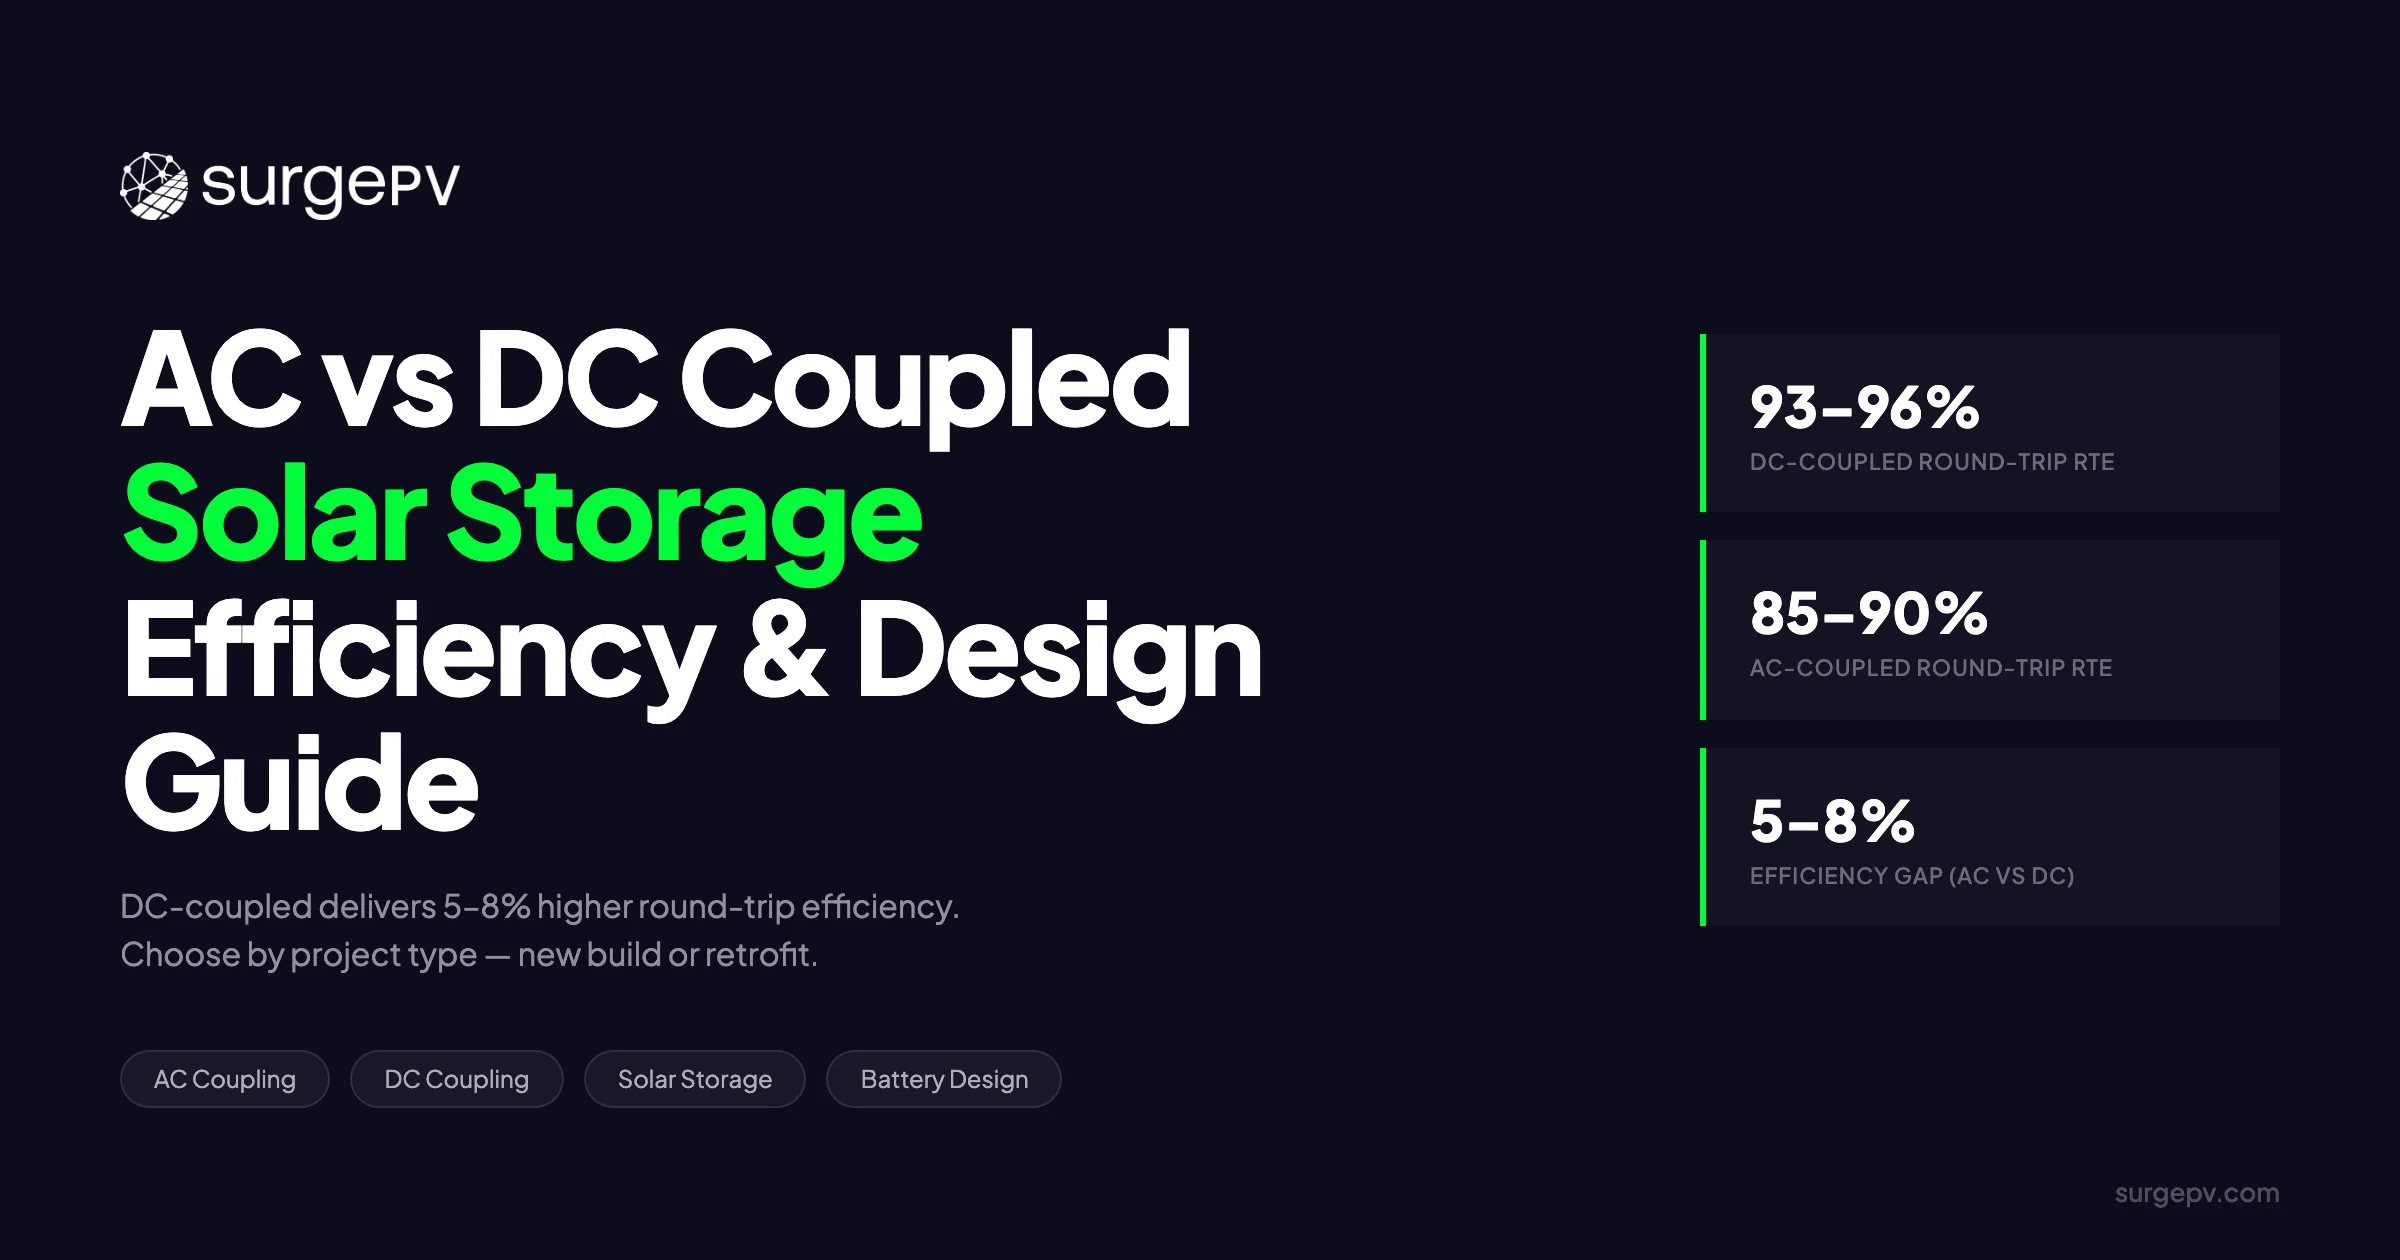
AC coupling adds a battery inverter to your existing AC panel and keeps your current inverter, costing $10,000–$18,000 with 90–95% round-trip efficiency. DC coupling replaces the inverter with a hybrid unit, costs $14,000–$22,000, and achieves 95–98% efficiency but requires more labor.
How AC Coupling Works
In an AC-coupled retrofit, the battery connects to the AC bus via a dedicated battery inverter. Your existing PV inverter stays exactly where it is. The energy flow looks like this: solar DC from the panels converts to AC through your existing inverter, feeds the main panel, and any excess is grabbed by the battery inverter, converted back to DC, and stored in the battery. On discharge, battery DC converts to AC through the battery inverter and feeds your panel or the grid.
The advantages for retrofits are clear. The existing inverter stays in place. The array wiring remains untouched. You can mix battery and solar brands. Installation typically takes one to two days. If your existing inverter has eight years of life left, you do not throw it away.
The disadvantage is conversion loss. Because energy moves through three conversion steps—DC to AC at the solar inverter, AC back to DC at the battery inverter, and DC to AC again on discharge—round-trip efficiency sits around 90–95%.
How DC Coupling Works
In a DC-coupled retrofit, the existing inverter is removed entirely and replaced with a hybrid inverter. The PV array’s DC bus connects directly to the hybrid inverter. The battery connects to the hybrid inverter’s DC bus. Energy flows: solar DC goes straight to the hybrid inverter, which either charges the battery directly or inverts it to AC for the home. On discharge, battery DC feeds the hybrid inverter and converts to AC in a single step. See DC Bus Voltage Optimization for detailed guidance.
The advantages are higher efficiency, a single inverter to monitor and maintain, and unified system control. Round-trip efficiency reaches 95–98% because the battery charges directly from the DC bus, bypassing the extra AC conversion step. Disadvantages include the cost of inverter replacement—typically $4,000–$6,000 for the hybrid unit plus labor—a longer installation of two to three days, and brand lock-in since the hybrid inverter must be compatible with your battery choice.
Comparison Table
| Aspect | AC Coupling | DC Coupling |
|---|---|---|
| How it works | Battery inverter connects to AC panel; existing solar inverter stays | Existing inverter replaced with hybrid unit handling PV + battery |
| Inverter requirement | Separate battery inverter + existing PV inverter | Single hybrid inverter (PV + battery) |
| Efficiency | ~90–95% round-trip | ~95–98% round-trip |
| Cost | $10,000–$18,000 (10–15 kWh) | $14,000–$22,000 (10–15 kWh) |
| Best for | Retrofits where inverter replacement is undesirable | New installs or inverter end-of-life replacement scenarios |
| Complexity | Low—1–2 day install | High—2–3 day install plus inverter removal |
Round-Trip Efficiency: The Real-World Difference
AC coupling loses 3–5% versus DC coupling due to those extra conversion steps. On a typical 7 kW residential system producing 10,000 kWh annually, that efficiency gap equals roughly $30–$60 per year in energy value, assuming an average blended rate of $0.25 per kWh. The avoided inverter replacement cost in an AC-coupled system—$4,000–$6,000—would fund that efficiency penalty for 60 to 150 years. For retrofits where the existing inverter is healthy, AC coupling is the rational default. DC coupling only makes sense when the inverter is already failing, out of warranty, or near end-of-life.
Inverter Compatibility: What Works with Your Existing System
Your existing inverter determines which retrofit path is practical. Microinverter systems essentially require AC coupling, while most string inverter systems support both paths.
Compatibility Table
| Existing Inverter | Compatible Retrofit Path | Notes |
|---|---|---|
| Enphase IQ microinverters (IQ6/IQ7/IQ8) | AC-coupled: Enphase IQ Battery + IQ System Controller; or third-party AC battery with separate battery inverter | Native integration requires IQ System Controller. Non-Enphase AC batteries work but lose unified monitoring. |
| SolarEdge string inverter with optimizers | AC-coupled: any AC battery; DC-coupled: SolarEdge StorEdge hybrid inverter | StorEdge retrofit requires inverter swap. AC coupling preserves optimizers and monitoring. |
| Fronius string inverter | AC-coupled: any AC battery; DC-coupled: Fronius Gen24 hybrid inverter | Gen24 adds backup power capability. Primo or Symo models require AC coupling for retrofits. |
| SMA string inverter | AC-coupled: SMA Sunny Boy Storage or any AC battery; DC-coupled: SMA Sunny Boy Storage hybrid or Sunny Island | Sunny Boy Storage is purpose-built for AC-coupled retrofits. |
| Generic string inverters | AC-coupled: any AC battery (Tesla Powerwall AC mode, FranklinWH, Enphase IQ Battery with controller) | Verify MPPT voltage ranges if considering DC-coupled hybrid replacement. |
Microinverter vs. String Inverter Implications
Microinverter systems are inherently AC-coupled at the panel level. Each panel has its own microinverter converting DC to AC right at the roof. DC coupling would require removing every single microinverter—an economically irrational proposition that adds thousands in labor and new DC wiring. For Enphase and other microinverter systems, AC coupling is the only sensible path. Also see: Us Residential Solar Market Trends 2026. For United States-specific compliance details, see United States arizona/phoenix. For United States-specific compliance details, see United States california/los-angeles.
String inverter systems offer both paths, but AC coupling is preferred unless the inverter is near end-of-life. A 10-year-old string inverter with a failing cooling fan or deteriorating capacitors may need replacement within a few years anyway. In that case, upgrading to a hybrid inverter during the battery retrofit saves on future labor costs.
Power optimizer systems like SolarEdge or Tigo retain their optimizer benefits under AC coupling. The optimizers continue to condition DC power and provide module-level monitoring. DC coupling with a non-SolarEdge hybrid inverter may require bypassing optimizers or verifying compatibility, which complicates the design and can void the optimizer warranty. If you have SolarEdge optimizers and want DC coupling, stick with the SolarEdge StorEdge or Energy Hub hybrid inverter.
When evaluating compatibility, verify three things: the inverter’s AC output rating against your battery inverter’s input capacity, the existing DC array voltage against any hybrid inverter’s MPPT range, and whether your monitoring platform can integrate both solar production and battery state of charge in a single dashboard.
NEC 2023 Article 706: Code Requirements Installers Must Know
NEC 2023 Article 706 mandates that energy storage systems have a readily accessible disconnecting means, an emergency shutdown initiation device outside dwellings, 125% conductor sizing for continuous loads, a 100V dwelling limit unless live parts are inaccessible, and commissioning before energizing.
NEC Article 706 governs energy storage systems (ESS), and the 2023 edition added specific requirements that directly affect residential battery retrofits. Installers who ignore these details fail inspection.
Disconnecting Means (706.15)
A disconnecting means must isolate the ESS from all wiring systems. It must be readily accessible and within sight of the ESS, or lockable per NEC 110.25. For one- and two-family dwellings, an emergency shutdown function is required to cease the export of power from the ESS to premises wiring. An initiation device must be located at a readily accessible location outside the building and must plainly indicate whether it is in the “on” or “off” position. This is not optional. The disconnect must be permanently marked “ENERGY STORAGE SYSTEM DISCONNECT” plus the nominal voltage. If your battery is in a garage and the main panel is on the exterior wall, the ESS disconnect must still be accessible without entering the structure.
Working Space and Accessibility
Working space around the ESS must comply with Table 110.26(A)(1). For voltages up to 150V to ground, the minimum working space is 3 feet. Dedicated space rules apply: no foreign systems—plumbing, HVAC ductwork, or gas lines—may occupy the zone above or in front of the ESS. Rooftop and garage installations trigger additional clearance requirements in NFPA 855 and local amendments. Some jurisdictions require a 3-foot clear path to the battery for first responder access, regardless of what the NEC minimum says.
Labeling and Marking
NEC 706.15(C) requires permanent labeling at the disconnect indicating nominal voltage. Non-dwelling installations must also show available fault current, an arc-flash label, and the date of calculation. Battery enclosures require chemistry identification (lithium-ion, LFP, etc.), shock hazard warnings, and emergency contact information. Outdoor installations need weather-resistant labels rated for UV exposure. Inspectors will photograph labels during inspection; if they are handwritten, peeling, or non-compliant, you will fail.
System Capacity Limits for Dwellings
NEC 706.30(A) limits ESS voltage in dwelling units to 100V between conductors or to ground unless live parts are inaccessible during maintenance. Most residential battery systems operate at 48V or 400V, so this affects system design and enclosure selection. The 706.30 continuous load rule requires sizing conductors and overcurrent protection at 125% of maximum ESS current. A battery with a 50A maximum charge rate needs conductors and breakers sized for 62.5A minimum.
DC overcurrent protection devices must be listed for DC operation at system voltage and available fault current per 706.31. Use only DC-rated breakers on a DC bus. Finally, commissioning requirement 706.7 mandates that systems be tested and verified before energizing. Document insulation resistance readings, ground-fault verification, and function test results. Provide these to the AHJ if requested.
UL 9540A Fire Safety Testing: What It Means for Your Project
UL 9540 is the mandatory system safety listing for all U.S. battery installations. UL 9540A is a separate test method evaluating thermal runaway fire propagation across four levels—cell, module, unit, and installation. Many authorities having jurisdiction require both for permit approval.
Battery safety standards are not interchangeable. Two UL standards matter for residential storage, and understanding the distinction keeps your project moving through permitting.
UL 9540 vs. UL 9540A: The Distinction
UL 9540 is the system safety standard. It certifies that a battery system—enclosure, battery management system, thermal management, and electrical connections—meets electrical, mechanical, and thermal safety requirements. A UL 9540 listing is mandatory for any battery installed in the United States.
UL 9540A is a test method, not a certification. It evaluates thermal runaway fire propagation in battery energy storage systems. It answers a specific question: if one cell goes into thermal runaway, will the fire spread to neighboring cells, modules, or the entire unit?
What UL 9540A Tests
The standard defines four testing levels. Level 1 tests the cell. Level 2 tests the module. Level 3 tests the complete unit. Level 4 tests the installation with active fire protection. Testing stops at the earliest level where no propagation occurs. The results inform spacing requirements, ventilation design, suppression system selection, and first responder protocols. A battery that passes Level 2 but not Level 3 may still be installable with additional clearance or a fire suppression system.
When Installers Need to Know About It
Many AHJs require UL 9540A test data beyond the base UL 9540 listing, especially for commercial installations and multi-unit dwellings. NFPA 855 and the International Fire Code reference UL 9540A for installation spacing and containment requirements. The 5th Edition, published March 12, 2025, added mandatory hydrogen detection for gas-releasing chemistries, specific criteria for rooftop and garage installations, and expanded guidelines for sodium-ion and flow batteries.
Reject unlisted systems. AHJs are increasingly refusing permits for batteries lacking UL 9540 listing or 9540A test data. Before you specify a battery for a retrofit, verify both documents. Most major manufacturers—Tesla, Enphase, FranklinWH, LG, SolarEdge—publish UL 9540A summary reports on their websites. If the manufacturer will not provide a 9540A test summary, choose a different battery.
Permits and Utility Interconnection: The Real Timeline Bottleneck
Physical battery installation takes one to three days, but permitting and utility approval typically consume four to ten weeks total. Most jurisdictions require a building permit, electrical permit, utility interconnection amendment, and fire code compliance review before the system can be commissioned.
Physical installation is fast. Paperwork is slow. The gap between signing a contract and flipping the battery on is almost entirely permitting and utility review.
Permit Checklist
- Building permit: Required in most jurisdictions for battery placement, especially outdoors, in garages, or when structural mounts are modified. Some cities treat battery wall mounts as structural modifications requiring engineering review.
- Electrical permit: Mandatory for all battery retrofits. Covers ESS disconnecting means, conductor sizing, grounding, interconnection methods, and NEC 706 compliance.
- Utility interconnection amendment: Adding storage to an existing interconnected system constitutes a material change. It requires an updated interconnection agreement and technical review by the utility.
- Fire code compliance review: Outdoor setbacks, garage ventilation, and suppression system verification per NFPA 855 and the International Fire Code. Some fire departments require a pre-installation site visit.
Why Utility Approval Takes Longer Than Installation
Utilities treat battery addition as a material change under HECO Rule 14H, California Rule 21, and similar state interconnection rules. Even if your solar system already has permission to operate, adding storage triggers a new technical review. IEEE 1547-2018 and UL 1741-SA certification may be required for advanced inverter functions like volt-var and volt-watt control. Smart DER programs, such as Hawaii’s Non-Export pathway, can expedite review if the system is configured correctly in the application. Export versus non-export configurations affect review timelines significantly. Non-export systems typically qualify for faster processing because they eliminate backfeed risk to utility lines.
Typical Timeline: Contract to Commissioning
- Site assessment and proposal: 3–5 days
- Permit submission and approval: 2–4 weeks
- Utility interconnection amendment: 2–6 weeks
- Material procurement: 1–2 weeks
- Physical installation (AC-coupled): 1–2 days
- Physical installation (DC-coupled): 2–3 days
- Inspection and permission to operate: 3–10 days
Total: 4–10 weeks. Permitting and utility approval are the bottlenecks, not the physical install. Solar design software can accelerate the front end by automating single-line diagrams, conductor sizing, and interconnection applications, but no software speeds up a utility backlogged with NEM 3.0 amendments.
Cost Breakdown: AC-Coupled vs. DC-Coupled Retrofits
An AC-coupled retrofit typically costs $10,000–$18,000 installed for 10–15 kWh of usable capacity, while DC coupling runs $14,000–$22,000. The $4,000–$6,000 delta covers hybrid inverter replacement and additional labor. Hidden costs include panel upgrades, critical loads subpanels, and conduit runs.
Understanding the full cost picture prevents sticker shock when the proposal includes line items beyond the battery itself.
Hardware and Labor Costs
An AC-coupled retrofit runs $10,000–$18,000 installed for 10–15 kWh of usable capacity. A DC-coupled retrofit runs $14,000–$22,000 for the same capacity. The $4,000–$6,000 delta is almost entirely the hybrid inverter replacement plus additional labor for removal, rewiring, and commissioning. Stationary storage battery pack prices fell 71% from 2016 to 2024 (NREL Winter 2025 Solar Industry Update, 2025).
Hidden Costs That Change the Math
Electrical panel upgrades add $2,000–$4,000 when the existing panel is 100A, Federal Pacific, Zinsco, or has no breaker space. A critical loads subpanel—required to isolate essential circuits for backup power—adds $1,500–$3,000. Gateway or controller hardware, such as a Tesla Gateway 3 or Enphase IQ Combiner, runs $900–$1,200. Conduit and wire runs between the battery and main panel add $500–$1,500 depending on distance and wall penetration complexity. If the battery must sit on a concrete pad outdoors, pad installation adds $300–$800.
Soft Costs: Permits, Inspections, and Delays
Permitting fees range from $200–$800 depending on jurisdiction. Utility interconnection fees run $100–$500. Inspection rescheduling due to code corrections—missing labels, incorrect disconnect placement, or undersized grounding—can add 1–2 weeks delay plus return trip labor at $150–$250 per hour. Some AHJs require an engineering stamp on the electrical plan, adding $300–$600.
Design Solar + Storage Retrofits in Minutes
SurgePV’s solar proposal software handles AC-coupled and DC-coupled retrofit configurations with full permit documentation and NEC compliance checks.
Book a DemoNo commitment required · 20 minutes · Live project walkthrough
For a direct comparison, see Arka 360 vs SurgePV.
Installation Workflow: From Site Assessment to Commissioning
A battery retrofit follows a structured workflow: site assessment and electrical verification, installation of the battery and disconnecting means per NEC 706.15, insulation resistance and ground-fault testing, utility interconnection amendment submission, inspection, and finally permission to operate.
A battery retrofit follows a structured workflow. Skipping steps leads to failed inspections and delayed permission to operate.
Site Assessment and Electrical Verification
The installer verifies the existing inverter model, age, and warranty status. They audit the main electrical panel for breaker space, busbar rating, and manufacturer. A load analysis sizes the battery capacity and determines backup coverage: essential circuits only, or whole-home backup. The battery placement is identified—exterior wall, garage, or utility room—with checks on ambient temperature ranges, NFPA 855 clearance zones, and accessibility for maintenance. Shading analysis is rarely needed for the battery itself but matters if the solar array production has degraded since installation. Shadow analysis software identifies shading issues before installation.
Installation Day
For AC-coupled systems, the crew mounts the battery, installs the battery inverter or system controller, runs conduit to the main panel, and installs the ESS disconnect per NEC 706.15. For DC-coupled systems, the crew de-energizes the existing system, removes the old inverter, installs the hybrid inverter, reterminates PV DC conductors, connects the battery bus, and installs the ESS disconnect. Communication cables for monitoring integration are run and tested. The existing PV production log is preserved so homeowners do not lose historical data.
Commissioning and Permission to Operate
The installer performs insulation resistance testing and ground-fault verification on all new DC conductors. They configure export limits, charge and discharge schedules, and backup settings per utility requirements. NEC 706.7 commissioning documentation is completed, recording test readings and functional verification. The inspection is scheduled. Upon passing, the inspection report is submitted to the utility for permission to operate. Once PTO is granted, the installer hands off monitoring access, emergency shutdown instructions, and warranty documentation to the homeowner. Homeowners should test backup mode within the first week to confirm critical loads transfer correctly. Proper documentation at each stage ensures a smooth inspection process and faster permission to operate.
Conclusion
Adding battery storage to an existing solar system is a proven, standardized process. AC coupling is the right choice for most retrofits because it avoids inverter replacement and keeps costs between $10,000 and $18,000. DC coupling offers marginally better efficiency but only makes sense when your existing inverter is already near failure. The real delays are permitting and utility approval. Installation itself moves quickly. Comply with NEC 2023 Article 706, specify UL 9540-listed batteries with 9540A test data, and budget 4 to 10 weeks from contract to commissioning. For installers, solar design software that automates retrofit modeling, single-line diagrams, and code compliance cuts proposal time and reduces costly errors.
Frequently Asked Questions
Can you add a battery to an existing solar system?
Yes. Nearly all grid-tied residential solar systems installed after 2010 can accept battery storage. AC coupling works with any existing inverter. DC coupling requires replacing the existing inverter with a hybrid unit. The main constraints are electrical panel capacity and local interconnection rules.
Is it worth adding a battery to existing solar panels?
It depends on your electricity rate structure and backup power needs. Under NEM 3.0 or time-of-use rates, batteries improve self-consumption economics. If you experience frequent outages, backup value alone can justify the investment. Payback periods range from 6 to 12 years depending on local incentives and rate design.
Will adding a battery void my solar panel warranty?
No. PV module warranties remain intact when you add a battery. However, replacing a string inverter for DC coupling may affect the original inverter warranty. Notify the original installer if a workmanship warranty is still in effect.
Do I need to upgrade my electrical panel to add a battery?
Only when your panel is undersized, full, or uses obsolete equipment. If your panel is 200A with available breaker space, you likely do not need an upgrade. If you have a 100A panel, Federal Pacific, Zinsco, or no breaker space, an upgrade is usually required. Budget $2,000–$4,000 if an upgrade is needed.
Does adding a battery change my net metering agreement?
Yes. Battery addition is treated as a material change to your interconnection agreement. You must file an amendment with your utility. The utility will review system capacity, inverter settings, and export configurations before granting permission to operate.
Can I retrofit a DC-coupled battery to my existing solar system?
Only if you replace your existing inverter with a DC-coupled hybrid inverter. This is generally not recommended unless your current inverter is failing or near end-of-life. For most retrofits, AC coupling is faster, cheaper, and technically simpler.