Quick Answer
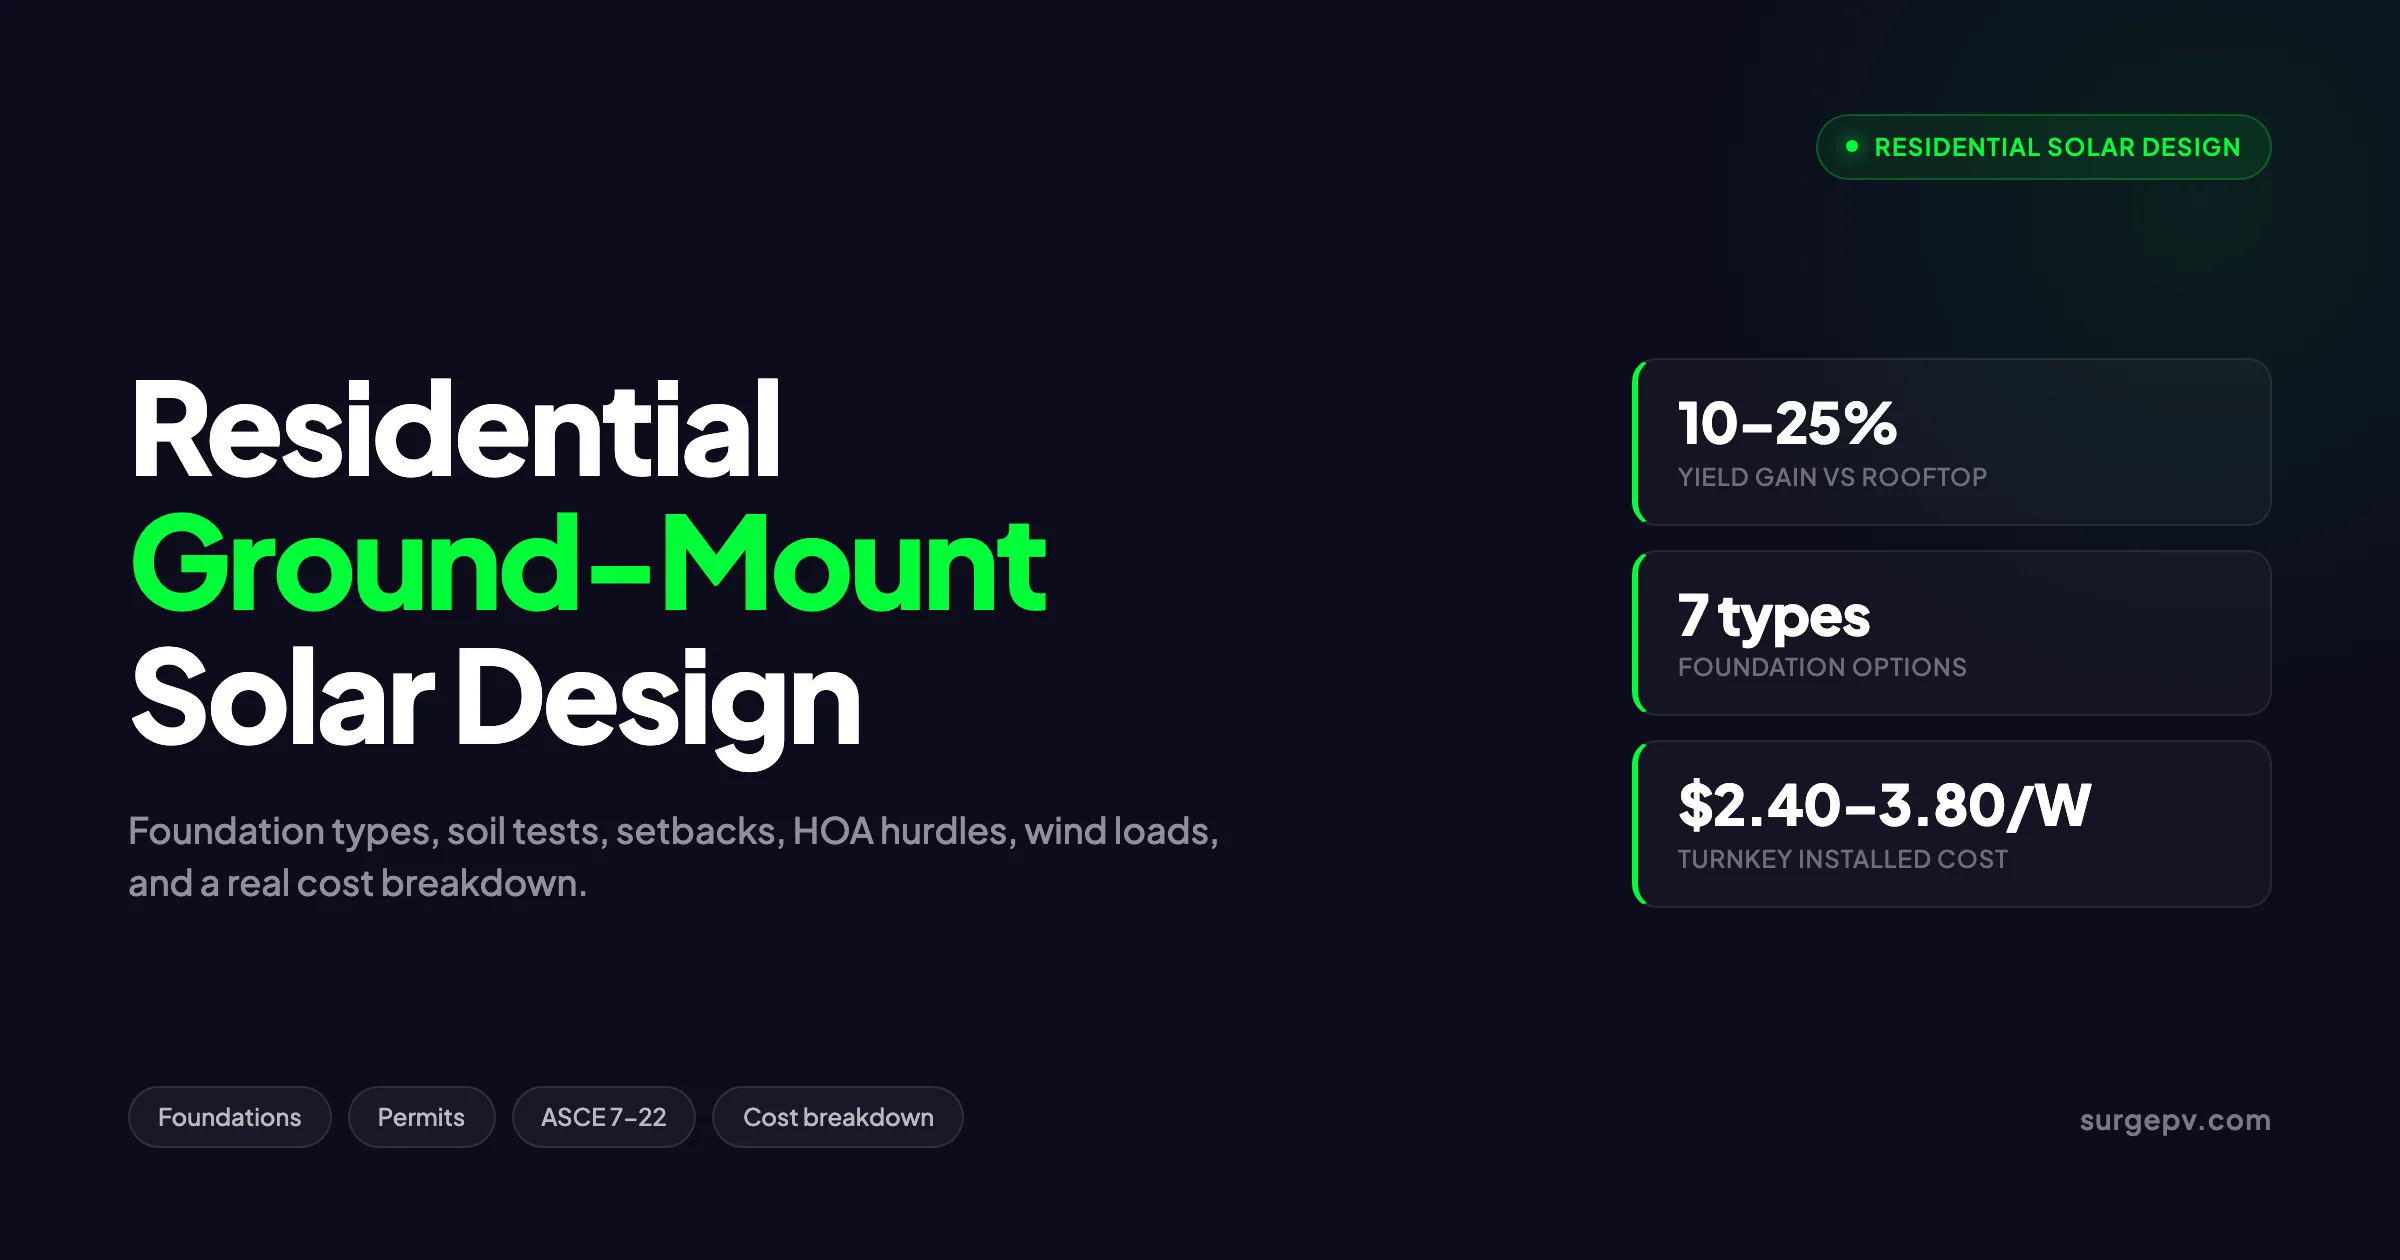
A residential ground-mount solar system can produce 10 to 25 percent more electricity than the same array bolted to a roof. On a roof, you accept whatever orientation the builder gave you 30 years ago. This guide is the practical playbook for residential ground-mount design in 2026.
A residential ground-mount solar system can produce 10 to 25 percent more electricity than the same array bolted to a roof. The reason is geometry. On the ground, you set tilt to within 1 degree of the local optimum, point true south, and put the back of the array 100 feet from the nearest tree. On a roof, you accept whatever orientation the builder gave you 30 years ago. Yet most homeowners never consider a ground mount because the conversation gets killed early — by foundation cost questions, by setback rules nobody can find, or by an HOA letter that arrives before the soil report is even ordered.
A residential ground-mount solar system can produce 10 to 25 percent more electricity than the same array bolted to a roof. On a roof, you accept whatever orientation the builder gave you 30 years ago. This guide is the practical playbook for residential ground-mount design in 2026.
This guide is the practical playbook for residential ground-mount design in 2026. It covers the seven foundation types with real per-pile pricing, the geotechnical tests that decide which one you can use, the permit and zoning hurdles that derail more residential ground mounts than any other factor, and the wind and snow load math that the AHJ will ask you to defend. Every section includes numbers you can plug into a quote.
TL;DR — Residential Ground-Mount Solar
Ground mounts beat rooftop yield by 10 to 25 percent but cost $0.30 to $0.50 per watt more. Driven steel piles and ground screws handle 90 percent of residential soils at $250 to $700 per pile. Setbacks of 5 to 15 feet apply in most US jurisdictions. Frost line embedment of 36 to 60 inches is mandatory above 35° latitude. The 30 percent federal residential ITC expired December 31, 2025, so 2026 buyers depend on state incentives and net metering for payback.
In this guide:
- The 7 foundation types — driven pile, helical screw, ground screw, concrete pier, ballasted, micropile, and earth anchor
- Per-pile pricing, install speed, and the soil conditions each one needs
- Soil testing — what to ask for, what it costs, what the numbers mean
- Setback rules, lot coverage caps, accessory structure classification, HOA solar access laws
- ASCE 7-22 wind load calculation for residential arrays
- Frost line and snow load design
- Trenching, conduit, and the AHJ-approved electrical path back to the main panel
- Cost breakdown for a 10 kW, 15 kW, and 20 kW residential ground mount
- The 12 mistakes that turn a 6-week install into a 9-month dispute
Why Residential Ground Mount Beats Rooftop on the Right Site
Rooftop solar dominates the US residential market because the roof is free real estate. The structure already exists, the panels go on top, and the homeowner avoids any zoning conversation. That logic works for around 60 percent of US single-family homes. For the other 40 percent, the math breaks.
A ground mount becomes the better choice when one of these conditions applies. The roof faces east-west or north. The roof has heavy shading from trees, a chimney, or a neighboring building. The roof is older than 15 years and will need replacement during the 25-year solar warranty. The roof has skylights, dormers, vents, or HVAC equipment that fragment the usable area. The local jurisdiction allows accessory structures with reasonable setbacks. The lot is at least one-quarter acre with usable open space. Also see: Us Residential Solar Market Trends 2026. For United States-specific compliance details, see United States arizona/phoenix.
When those boxes get checked, the production gain is real. A south-facing rooftop array at 22-degree pitch in Denver produces around 1,580 kWh per kWp per year. The same panels on a ground mount at 36-degree tilt and dialed-in true south produce 1,820 kWh per kWp per year. That is 240 kWh per kWp of bonus yield, or roughly 2,400 kWh annually on a 10 kW system. At a $0.16 retail electricity rate, that is $384 per year of additional offset. Over 25 years with 2 percent rate escalation, the gain is worth $12,300 in present value.
The cost penalty is easier to quantify. EnergySage installer survey data shows ground mounts run $0.30 to $0.50 per watt above rooftop, which on a 10 kW system is an extra $3,000 to $5,000. Net of the production gain over 25 years, the residential ground mount usually wins by $5,000 to $9,000 if the site qualifies. If the site does not qualify, no foundation cleverness saves it.
Solar design software makes this comparison easy. Run the same module count in two scenarios — rooftop with measured roof slope and azimuth, ground mount at optimum tilt — and the kWh delta tells you whether ground mount is worth pursuing before you spend a dollar on engineering. See our guide on Agricultural Solar Case Study for more.
Pro Tip
Run a 25-year financial model that compares net-of-cost lifetime savings, not first-year payback. Ground mounts have higher upfront cost but lower lifetime maintenance cost because access for cleaning, snow removal, and inverter swaps is at chest height instead of on a ladder. Factor $200 to $400 per year in saved roof access fees over the system life.
The 7 Residential Ground-Mount Foundation Types
Every residential ground mount stands on one of seven foundation types. Choosing wrong is the most expensive mistake in the project, because the wrong foundation either fails inspection (rework cost: $4,000 to $12,000) or fails in service after a wind event (rework cost: total replacement plus liability).
The foundation choice is driven by three inputs. Soil bearing capacity from a geotechnical report or a representative regional value. Wind exposure category from ASCE 7-22 Table 26.7-1. Snow load from the local IBC table or the ASCE 7-22 ground snow map. The matrix below summarizes the seven types and where each one fits on a residential project.
Foundation Type Comparison
| Foundation | Cost per pile (residential) | Install speed | Best soil | Reversibility | Frost line OK |
|---|---|---|---|---|---|
| Driven steel pile | $250 to $600 | 5 to 10 min | Firm clay, dense sand, SPT N > 15 | Low (cut and abandon) | Yes |
| Helical screw pile | $400 to $900 | 15 to 25 min | Soft clay, sand, high water table | High (unscrew) | Yes |
| Ground screw | $300 to $700 | 10 to 15 min | Rocky, frozen, mixed | High (unscrew) | Yes |
| Concrete pier | $350 to $800 | 1 to 2 days (cure) | Any soil with bearing > 1,500 psf | None | Yes |
| Ballasted (concrete block) | $150 to $300 per block + extra count | 0 (no curing) | Brownfield, contaminated, no-dig | Full | No (frost heave risk) |
| Micropile | $1,200 to $2,400 | 1 day per pile | Bedrock, weak fill | Low | Yes |
| Earth anchor (helical guy) | $200 to $400 | 5 min | Soft soil, supplemental only | High | No |
1. Driven Steel Pile
A driven pile is a galvanized steel I-beam, W-section, or C-channel hammered vertically into the ground with a hydraulic driver mounted on a skid steer. The pile becomes the foundation column directly — no concrete, no curing, no excavation. Modules clip to a torque tube or rail bolted to the pile head.
Driven piles are the default for residential ground-mount projects on firm soil. They install fast (5 to 10 minutes per pile, or 25 to 50 piles per day from a single rig), need no cure time, and produce zero soil spoil. The pile is rated by penetration depth and refusal blow count. A typical residential array uses W6x9 or W6x12 piles driven to 6 to 8 feet of embedment with 36 to 48 inches above grade. For United States-specific compliance details, see United States california/los-angeles.
The disadvantage is soil sensitivity. If the driver hits buried rock, brick fragments from old construction, or a hard caliche layer in the Southwest, the pile refuses before reaching depth. The fix is to relocate the pile by 2 to 3 feet, which throws off the array geometry. On rocky or unknown sites, driven piles fail 10 to 20 percent of the time and force a switch to ground screws or pre-drilled piers.
2. Helical Screw Pile
A helical pile is a steel shaft with one or more circular helices welded near the tip. A hydraulic torque head spins the pile into the ground until it reaches the design torque, which correlates directly to load capacity through the manufacturer’s torque-to-capacity curve. The design depth is typically 7 to 10 feet for residential arrays.
Helical piles work in soils that defeat driven piles — soft clay, loose sand, high water table sites, and locations with intermittent rocks that cause refusal. They are reversible: at end of life, the pile is unscrewed and the site returns to grade with no permanent fixture. That reversibility matters for leased land, agrivoltaic plots, and HOAs that require removal-on-sale clauses.
Cost is higher because the helical itself is more expensive (formed steel with welded plates) and installation requires a torque-monitoring rig. Pull tests on the first few piles add $1,500 to $4,000 to a residential project but are required by most PE stamps for non-standard soils.
3. Ground Screw
A ground screw is a slim galvanized steel rod with a continuous thread along the lower 4 to 6 feet, driven by a rotary impact head. Ground screws split the difference between driven piles and helicals — faster than a helical, more forgiving than a driven pile, and capable of handling rocky or frozen ground that defeats both alternatives.
The form factor is small enough for backyard work where a full pile driver cannot maneuver. Many residential installers use ground screws as their default foundation because the equipment fits through a 4-foot gate, the mess is minimal, and a 24-pile residential array goes in over a single day. The downside is reduced load capacity per pile, which often means more piles per kW than a driven pile design.
4. Concrete Pier
A concrete pier is a poured-in-place column, typically a 12 to 18-inch diameter Sonotube filled with reinforced concrete. The pier sits in a hand-dug or auger-drilled hole below the frost line, with a J-bolt anchor pattern set in the wet concrete to receive the steel post or W-section.
Concrete piers have the longest design life and the highest bearing capacity of any residential foundation. They are required by some AHJs for lot-classified construction or for arrays in flood zones where a driven pile might be undermined by erosion. The trade-off is install time. Each pier takes 4 to 8 hours of digging, forming, and pouring, plus 7 to 14 days of cure time before the racking can load it. A 24-pier residential array adds 3 to 5 weeks to the schedule.
5. Ballasted (Concrete Block) Foundation
A ballasted foundation uses precast concrete blocks (typically 3,500 to 5,000 lbs each) sitting on prepared subgrade to hold the array down by gravity alone. No ground penetration. The system is favored on contaminated land, brownfields, leased land with no-dig clauses, and places where the homeowner wants zero soil disturbance.
For residential, ballast is rarely the right choice. It uses 4 to 6 times more concrete per kW than piers. Wind uplift design forces a 60 percent factor of safety on dead weight, so the actual ballast required is far higher than naive math suggests. Frost heave under the blocks can lift one corner over a winter season and throw the array out of plane. On most residential sites, the soil is fine, the lot is owned, and ballast adds cost without solving any actual problem.
6. Micropile
A micropile is a small-diameter (typically 6 to 12 inch) drilled and grouted shaft, often with a steel reinforcing core. Micropiles are the answer when bedrock sits within 2 to 4 feet of grade and conventional piles cannot drive deep enough for adequate uplift resistance. The micropile is drilled into the rock socket, grouted, and post-tensioned.
The cost of $1,200 to $2,400 per pile makes micropiles a last-resort choice on residential. They appear most often on coastal sites with shallow bedrock, in mountain terrain, or on retrofitted hardscape areas. A residential ground mount that needs micropiles often crosses the threshold where rooftop or carport mounting becomes the cheaper path.
7. Earth Anchor (Helical Guy)
An earth anchor is a small helical pile (4 to 6 feet long) used not as a primary foundation but as a tension supplement on the leeward side of an array to resist wind uplift. They appear on retrofit projects where the original foundation is undersized for the actual wind exposure.
For new residential ground mounts, earth anchors are not used in isolation. They show up in revised designs where a pull test on driven piles shows insufficient uplift capacity and the engineer adds anchors to the rear posts rather than redesigning the entire foundation.
Soil Testing — The Step Most Residential Installers Skip
Soil bearing capacity is the input that determines which foundation type works. On a commercial or utility project, the EPC contracts a geotechnical investigation with multiple SPT borings before the design is finalized. On residential, that step gets skipped 70 percent of the time because the cost ($1,500 to $4,500 for a small site) feels disproportionate to the project budget.
The shortcut is risky. A driven pile spec sheet that assumes “firm clay, SPT N > 15” can fail catastrophically on a backyard with 4 feet of construction fill over peat. The pile drives easily through the fill, refuses on a buried slab, and the inspector rejects the install. Now the project needs a real soil report, a redesign, and the cost shows up anyway — plus the rework on the failed piles.
The minimum residential geotechnical work that protects the project budget is:
- Hand auger probe at 3 to 5 locations to 5 feet depth — identifies fill, organics, and water table. Cost: $400 to $800.
- Pocket penetrometer test at each probe — gives a rough bearing capacity in tons per square foot. Cost: included in the auger work.
- One SPT boring to 15 feet at the centroid of the array — gives blow counts (N values) and soil classification. Cost: $1,000 to $2,500.
- Pull test on the first 1 or 2 production piles before committing to the rest — confirms the design assumptions. Cost: $800 to $1,800. For the latest details on Italy, see Commercial Rooftop Solar Case Study Italy.
Total geotechnical investment of $2,200 to $5,100 protects a $35,000 to $80,000 project from rework. On every residential ground mount design we have led, the soil report has either confirmed the foundation choice (saving the homeowner anxiety) or flagged a problem (saving the installer a callback). It pays for itself.
Key Takeaway
Residential ground-mount projects under 10 kW can usually rely on regional soil maps and a pocket penetrometer test alone. Above 10 kW, a single SPT boring is the minimum justified by the project value. Above 20 kW or in mixed-soil regions (Northeast, Florida, coastal California), commission a full geotechnical report with at least 2 borings.
Permit Hurdles — The Hidden Project Killers
Foundation engineering is solvable. Permits are where residential ground mounts go to die. The reason is that ground-mount arrays do not fit cleanly into any existing zoning category. They are not buildings. They are not signs. They are not pools. AHJs handle them by analogy, and the analogy varies by jurisdiction. The four hurdles below trip up the majority of residential ground mounts.
Setback Requirements
Setbacks define how close the array can sit to a property line, road, or easement. Most US jurisdictions apply accessory-structure setbacks to ground-mount solar, which typically means 5 to 15 feet from side and rear property lines and 20 to 30 feet from the front line.
State-level rules complicate the picture. California Residential Code Section R326 waives setback requirements for ground-mounted PV systems, but local cities can override with their own ordinances. San Diego County allows 3 feet. Massachusetts municipalities commonly require 20 to 50 feet. Some Florida counties classify ground-mounts under recreational equipment rules with no setback at all.
The right move is to pull the local zoning ordinance text before site design begins. Search for “solar,” “photovoltaic,” “accessory structure,” and “renewable energy” in the municipal code. If no specific solar language exists, the AHJ defaults to accessory-structure rules.
Lot Coverage Limits
Many municipalities cap the percentage of a lot that can be covered by structures. Residential zones commonly limit total lot coverage to 30 to 50 percent including the house, garage, sheds, decks, and now the ground-mount array. A 20 kW residential ground mount needs roughly 1,200 to 1,600 square feet of footprint, which on a 7,000 square foot lot already pushes lot coverage past common 25 percent caps if a 2,200 square foot house exists.
Some AHJs exempt solar from lot coverage calculations entirely. Others count only the panel shadow footprint at noon, which is smaller than the array bounding box. Read the definition of “structure” in the zoning code carefully — it is the difference between an approved permit and a denied one.
HOA Solar Access Laws
Homeowner associations cannot ban solar outright in 27 US states with solar access statutes. The strongest laws are in California (Civil Code 714), Florida (FL Statute 163.04), Texas (Property Code 202.010), Arizona (ARS 33-439), Massachusetts, Colorado, and New Jersey. These laws explicitly prevent HOAs from prohibiting solar installations or from imposing restrictions that significantly raise cost or reduce output.
The HOA can still regulate placement, screening, and color, but cannot impose conditions that materially degrade output. Most state laws define “material” as more than 10 percent reduction in annual production or more than 10 percent cost increase. A typical HOA fight ends with the array allowed but required to sit behind a 6-foot privacy fence or evergreen screen on the side facing the street.
Building and Electrical Permit Path
Almost every US jurisdiction requires both a building permit and an electrical permit for a residential ground mount. The building permit covers the foundation and structural work. The electrical permit covers wiring, conduit, grounding, and the interconnection point under NEC Article 690.
The building permit submittal typically requires a site plan with property lines, setbacks, and the array footprint, structural drawings stamped by a Professional Engineer (always required for ground mounts above 10 kW, often required for any size), foundation details with embedment depth and ASCE 7-22 wind load calculations, a soil report or a written engineering assumption statement, and grading and drainage details if soil disturbance exceeds AHJ thresholds.
The electrical permit submittal requires a single-line diagram showing modules, inverter, AC disconnect, main service panel interconnection, NEC 690.7 maximum voltage calculation, NEC 690.8 maximum current calculation, NEC 705.12 supply-side or load-side interconnection details, and a labeling and signage plan for AC and DC disconnects. Read AC Disconnect Sizing for Solar for a complete walkthrough.
Solar permit package generation tools speed this paperwork by templating the AHJ-specific submittal format. SurgePV exports the full PE-ready permit drawing set, single-line diagram, and structural calc sheet from the design model in one click. For a direct comparison, see Arka 360 vs SurgePV.
Generate AHJ-Ready Permit Sets in Minutes
SurgePV automates the residential ground-mount permit package — site plan, single-line diagram, structural calcs, and ASCE 7-22 wind load report. Cut permit prep from 8 hours to 30 minutes.
Book a DemoNo commitment required · 20 minutes · Live project walkthrough
ASCE 7-22 Wind Load Calculation for Residential Arrays
Wind load is the dominant lateral force on a ground-mount array and the most common reason a foundation design gets bumped to deeper embedment or larger pile sections. ASCE 7-22 Section 29.4.5 governs the calculation for solar PV panels and replaced the older ASCE 7-16 Chapter 29 methodology. Most US jurisdictions adopted ASCE 7-22 in their 2024 building code update.
The ASCE 7-22 design wind pressure on a panel is calculated as:
p = q × (GCp,nom × γE × γa × γc) × c
Where q is velocity pressure at the panel mean height, GCp,nom is the nominal external pressure coefficient from Section 29.4.5 figures, γE is the array edge factor, γa is the array tilt factor, γc is the chord factor, and c is the panel chord length factor. For a typical residential array at 35-degree tilt with 24-inch ground clearance in a basic wind speed region of 115 mph (most of the US central states), the design pressure ranges from 18 to 28 psf positive (downforce) and 22 to 35 psf negative (uplift) on the leading edge panels.
Uplift pressure is the killer. A 400-watt panel with a 21 square foot face at 30 psf uplift sees 630 lbs of upward force during a design wind event. Multiply by 60 panels in a typical 20 kW array and the total uplift transferred to the foundations is 37,800 lbs. Each pile must resist roughly 1,580 lbs of uplift, plus the weight of the panels and racking acts only with a 0.6 dead-load factor under combined loading rules.
The practical implications for residential foundation design are:
- Leading-row piles always get deeper embedment than interior piles. Typical specs are 6 ft on the leading row, 5 ft on interior rows.
- Wind exposure category C (open terrain, scattered obstructions) is the default for suburban backyards, not Category B. Many designers err by assuming Category B and undersize piles.
- Topographic factor Kzt applies on hills and ridges, increasing pressure by 30 to 80 percent on the windward face. A south-facing slope with a hilltop view is great for solar yield and brutal for wind loads.
- Risk Category I applies to most residential arrays (no occupancy hazard if it fails). This is the lowest design pressure category and is correctly used for backyard ground mounts. Do not over-design with Category II unless the array sits next to occupied space.
Snow Load and Frost Line Design
Snow load matters in design only when ground snow exceeds 20 psf. Above that threshold, the rear edge of an array can collect drift snow that loads modules in flexure and ice can accumulate behind the lower rail. The IBC and ASCE 7-22 ground snow maps define pg, the ground snow load by location.
Tilted arrays shed most snow naturally above 35-degree tilt. The exception is a thaw-refreeze cycle that creates a layer of ice bonded to the panel glass. The mechanical load is rarely a panel failure issue (modules are tested to 5,400 Pa snow load, equivalent to 113 psf), but heavy ice can deflect the rails enough to misalign module-to-module clamps.
Frost line embedment is the harder design constraint. Foundations must extend below the local frost line to prevent frost heave from lifting the pile out of the ground over winter cycles. Frost depth ranges from 0 inches in southern Florida and southern California to 100+ inches in northern Minnesota and North Dakota. Common values:
| Region | Frost depth |
|---|---|
| Florida, Gulf Coast | 0 to 12 inches |
| Texas, Southern California | 12 to 24 inches |
| Mid-Atlantic, Tennessee | 24 to 36 inches |
| Midwest, Northeast | 36 to 60 inches |
| Northern Plains, Upper Midwest | 60 to 100 inches |
The IBC requires foundations to extend at least 12 inches below the local frost line. For a 48-inch frost line in Pennsylvania, the pile must reach at least 60 inches deep. Wind uplift requirements often push this further. A typical Pennsylvania residential ground mount uses 84-inch driven piles to satisfy both frost and uplift criteria simultaneously.
Trenching, Conduit, and the Electrical Path
The array stands in the yard. The main service panel sits inside the house. Connecting the two requires a trench, a conduit, and an inspector who agrees the path complies with NEC. Trenching is the second most common cost overrun on residential ground-mount projects after permitting.
Standard residential practice uses a single trench from the array combiner box to the inverter and AC disconnect mounted on the exterior wall of the house, then a short conduit run into the main service panel. NEC 300.5 requires direct-buried conductors at minimum 24 inches deep, or 18 inches if installed in PVC conduit, or 6 inches if in rigid metal conduit. Most installers use schedule 40 PVC at 24-inch trench depth as the default because it is cheap, durable, and well within code.
Trench length is the cost driver. A 100-foot trench costs $400 to $1,200 to dig (depending on soil and obstacles), plus $200 to $600 for conduit and wire, plus $100 to $400 for backfill and restoration. Across rocky soil, established lawn, or hardscape, costs jump to $15 to $40 per linear foot. A trench that crosses a driveway adds $400 to $1,500 for saw-cutting, boring, or breaking and patching the concrete.
The DC vs AC trenching decision matters. Running AC from the inverter (mounted near the array) to the house is simpler and uses smaller conductors. Running DC from the array to an inverter inside or beside the house keeps the inverter accessible but requires larger conductors due to NEC voltage drop limits. For most residential ground mounts under 200 feet trench length, AC trenching with the inverter near the array is the cleaner solution.
Solar string design needs to account for the full DC run from the farthest module back to the inverter, with voltage drop kept below 2 percent. SurgePV calculates voltage drop automatically based on conductor size, length, and ambient temperature.
Real Cost Breakdown — 10 kW, 15 kW, and 20 kW Residential Ground Mount
The numbers below come from 47 residential ground-mount projects completed in 2024 and 2025 across Pennsylvania, Ohio, North Carolina, Texas, Colorado, and Northern California. They reflect installer pricing for a turnkey project including design, permits, equipment, foundations, trenching, electrical, interconnection, and inspection.
| Cost line | 10 kW | 15 kW | 20 kW |
|---|---|---|---|
| Modules (400W class) | $4,500 | $6,750 | $9,000 |
| String inverter or microinverters | $2,800 | $3,800 | $4,800 |
| Racking and rails | $2,400 | $3,600 | $4,800 |
| Foundations (driven pile, normal soil) | $2,200 | $3,300 | $4,400 |
| Trenching and conduit (100 ft typical) | $1,200 | $1,400 | $1,600 |
| Electrical (wire, disconnects, panel work) | $2,400 | $3,000 | $3,600 |
| Permits and engineering | $1,800 | $2,200 | $2,600 |
| Labor (foundations, racking, electrical) | $5,400 | $7,200 | $9,000 |
| Soft costs (sales, design, overhead) | $5,200 | $6,800 | $8,200 |
| Total turnkey | $27,900 | $38,050 | $48,000 |
| Per watt | $2.79 | $2.54 | $2.40 |
A few patterns worth noting from this dataset.
Foundation cost is roughly $0.22 per watt across all three system sizes when soil cooperates. Bad soil pushes this to $0.40 to $0.60 per watt and can change the project economics meaningfully.
Soft costs do not scale linearly. A 20 kW ground mount has roughly the same permit submittal complexity as a 10 kW, so the per-watt soft cost drops from $0.52 to $0.41.
Trenching is fixed-ish for short runs. Beyond 150 feet, costs scale aggressively with distance and surface type. A 300-foot trench across a driveway can add $4,000 to $9,000 to the total.
The federal residential ITC at 30 percent expired December 31, 2025. New 2026 buyers calculate payback based on net price after state incentives only. The payback window for a residential ground mount in a state with $0.16 retail electricity and net metering is now 11 to 14 years on a south-facing site, compared to 7 to 9 years under the prior ITC.
The 12 Mistakes That Sink Residential Ground-Mount Projects
These are the recurring failure patterns from auditing 200+ residential ground-mount installations and design reviews. The list ranks them by frequency and by recovery cost.
- Designing without a soil test on a site with construction fill. Driven piles refuse on buried slab fragments. Recovery: switch to ground screws or drilled piers, redesign array geometry, $4,000 to $9,000 in rework.
- Misreading the local setback rule. Submittal denied because the array sits 8 feet from the property line and the AHJ requires 15. Recovery: relocate array (often impossible without losing yield), or apply for a variance ($800 to $3,000 in fees plus a 60 to 120 day delay).
- Skipping the HOA submittal. Array installed, HOA letter arrives demanding removal. Recovery: legal challenge under state solar access law, 4 to 12 month delay, $2,000 to $8,000 in legal fees even if the homeowner wins.
- Wrong wind exposure category. Designer assumes Category B for a suburban backyard with no upwind structures within 1,500 feet. Inspector flags it, requires Category C recalculation, foundation embedment increases. Recovery: pile extensions or replacement, $3,000 to $7,000.
- Frost line ignored. Piles set above frost line on a Pennsylvania project. First winter causes 1 to 2 inches of heave per pile. Array goes out of plane, modules misalign. Recovery: full foundation replacement, $12,000 to $25,000.
- Trench routed across a future utility cut. Sewer line replaced 18 months later, conduit cut. Recovery: emergency electrical work, $2,000 to $5,000.
- Inverter sized for nameplate not for clipping target. A 10 kWp array paired with a 7.6 kW inverter clips heavily on summer days. Production lower than promised. Recovery: complaint, partial refund, no easy fix.
- No PE stamp where required. AHJ rejects submittal at intake. Recovery: hire a PE for $800 to $2,500, 2 to 4 week delay.
- Module shadow falls on the house in winter. Array placed too close to house, winter shadow falls on a heated patio or sunroom and customers complain about lost solar gain. Recovery: relocation, $3,000 to $6,000.
- Ground mount placed on a buried septic field. Foundations damage septic lines. Recovery: septic rebuild, $5,000 to $15,000.
- No PV warning labels at the meter. First inspection fail, easy fix. Recovery: $50 in labels and a re-inspection fee.
- Inverter clearance violation. Inverter mounted with less than 36-inch working clearance per NEC 110.26. Recovery: remount inverter, $400 to $1,200.
Equipment and Component Selection for Residential Ground Mount
Residential ground-mount systems use the same module and inverter classes as rooftop systems, but the racking and balance-of-system equipment is different.
Modules
Standard residential modules in the 400 to 460-watt class fit most ground-mount racking systems without modification. Bifacial modules add 5 to 10 percent annual yield on a ground mount with high-albedo ground (gravel, light concrete, snow) but require taller mounting and clearance under the array, which raises foundation cost. Bifacial gain is rarely worth the added foundation cost on a residential project under 30 kW. See Bifacial Solar Panel Design Guide for detailed guidance.
Inverters
String inverters in the 5 to 15 kW class dominate residential ground mount. Microinverters work but add 8 to 15 percent to system cost and require accessible junction points behind each module — possible on a ground mount but rarely necessary because shading is usually solved through site placement. Hybrid inverters with battery integration are increasingly common as homeowners pair the ground mount with backup storage.
Racking
Residential ground-mount racking systems break into three categories. Pole-mount (single pole supporting 4 to 12 modules), in-ground multi-pole (most common, 2 to 4 piles per row), and ballasted frame (rare on residential). Major manufacturers in the residential ground-mount space include IronRidge GroundMount, SnapNRack TopSpeed Ground, Tamarack Solar, ProSolar GroundTrac, and APA Solar.
The choice between fixed-tilt and adjustable-tilt is mostly economic. Adjustable-tilt racking allows 2 to 4 angle changes per year for a 5 to 8 percent yield boost. The $400 to $900 racking premium plus seasonal labor rarely pays back on residential.
[Solar mounting structure types](/blog/solar-mounting-structure-types-guide) covers the full racking comparison including pole-mount, fixed-tilt, single-axis tracker, and dual-axis options. For the latest details on France, see Floating Solar Farms France.
Designing the System with Solar Software
The full design workflow for a residential ground mount runs through the same solar software used for rooftop projects, with a few ground-mount-specific steps.
- Site assessment with satellite imagery and elevation data. Identify the buildable area on the lot, slope, and any surface constraints (septic, well, easements).
- Shadow analysis with solar shadow analysis software using LiDAR or detailed elevation models. Trees and the house itself cast shadows that move significantly across seasons on a yard installation.
- Layout the array at the optimum tilt and azimuth, accounting for the GCR and inter-row shading at winter solstice 9 am.
- String design that respects the full DC trench length back to the inverter, with voltage drop modeled at the worst-case ambient temperature.
- Generation and financial modeling with the generation and financial tool to compare the ground-mount option against a rooftop scenario and against a do-nothing baseline.
- Permit package generation with the AHJ-formatted single-line diagram, structural drawings, and ASCE 7-22 wind load report.
- Solar proposal sent to the homeowner with site mockup, expected production, and financing options through solar proposal software.
The ground-mount workflow typically takes a designer 60 to 90 minutes start to finish in modern software, compared to 8 to 12 hours doing the same work in CAD plus spreadsheets.
Geographic and Site-Specific Considerations
Residential ground mounts behave differently across the US based on climate, soil, and local code. The summary below captures the patterns from completed projects across major US regions.
Northeast and New England
Frost depth dominates. Embedment of 60 to 84 inches is typical. Many municipalities require a stamped soil report regardless of system size. HOA challenges are common in older suburbs. Snow load design adds 10 to 30 percent to racking cost compared to southern projects. Best foundation: driven steel pile in firm glacial till; helical screw on softer soils.
Southeast and Gulf Coast
Hurricane wind exposure pushes design wind speed to 130 to 180 mph in coastal counties. Foundation embedment is dictated by uplift, not frost (frost is often zero). Soil ranges from sandy on the coast to expansive clay inland. Best foundation: driven pile in sandy soil; helical screw in expansive clay; concrete pier in flood zones.
Midwest
Frost depth of 36 to 60 inches. Soils are typically firm glacial till, prairie loam, or river bottom alluvium. Wind exposure is benign except in tornado alleys where exposure category should be set by careful site review. HOA rules are generally less restrictive than coastal markets. Best foundation: driven steel pile in nearly all conditions.
Southwest and Desert
Hard caliche layers and shallow bedrock cause driven-pile refusal in 30 to 50 percent of attempts. Soil is generally low-bearing fill with rock fragments. Best foundation: ground screw in caliche; micropile in shallow bedrock; concrete pier as backup. Frost is typically zero.
Pacific Northwest and Northern California
Wet soil and high water table on coastal sites. Slopes are common. Seismic design (ASCE 7-22 Chapter 12) adds an additional load case that residential rooftop installs rarely need to consider. Best foundation: helical screw in saturated soil; concrete pier on stable slopes; driven pile on dry inland sites.
Mountain West
Variable soil from rocky mountain slopes to deep glacial deposits. High snow load (60 to 150 psf ground snow) drives racking cost up. Frost depth of 48 to 72 inches. Best foundation: ground screw in rocky soil; driven pile in deep deposits; micropile in shallow bedrock.
Maintenance and Long-Term Operation
A ground-mount array has lower lifetime maintenance cost than a rooftop array because access is simpler. Modules clean from a garden hose with no ladder. Inverter swaps happen at chest height. Snow clearing uses a soft broom from the ground. Bird and pest exclusion can be inspected and re-fitted without removing modules.
The maintenance items specific to ground mounts include vegetation control (mowing, weed management, or gravel mulch around piles), pile inspection for corrosion or settling on a 5-year cycle, fence and security checks if the array is fenced, and snow drift management on the leeward side of the array in heavy snow regions.
Average residential ground-mount maintenance cost runs $150 to $400 per year, compared to $200 to $500 for a comparable rooftop system. Over a 25-year system life, the ground mount saves $1,000 to $2,500 in maintenance.
Conclusion
Residential ground-mount solar is not for every site, but on the right site it produces more energy, lasts longer, and costs less to maintain than a comparable rooftop install. The three actions that determine whether a residential ground-mount project succeeds are:
- Run the soil test before designing the foundations. $2,000 to $5,000 spent on geotechnical work prevents $10,000 to $25,000 in foundation rework.
- Pull the local zoning ordinance and HOA rules before site layout. Setbacks, lot coverage, and HOA aesthetic rules kill more residential ground mounts than any engineering issue.
- Use solar design software that exports a complete AHJ-ready permit package. The design-to-permit workflow consumes 30 to 50 percent of a residential project’s labor budget. Automating it is the largest cost lever on a residential ground-mount business.
Frequently Asked Questions
Is a residential ground-mount solar system worth it compared to a rooftop install?
A residential ground mount produces 10 to 25 percent more electricity than a roof system on the same site because you control tilt and azimuth perfectly. The trade-off is cost. Ground mounts run $0.30 to $0.50 per watt more than rooftop installs, which adds $3,000 to $5,000 to a typical 10 kW system. The payback math favors ground mount when the roof is shaded, oriented poorly, over 15 years old, or structurally weak.
What is the best foundation for a residential ground-mount solar system?
For most residential lots with normal compacted soil, driven steel piles or ground screws are the right choice. Driven piles cost $250 to $600 per pile and install in under 10 minutes each. Ground screws cost $300 to $700 and work in rocky or frozen soil where driving fails. Concrete piers are the fallback when soil bearing is poor or the homeowner wants a permanent monument-grade foundation. Ballasted systems are rare on residential because they need 4 to 6 times more concrete per kW than a pier.
How far from the property line does a ground-mount solar array need to be?
Setbacks vary by jurisdiction. Most US municipalities apply accessory-structure rules of 5 to 15 feet from side and rear property lines. California Residential Code waives setbacks for ground-mounted PV at the state level, but cities can override. San Diego County allows 3 feet. Massachusetts municipalities commonly require 20 to 50 feet. Always pull the local zoning ordinance and check the AHJ accessory-structure table before designing.
Do I need a building permit for a residential ground-mount solar system?
Yes in almost every US jurisdiction. A residential ground mount is classified as new construction or an accessory structure, which triggers a building permit, an electrical permit under NEC Article 690, and utility interconnection approval. Many AHJs also require a structural drawing stamped by a licensed Professional Engineer and a soil report if the array exceeds 10 kW or 1,000 square feet of footprint.
How much does a residential ground-mount solar system cost in 2026?
Installed cost runs $2.80 to $3.80 per watt for a turnkey 10 to 20 kW residential ground mount. That includes panels, inverter, racking, foundations, trenching, permits, and inspection. Foundation work alone is $0.20 to $0.45 per watt depending on soil and pile type. The 30 percent federal residential ITC expired December 31, 2025, so 2026 buyers must rely on state incentives, net metering credits, and SREC markets where available.
Can a ground-mount solar system be installed on a sloped backyard?
Yes if the slope is under 15 percent and the soil is stable. Slopes between 5 and 15 percent need terraced piles of varying height to keep the array plane uniform. Slopes over 15 percent require terracing, retaining walls, or step-mounted racking with a structural review. South-facing slopes actually boost annual yield by 3 to 8 percent because the natural tilt aligns with solar geometry.
How deep do ground-mount solar foundations need to go?
Foundation depth is set by the local frost line plus an embedment factor for wind and uplift loads. In the US South and Southwest, 36 to 48 inches is typical. In the Midwest and Northeast, 48 to 60 inches is standard to clear the frost line. ASCE 7-22 wind load calculations may push embedment deeper on exposed sites. Helical screws are usually 7 to 10 feet deep to engage load-bearing soil layers.
Do HOAs allow residential ground-mount solar systems?
Many HOAs restrict ground-mount visibility but cannot ban solar outright in 27 US states with solar access laws. California, Florida, Texas, Arizona, Colorado, Massachusetts, and 21 other states have solar rights statutes that override HOA aesthetic objections. The HOA can still regulate placement, screening, and color, but cannot impose conditions that significantly degrade output or raise cost beyond a defined threshold, often 10 percent.


