Quick Answer
The wrong solar design software doesn't announce itself during the sales demo. The goal is to give you a decision process that works regardless of which solar software you evaluate. A 10% simulation error on a 200 kWp C&I system means roughly 20,000 kWh missing from the annual generation figure.
A yield simulation that comes in 15% too optimistic can look like a sales win — until the system is commissioned and the customer starts tracking generation against the proposal. Post-install disputes are expensive: remediation costs, goodwill credits, and the referral business that never comes. The wrong solar design software doesn’t announce itself during the sales demo. It shows up in per-project credit overruns, proposals that have to be rebuilt from scratch when the scope changes, and new hires who are still unproductive two weeks in.
This is a structured checklist, not a ranked list of products. By the end, you will have a 10-point scoring framework, a 20-minute demo script you can use on any platform, and a way to calculate the true loaded cost of the tool you are considering. The goal is to give you a decision process that works regardless of which solar software you evaluate.
TL;DR — The Short Answer
The right solar design software depends on three things: your project mix (residential vs. C&I), your team size, and your per-project cost tolerance. A tool that cuts design-to-proposal time by 40 minutes per project recovers its subscription cost in under a week for a team doing 20+ projects a month. This guide gives you a 10-point checklist and a 20-minute demo script to make the decision with numbers, not marketing copy.
What you will learn in this guide:
- How to match software capabilities to your actual project mix — residential, C&I, or both
- The true loaded cost of solar design software (subscription + per-project credits + onboarding time)
- A 10-point feature checklist covering design, simulation, and proposal workflow
- How to run a focused 20-minute demo that exposes a tool’s real weaknesses
- Red flags that signal a platform is wrong for your business size or project type
- What simulation accuracy standards matter for bankable C&I yield reports
To choose solar design software, evaluate five factors in order: (1) project type fit — residential speed vs. C&I simulation depth; (2) design accuracy — 3D shading geometry, not estimate-based; (3) workflow integration — design, yield simulation, and proposals in one tool; (4) pricing model — per-project credits vs. flat subscription; (5) onboarding time — a new hire should complete a real design within one working day.
Why the Wrong Software Costs More Than the Subscription Fee
The advertised price is the most visible number in any software decision, and it is almost always the least relevant one. Installers who switch platforms mid-year consistently cite the same lesson: the subscription fee was a rounding error compared to what the wrong tool actually cost them.
There are four hidden cost categories that do not appear on any vendor pricing page. The first is per-project credit overruns. Some platforms charge per design or per revision, which means every scope change, panel layout iteration, or financing option comparison generates a new charge. A complex C&I job with eight design rounds can accumulate credit costs that exceed the monthly base fee before a proposal is even sent. The second category is yield simulation error. A 10% simulation error on a 200 kWp C&I system means roughly 20,000 kWh missing from the annual generation figure. That is not a rounding issue — it is the difference between a project that pencils for a commercial buyer and one that does not. When the system underperforms, the dispute lands on the installer. For France-specific information, see Agricultural Solar Case Study.
The third hidden cost is proposal rework from disconnected tools. When design lives in one application, yield simulation in another, and proposals in a third, every scope change triggers updates across all three. A single panel count revision that takes two minutes in an integrated workspace can take 45 minutes across three separate tools with manual data re-entry at each handoff. At 30 projects a month, that gap compounds quickly. The fourth category is team onboarding time. A platform that takes two weeks for a new hire to become productive is not just a training cost — it is two weeks of reduced output, elevated error rates, and supervisor time spent reviewing work that should be self-sufficient.
| Hidden cost category | Example scenario | Estimated impact |
|---|---|---|
| Per-project credit overruns | 8 design revisions on one C&I job | $80–$240 extra |
| Yield simulation error | System undersized by 12% on 200 kWp job | Customer dispute + remediation |
| Proposal rework | Switching tools mid-deal | 2–3 hours per proposal |
| Team onboarding | New hire unproductive for 2 weeks | ~$1,500 in unbilled time |
| Software switching cost | Migrating mid-year | Lost project history + retraining |
Put the design time gap in concrete terms: 45 minutes per design vs. 12 minutes per design, multiplied by 30 projects a month, equals 16.5 hours per month difference — roughly half a working week, every month. That is not a feature comparison. That is a staffing decision. For France-specific information, see Floating Solar Farms France. For France-specific information, see France Solar Feed-in Tariffs.
Software switching itself has a cost that often gets ignored when an installer decides to move platforms. Project history does not migrate cleanly between tools. Team members who have built muscle memory on one workflow need retraining. Active projects in progress get stranded in an old system. The sunk cost of the switch is real, which is why the first decision deserves more rigour than a 30-minute vendor demo with a pre-loaded ideal project.
Pro Tip
Before your next software demo, pull three recent projects — one straightforward residential, one complex rooftop, one C&I. Use these as test cases. A platform that handles all three in its demo environment tells you far more than a scripted walkthrough on ideal geometry.
The right starting point is not “which tool is most popular” or “which tool has the most features.” It is shadow analysis accuracy for your project type, workflow continuity from design to proposal, and a pricing model that does not punish iteration. Start there.
Step 1 — Define Your Project Mix Before Looking at Any Feature
Every solar design platform makes trade-offs. Platforms optimised for residential volume prioritise speed: fast roof tracing, auto panel placement, and consumer-ready proposals. Platforms built for C&I or EPC work prioritise accuracy: bankable yield simulations, detailed shading geometry, and financial outputs that hold up to lender scrutiny. A tool that excels at one rarely excels at both. Defining your project mix before you open any demo is the most important step in this process.
Solo Installer or Small Team (1–5 People)
Speed is the primary value driver for a solo installer or a small team. The platform needs to take a new address from satellite imagery to a complete proposal without requiring specialist knowledge at each step. Fast roof tracing that auto-detects facets, automatic panel placement with setback logic, and one-click proposal generation are table stakes. The pricing model matters enormously at this scale: a flat monthly subscription with unlimited designs allows iteration without anxiety. Per-project credit pricing at low volume can appear affordable — until a single complex job with multiple revisions consumes a month’s budget.
The red flag to watch for: any platform that requires a desktop install and three hours of setup before producing a first design. At solo or small-team scale, the tool needs to work from a browser on day one. Another red flag is a support model built around business hours only — a small team does not have a backup when the platform has issues during a customer meeting.
Growing Residential Company (6–30 People)
At this scale, consistency matters as much as speed. Designs produced by your most experienced designer and your newest hire need to look the same and be based on the same underlying simulation logic. That requires a multi-user cloud platform with role separation — sales reps who can open and present designs without being able to alter simulation parameters, designers who can work on projects without touching financial models, and managers who can see all active projects without logging in as individual users.
For more details, see our guide on agrivoltaics systems guide. See Agrivoltaics Design for detailed guidance.
CRM integration becomes relevant here. When a design is qualified, it should push directly to your pipeline without manual re-entry. Proposal quality starts affecting close rates in a meaningful way at this scale — a branded, well-structured proposal with 3D visuals and a clear financial summary outperforms a generic PDF in competitive markets. The platform’s proposal output should be something your sales team is proud to send.
C&I-Focused or EPC Team
For teams regularly quoting commercial and industrial projects, simulation accuracy is not optional — it is the product. C&I buyers and their lenders evaluate yield reports critically. A simulation based on simple monthly irradiance averages or a rule-of-thumb performance ratio is not bankable. The platform needs hourly TMY simulation with a full loss cascade, 3D obstruction shading for complex flat roofs with HVAC equipment and parapets, and P50/P90 output that a lender’s technical advisor will accept.
For more details, see our guide on P50 and P90 energy yield explained.
Financial modeling for C&I is structurally different from residential. Demand charge reduction, time-of-use (TOU) rate optimization, and off-take agreement structures all need to be modeled in the same workspace as the energy yield. If the financial model lives in a separate spreadsheet, every scope change means parallel updates with version risk.
Before evaluating any platform, complete this self-assessment:
□ I know my residential:C&I project split (e.g., 80/20)
□ I know my average monthly design volume
□ I know whether my C&I clients or lenders request yield reports
□ I know how many people on my team will use the tool daily
□ I know whether I need multi-office or multi-country access
If you cannot answer all five, do that work first. Every feature comparison is meaningless without this context.
The 10-Point Feature Checklist for Solar Design Software
Work through each item in a live demo. Score pass or fail on each. A tool that scores 7 or below deserves a second look before you commit.
1. 3D Design Accuracy — Roof Geometry and Module Layout
True 3D rooftop tracing means each roof facet has its own tilt and azimuth — not a single global assumption applied to the entire roof. On a hip roof with four facets at different orientations, a platform that assigns one average tilt and azimuth is not doing 3D design. It is applying a correction factor to a 2D calculation and calling it 3D. That error propagates into the yield simulation and the financial model. Module auto-placement needs to respect local setback rules, ridge lines, and obstruction boundaries — not just pack panels onto a flat plane and let the designer manually correct the layout. For Global-specific compliance details, see Global net-metering-by-country.
The 3D model also determines how accurately the platform can calculate inter-row shading on flat commercial roofs and cast shading from obstructions like chimneys, dormers, and adjacent buildings. A preview pane that shows a three-dimensional visualisation while running a two-dimensional single-tilt calculation behind it is the most common form of false confidence in residential solar software.
Demo question: “Trace this address. Show the module layout with per-facet tilt and azimuth values in under 5 minutes.”
Red flag: The 3D preview pane is cosmetic — shading calculation uses a single tilt/azimuth for the whole roof.
2. Shading and Irradiance Analysis
Physics-based obstruction shading uses the 3D geometry of the model to calculate hourly shade on each module string — it is not a derate slider applied uniformly across the array. The difference matters on east-west rooftops with chimneys, on flat commercial roofs with HVAC equipment, and on any project where one string’s shading affects an entire inverter input. A platform using a single annual shading derate systematically underestimates shade losses in the morning and afternoon and overestimates midday production, which skews the annual yield figure optimistically on the kinds of rooftops where shade is most relevant.
Irradiance data source matters. Hourly irradiance from validated datasets (PVGIS, Solargis, or NASA POWER) produces a different result from monthly averages interpolated into hourly profiles. The validation history of the irradiance dataset — how closely it tracks historical metered PV output in your region — is a question worth asking directly.
Demo question: “Add a chimney to this design. Show how it affects yield on the adjacent string at 3 PM in December.”
Red flag: Shading is a single annual percentage derate with no hourly geometry calculation. Learn more about what accurate solar shadow analysis software looks like in practice.
3. String Sizing and Electrical Design
Automatic string sizing needs to go beyond a simple module count recommendation. It should check inverter compatibility by model, calculate Voc and Vmp at temperature extremes (using actual module temperature coefficients from the datasheet), flag mismatches before they reach the permit package, and generate a bill of materials automatically. Manual string sizing done outside the design environment is an error-prone step that slows down designs and introduces version inconsistency when module or inverter selections change. See Inverter Selection Solar Design Guide for detailed guidance.
A related consideration: how does the platform handle DC/AC ratio optimization? Some projects benefit from higher DC/AC ratios for economic reasons, and the platform should let the designer evaluate this without rebuilding the design from scratch. BOM generation should pull directly from the design — not from a separate manual entry process that creates a second version of the project data.
Demo question: “Change the inverter model to a different manufacturer. Show how string sizing updates automatically and whether any mismatches are flagged.”
Red flag: String sizing is a separate manual step that does not update when the design changes.
4. Energy Yield Simulation
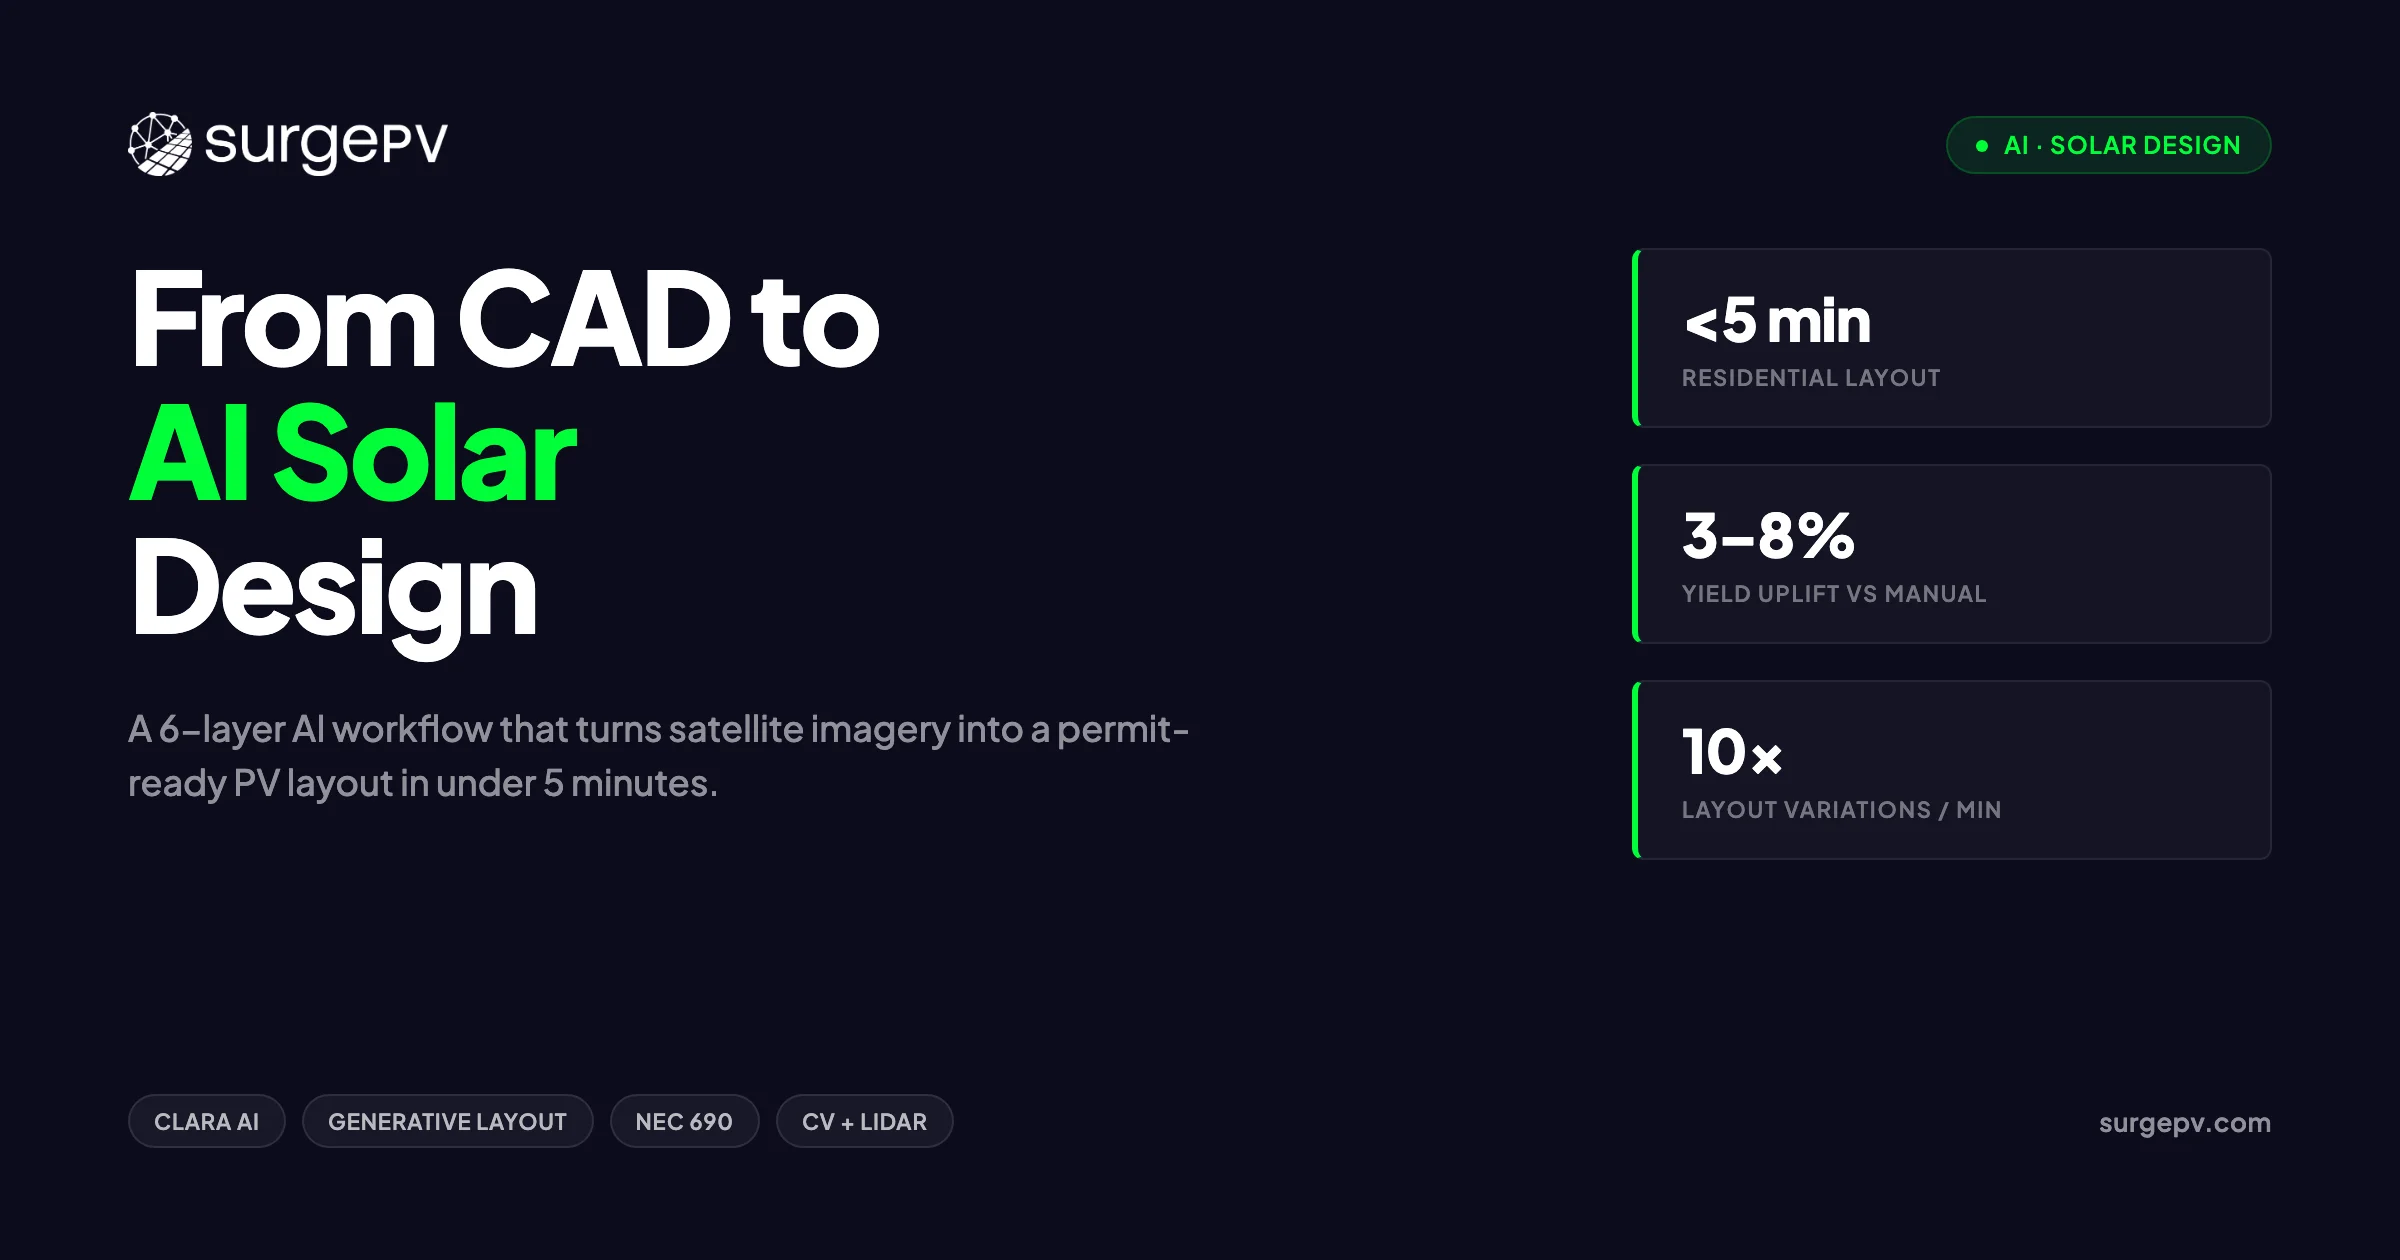
The distinction between a monthly simulation and a full hourly simulation is not technical detail — it is the difference between a number that holds up and one that does not. Monthly irradiance averaged across each month and multiplied by system efficiency misses diurnal variation, temperature effects that peak in summer afternoons, and the interaction between shading and specific hours of the day. A full hourly simulation using TMY (Typical Meteorological Year) data runs 8,760 calculations per year, applies temperature and irradiance-dependent efficiency curves from the actual module datasheet, and produces a loss cascade that shows exactly where energy is being lost and why.
For residential work, the annual kWh figure is the primary output. For C&I, lenders and off-takers require P50 and P90 yield estimates — the production level exceeded 50% or 90% of years respectively. P90 is the bankable floor: a lender providing project finance needs to know that in 9 out of 10 years, the system will produce enough to service the debt. A platform that cannot produce P50/P90 output is not suitable for C&I project finance, regardless of how accurate its P50 estimate might be.
Demo question: “Show me the full loss cascade breakdown from incident irradiance to AC output, with each loss factor labeled and quantified.”
Red flag: Annual yield is a single number with no loss breakdown. No P50/P90 output available.
5. Financial Modeling
Financial modeling needs to live in the same workspace as the energy yield simulation — not in an exported spreadsheet that a designer populates separately. When the financial model is integrated, a change in panel count or module selection flows through to the yield number and then through to payback, NPV, and IRR without a manual update cycle. When it lives in a spreadsheet, every design iteration requires a parallel update, and the spreadsheet is almost always one version behind the current design.
At minimum, the financial model should handle simple payback, NPV at a configurable discount rate, IRR, and 25-year cash flow. For residential, net metering and feed-in tariff modeling matters. For C&I, TOU rate modeling, demand charge reduction, and off-take agreement structures are relevant. The electricity price escalation rate assumption has an outsized effect on IRR, so it should be a configurable input — not a hidden constant. The generation and financial tool needs to update in real time as design parameters change.
Demo question: “Change the electricity price escalation rate from 2% to 4%. Show how IRR and payback period update.”
Red flag: Financial outputs require export to a spreadsheet for every project. No real-time update when design parameters change.
6. Proposal Generation
A proposal that your sales team is proud to send is a competitive asset. One-click proposal generation from a completed design means the 3D visuals, yield projections, and financial summary are pulled directly from the simulation — no re-entry, no copy-paste, no version risk. The proposal output should be a branded PDF with your logo, colour scheme, and cover page — not a generic template with the platform’s branding. Customer-facing language in the financial summary should be configurable: some markets expect payback period, others expect bill savings, others expect a 25-year savings figure.
The speed of proposal generation is a practical close-rate factor. A sales rep who can update a proposal in a customer meeting — changing the system size or financing structure on the fly and regenerating the document in under a minute — can close deals that “I’ll revise and resend by Friday” loses. The solar proposal software and the design tool should be the same workspace.
Demo question: “Generate a full customer proposal from this completed design. How long does it take? Show me what happens when I change the system size.”
Red flag: Proposals require re-entering design data into a separate tool. Branding is not configurable.
7. Module and Inverter Database
The module and inverter database should contain the models your suppliers currently stock — not models that were current two years ago. A database that is 12 months behind the current product cycle means designers are manually entering datasheets for new modules, which introduces transcription error and adds time to every design using new equipment. The datasheet parameters that matter most: Pmax, Voc, Vmp, Isc, temperature coefficients, and the degradation curve over the system life. These feed directly into string sizing and yield simulation accuracy.
Update frequency is a question worth asking directly: how often does the database add new models, and what is the process for requesting a module that is not listed? Some platforms update quarterly on a fixed cycle; others add models on request within a few days. For installers who frequently quote new module generations, the difference is significant.
Demo question: “Search for [a specific module model you currently install]. Is it in the database with full datasheet parameters including temperature coefficients?”
Red flag: Database is 12 or more months behind current product releases. Requires manual datasheet entry for new equipment.
8. Cloud Access and Collaboration
A browser-based platform with central project storage is not a preference — it is a risk management requirement. When project files live on individual laptops, a single hardware failure, a resignation, or a team member working remotely without VPN access can strand an active project. Cloud-based solar design software with central storage means every project is accessible by any authorised team member from any device, and project history is preserved when staff change.
Role-based access controls matter at team scale. Sales reps should be able to open, present, and share designs without being able to alter simulation parameters. Junior designers should be able to work on projects without touching the financial model defaults. Managers should have read access to all active projects for status tracking. A platform with a single permission level for all users is a platform that relies on policy enforcement rather than technical controls.
Demo question: “Can a sales rep in a different city open this project on their laptop right now, without installing anything, and present it to a customer?”
Red flag: Desktop-only application where project files are stored locally. No role-based access controls.
9. Onboarding and Learning Curve
The measure of onboarding success is not “how good are the video tutorials” — it is whether a new team member can complete a real, unassisted design within one working day. A platform that requires two weeks before a new hire produces usable work has a recurring cost that compounds with every hire. At a team of 10 with 30% annual turnover, a two-week onboarding drag means roughly six weeks of reduced-output time per year, which translates directly to unbilled project time. Also see: Us Residential Solar Market Trends 2026. For United States-specific compliance details, see United States arizona/phoenix.
Ask the vendor specifically what the first day looks like for a new user. A structured onboarding flow — not just a library of documentation — with a sample project that mirrors real working conditions is the minimum. Sub-24-hour support response times during onboarding are a fair expectation. After onboarding, support quality should not drop off.
Demo question: “Walk me through what the first day looks like for a new team member who has never used your platform. What does the onboarding flow look like?”
Red flag: Vendor says “most users are up to speed in a few weeks.” That is an answer to a different question.
10. Pricing Model — Subscription vs. Per-Project Credits
The pricing model has more impact on monthly software cost than the subscription rate for any installer doing meaningful volume. A flat monthly subscription includes unlimited designs and revisions — the marginal cost of iterating on a design is zero, which means designers iterate freely and produce better work. A per-project credit model charges for each design and often for each revision, which creates a financial disincentive to improve a design once it has been sent.
For a team doing 20+ residential projects a month with an average of two to three revision rounds, the credit math compounds quickly. Add C&I projects with six to eight revision cycles and the monthly credit spend can exceed the subscription cost of a flat-rate alternative by a significant margin. The right question for any credit-based platform is not “what is the per-credit price” — it is “what does a revision cost after a proposal has been sent?”
Demo question: “If I send a proposal and the customer asks for three panel count options and two financing structures, how many credits does that consume? What does it cost?”
Red flag: Per-revision credit charges that increase with the number of rounds. No flat-rate option available.
After completing a demo, score each item pass or fail using this checklist:
SOLAR DESIGN SOFTWARE BUYER'S CHECKLIST

Design Capability
□ 1. True 3D roof tracing with per-facet tilt/azimuth
□ 2. Physics-based shading with obstruction geometry
□ 3. Auto string sizing with inverter compatibility checks

Simulation & Financials
□ 4. Hourly energy yield simulation with configurable losses
□ 5. Financial modeling (payback, IRR, NPV) in same workspace
□ 6. P50/P90 output for C&I bankability (if applicable)

Output & Workflow
□ 7. One-click branded proposal from completed design
□ 8. Current module/inverter database (models you actually stock)

Platform & Pricing
□ 9. Cloud-based, multi-user, no desktop install
□ 10. Flat subscription — no per-project credit penalties on revisions
Score 7 or below: keep looking.
See the Full Workflow in 20 Minutes
Book a live walkthrough where we run SurgePV against a real project from your portfolio — design, shading, simulation, and proposal in one session.
Book a Free DemoNo commitment required · 20 minutes · Live project walkthrough
For a direct comparison, see Arka 360 vs SurgePV.
The True Loaded Cost of Solar Design Software
The advertised monthly price is always the floor. It is the number in the headline on the pricing page, and it is almost never the number that appears on your invoice at the end of the first quarter of real use. Understanding the full loaded cost before you commit is straightforward once you know what to add to the base fee.
The first addition is per-project credit cost. Platforms with credit-based pricing charge for each design generated, and often for each revision or output format (permit pack, proposal PDF, yield report). The per-credit price looks small in isolation — typically $15–$50 per design — but it scales with project volume, revision rounds, and team size in ways that become significant quickly. The second addition is revision overage. A design that goes through five revision rounds on a credit-based platform at $20 per credit costs $100 in credits before accounting for the base subscription. On a flat-rate platform, the same five revision rounds cost nothing extra.
| Cost element | Per-project credit model | Flat subscription |
|---|---|---|
| Base fee | Low or free | Fixed monthly per user |
| Cost per design | $15–$50 per credit | Included |
| Revision cost (5 revisions) | $75–$250 additional | $0 |
| C&I project (8 revisions) | $120–$400 additional | $0 |
| 20 projects/month overage | $300–$1,000+ | $0 |
| Onboarding (2 weeks reduced output) | Credit topup + training | Onboarding only |
Put this in scenario terms. A solo installer closing 15 projects a month, averaging two revisions each, at $20 per credit: 15 × 3 designs (initial + 2 revisions) × $20 = $900 per month in credits, before the subscription fee. At five revisions per project (not unusual for C&I quoting), the same calculation becomes $1,500 per month. A team of five, 60 projects a month, three revision rounds each: $3,600 per month in credits. On a flat-rate subscription, all of those revision rounds are included.
The hidden onboarding cost is separate from both. When a new hire needs two weeks to become productive, the unbilled time calculation is concrete: two staff members, five days each, four billable hours per day, at a fully-loaded rate of $50 per hour = $2,000 in unbilled project time per hire, per platform switch. A platform with a structured one-day onboarding path eliminates most of that cost.
How to Calculate Your Break-Even Point
Monthly designs × average revision rounds × per-project credit cost = monthly credit spend. Add the subscription fee. Compare to the flat subscription alternative. The break-even is typically between 8 and 15 projects per month for a solo installer.
One more cost that rarely appears in any vendor comparison: the cost of switching platforms a year from now if the current choice turns out to be wrong. Project history does not migrate cleanly. Client data, design files, and yield reports built in one platform are not available in another. The sunk cost of a mid-year switch — lost history, retraining, and the productivity dip during transition — is typically two to three months of the old platform’s cost. Factor that into the decision now.
The right framework is not “which tool is cheapest per month.” It is “what is the total 12-month cost at my actual project volume, including credits, onboarding, and the cost of switching if this is the wrong choice?” Run that calculation for each platform you are evaluating before you make any decision.
The Design-to-Proposal Workflow — Why Integration Matters
The number of separate tools in your design-to-proposal workflow is a direct multiplier on the time cost of every scope change. Each tool handoff — from design to simulation to proposal — is a point where data has to be manually re-entered, where version mismatches can occur, and where a change in one tool requires parallel updates in the others. For a team doing 30 projects a month, the cumulative time cost of a three-tool workflow is not a small inefficiency. It is a structural drag on capacity.
What Happens When You Use Three Separate Tools
Walk through the typical disconnected workflow: a designer traces the roof in design Tool A, exports a layout file, imports it into simulation Tool B to run the yield estimate, copies the kWh figure and financial inputs into proposal Tool C, and generates a PDF to send to the customer. The customer asks to see a slightly larger system with a different financing structure. The designer has to re-open Tool A, adjust the layout, re-export, re-import into Tool B, re-run the simulation, update Tool C with the new numbers, and regenerate the proposal. That process takes 30–45 minutes for a revision that should take two minutes.
At 30 projects a month with an average of two revision rounds each, a 35-minute revision process across three tools adds up to 35 hours per month in avoidable work. That is nearly a full working week every month, consumed entirely by tool handoffs. The version mismatch risk adds a separate cost: a proposal sent with the yield figures from a previous simulation iteration — because Tool C was not updated after the last design change — is an error that might not surface until the system is commissioned.
What an Integrated Workflow Looks Like
When design, simulation, and proposal live in the same workspace, a scope change takes two minutes. Adjust the panel count, the simulation re-runs automatically, the financial model updates, and the proposal reflects the new figures. No re-entry, no version risk, no parallel tools to keep synchronized. For a sales professional presenting to a customer, the ability to update the design live and regenerate a proposal in under a minute is a meaningful close-rate advantage over competitors who say “I’ll get you a revised proposal by tomorrow.”
The integrated workflow also affects proposal quality. When the 3D visual, the yield table, and the financial summary all come from the same simulation run, the proposal is internally consistent. When they come from different tools with manual data transfer, there are always opportunities for small inconsistencies that undermine customer confidence.
Further Reading
See how SurgePV connects solar design and the generation and financial tool in a single workspace — design to proposal without switching applications.
Residential vs. Commercial Solar Software — The Real Differences
The term “solar design software” covers two meaningfully different categories of tool that happen to share a name. A platform built for residential speed makes trade-offs that make it unsuitable for C&I work. A platform built for C&I accuracy typically has an onboarding curve and a complexity level that slows residential volume. Understanding where a platform sits in this spectrum — and whether that matches your project mix — is more useful than any feature checklist comparison.
What Residential Speed Looks Like in Practice
For a residential-focused installer, the benchmark is: a trained designer completes a standard single-family rooftop design from satellite imagery to a complete customer proposal in under 20 minutes. That requires satellite imagery that loads in seconds, roof facet detection that is accurate enough that the designer is correcting rather than rebuilding, automatic panel placement that respects setbacks without manual adjustment, and one-click proposal generation that produces a professional-looking PDF immediately.
The customer-facing proposal for residential work centers on three numbers: annual kWh generation, monthly bill savings, and payback period. The proposal format should be consumer-readable — clear language, 3D visuals of the actual roof, and a simple financial summary that a homeowner can explain to their spouse without the installer in the room.
What Commercial Accuracy Requires
Commercial and industrial projects have a different set of non-negotiables. A flat commercial roof with HVAC equipment, parapets, skylights, and irregular obstructions needs 3D modeling that places each element correctly and calculates its shading effect on the array at hourly resolution across the year. A yield simulation based on a performance ratio applied to annual irradiance is not defensible when a commercial buyer’s due diligence team reviews it.
The financial model needs to handle commercial electricity tariff structures: TOU rates that vary by hour of day and season, demand charges based on peak 15-minute intervals, and potentially an off-take agreement with a defined rate per kWh. These are not edge cases for C&I quoting — they are the core of the financial analysis. A demand charge reduction calculation that is missing or approximate can change the project economics by 20–30%.
| Requirement | Residential priority | C&I priority |
|---|---|---|
| Design speed | Critical | Secondary |
| Shading accuracy | Important | Non-negotiable |
| P50/P90 simulation | Not required | Required for bankability |
| Consumer proposal | Central to close rate | Less important |
| Lender-grade yield report | Not needed | Essential |
| TOU/demand charge modeling | Rare | Common |
| Permit package generation | Useful | Required |
The most common mistake in software selection for a team transitioning from residential to C&I work is choosing a platform that is genuinely excellent at residential and assuming it will be good enough for C&I. The simulation engine difference matters. A fast residential tool that produces a single annual kWh figure with no P50/P90 output and no demand charge modeling is not C&I-capable, regardless of how polished the interface is.
How to Run a 20-Minute Demo That Actually Tests the Software
Most software demos are scripted to show a platform at its best. The vendor has prepared an ideal project — a clean rectangular south-facing roof with no obstructions, a standard residential system size, and a straightforward financial scenario. That project will look good on any platform. The only way to get useful information from a demo is to replace the vendor’s test project with your own.
Prepare Before the Demo
Choose three real projects from your portfolio before the demo session: one straightforward residential project, one complex rooftop with obstructions or multiple orientations, and one C&I project if that is part of your mix. Write down the five biggest pain points you have with your current tool — the moments where you feel the most friction, spend the most extra time, or produce outputs you are least confident in. Send the project addresses to the vendor in advance and ask them to have the satellite imagery loaded before the session starts.
Ask for a self-serve sandbox environment before purchasing. A platform that is genuinely straightforward to learn will offer a trial environment where you can test independently. One that requires a guided demo for every interaction has something to hide about its learning curve.
The 20-Minute Demo Script
Minutes 1–5 — Design: Ask the vendor to trace one of your real project addresses from scratch, in front of you, without preparation. Watch how long satellite imagery takes to load. Count how many clicks it takes to define the roof geometry. Ask them to show per-facet tilt and azimuth values.
Minutes 6–10 — Shading and Simulation: Ask them to add an obstruction to the design — a chimney, an HVAC unit, or an adjacent building — and show how it affects the yield on the adjacent string. Ask to see the full loss cascade from incident irradiance to AC output, with each factor labeled and quantified.
Minutes 11–15 — Financial Model and Proposal: Ask them to change the electricity price escalation assumption and show how payback period and IRR update. Then generate a customer proposal from the completed design and time it. Ask what the output looks like with your branding instead of theirs.
Minutes 16–20 — Edge Cases: Ask what happens if you need to revise the design after sending the initial proposal — does it cost extra credits? Ask how to add a module model that is not currently in the database. Ask what the first day looks like for a new hire.
Pro Tip
If a vendor will not give you a self-serve sandbox before purchase, that is a signal. Platforms that are genuinely easy to learn let you test them independently. Platforms that require a guided demo for every session are hiding a learning curve.
Document your answers from each demo on the 10-point checklist. Do this for at least two platforms before making a decision. The comparison is much clearer with structured notes from parallel demos than from a single vendor presentation followed by a memory exercise.
Red Flags — When to Walk Away From a Solar Design Platform
Not every red flag is obvious during a vendor demo. Some surface only when you ask the right questions directly; others only become visible when you push the platform outside the scenario the vendor has prepared.
Per-project credit pricing with no revision protection. A credit model that charges for every design and every revision penalises iteration. Good solar design requires iteration — responding to customer feedback, comparing financing options, adjusting for equipment availability. A pricing model that creates a financial disincentive to improve a design before sending it is not aligned with producing good work.
Simulation accuracy that is not independently validated. Ask the vendor directly: has your simulation engine been back-tested against metered generation data? If so, for what system types, locations, and time periods? A vendor that cannot answer this question specifically is asking you to trust marketing claims rather than evidence.
The proposal tool is a separate subscription or a third-party integration. Every tool handoff introduces version risk and re-entry time. A proposal tool that connects via API to the design platform is not the same as a proposal tool built into the same workspace. “Integration” can mean anything from a deep two-way data sync to a one-way export that requires manual formatting.
No self-serve trial or sandbox access. A platform confident in its usability offers a trial environment where you can test without a vendor on the call. If every interaction requires a scheduled demo, the learning curve is steeper than the vendor is acknowledging.
Module and inverter database 12 or more months behind current releases. Manual datasheet entry for new equipment is not just a time cost — it is an error source. Temperature coefficient errors in a manually entered datasheet propagate directly into string sizing and yield simulation. An outdated database is a quality control risk.
No clear onboarding pathway for new hires. Ask the vendor to show you the onboarding flow for a new user — not the documentation library, but the structured pathway from account creation to first unassisted design. If the answer is “they can watch our YouTube channel,” the onboarding relies on self-directed learning with no quality control on the outcome.
Cloud saves are local; no central project repository. Project files stored on individual laptops create a single point of failure. A sales rep who leaves takes their active project files with them. A laptop failure mid-project means rebuilding from scratch. Central cloud storage with version history is not a premium feature — it is basic risk management.
Simulation Accuracy and Bankability — What C&I Teams Need to Know
Simulation accuracy is where the gap between residential and commercial solar software is most consequential — and most frequently misunderstood. For residential work, an annual yield estimate within 8–10% of actual production is generally sufficient. For a 200 kWp commercial system where a lender has financed the project based on a yield report, a 10% simulation error means the debt service coverage ratio is wrong and the project may not generate enough revenue to service the loan.
The two numbers that define bankable yield simulation are P50 and P90. P50 is the production level exceeded in 50% of years — the median expectation. P90 is the production level exceeded in 90% of years — the conservative floor. Lenders providing project finance typically size their underwriting around the P90 figure: they want to know that even in a below-average solar resource year, the system will generate enough revenue to cover debt obligations. A simulation that produces only a single annual kWh figure cannot support this analysis.
What separates a bankable simulation from a good estimate is the combination of: hourly TMY irradiance data with validated uncertainty bounds for the specific location, temperature and soiling loss profiles based on local climate data, the module’s actual degradation curve from the datasheet, and inter-row shading geometry calculated from the 3D model. Each of these factors, if approximated rather than calculated, adds to the uncertainty band around the yield estimate.
| Simulation approach | Typical accuracy vs. metered | Suitable for |
|---|---|---|
| Simple rule-of-thumb (kWh/kWp × factor) | ±15–25% | Rough residential ballpark only |
| Monthly irradiance × system efficiency | ±8–15% | Residential quoting |
| Hourly TMY simulation, no 3D shading | ±5–10% | Most residential, small C&I |
| Hourly TMY + full 3D obstruction shading | ±3–6% | Standard commercial |
| Hourly + 3D + P50/P90 + uncertainty bands | ±2–4% | Bankable C&I / project finance |
For EPC teams doing day-to-day C&I quoting, the goal is not just accuracy on any single project — it is internal consistency across all projects. When every project uses the same simulation engine with the same inputs and assumptions, clients who commission multiple projects develop confidence in your numbers. When simulation methodology varies between projects, the inconsistency erodes trust with repeat clients even if individual estimates are close to actual.
The shadow analysis methodology the platform uses is worth asking about specifically. Platforms that calculate hourly shading from 3D obstruction geometry produce meaningfully different results from those that apply an annual shading derate — particularly on rooftops and sites where shading is most severe in the early morning and late afternoon, which are the hours the annual derate approach handles least accurately.
Making the Final Decision — A Scoring Framework
After completing demos with at least two platforms, the decision framework is straightforward: score each platform on the criteria that matter most for your business, weight the scores by importance, and compare the totals. The weighting below reflects priorities for a mixed residential/C&I installer. Adjust the weights to match your actual project mix.
| Evaluation criterion | Weight | Platform A (1–5) | Platform B (1–5) |
|---|---|---|---|
| Design accuracy (3D geometry, shading) | 25% | — | — |
| Simulation engine (yield accuracy, loss cascade) | 20% | — | — |
| Proposal output (branded, one-click, financials) | 15% | — | — |
| Pricing model (flat subscription vs. credits) | 15% | — | — |
| Onboarding speed (new hire productive in under 1 day) | 10% | — | — |
| Module/inverter database currency | 10% | — | — |
| Support quality and response time | 5% | — | — |
Fill in each platform’s scores from your demo notes. Multiply each score by the weight and sum the column. The platform with the higher weighted total is the rational choice based on your stated priorities. If the scores are close, the tiebreaker is the pricing model: a flat subscription that does not penalise iteration will produce better design quality and lower total cost over 12 months than a credit model at any comparable volume.
Before making the final call, ask the vendor for two reference customers at your business size — same team size, similar project mix. A vendor who cannot provide references at your scale is either new to that segment or has retention issues in it.
One More Filter Before You Decide
Run your most complicated recent project on the new platform during a self-serve trial. If it handles it faster and more accurately without workarounds, you have your answer.
One practical note on timing: avoid switching platforms at the start of a busy season. The productivity dip during onboarding and data migration is manageable in a quiet quarter. It is disruptive during peak volume. If you are evaluating now and the busy season starts in two months, either commit quickly or wait. A half-implemented platform switch during your highest-volume period is worse than staying on the current tool for another quarter.
Conclusion — Three Actions to Take This Week
The decision framework for choosing solar design platform is not complicated — but it requires doing the work before the demo rather than during it.
Action 1: Audit your current tool against the 10-point checklist above. Mark each item pass or fail. Score under 7 out of 10 and you have a clear signal to evaluate alternatives. Score 8 or above and the question becomes whether the switching cost justifies the marginal improvement.
Action 2: Pull three real projects from your portfolio — one simple residential, one complex rooftop, one C&I if applicable — and book demos with two platforms this week. Use the 20-minute demo script. Ask for sandbox access before either demo so you can test independently. Take structured notes against the same 10-point checklist for both platforms.
Action 3: Calculate your true loaded cost for your current tool and each alternative. Monthly project volume × average revision rounds × per-credit cost + subscription fee. Compare that to the flat subscription total. Add the onboarding cost for your team size. The spreadsheet usually makes the decision obvious.
The solar software platforms that consistently win long-term are the ones where design, simulation, and proposals live in the same workspace, with a pricing model that does not penalise the iteration that produces good work. Find that combination at the right price point for your project volume, and the subscription pays for itself before the first month is out.
Ready to Run SurgePV Against Your Real Projects?
Book a 20-minute demo and bring your own project addresses. We’ll run design, shading, simulation, and proposal live — no scripted walkthrough.
Book Your DemoNo commitment required · 20 minutes · Live project walkthrough
Frequently Asked Questions
How do I choose the right solar design software for my business?
Start with your project mix: residential-only, C&I, or a combination of both. A residential-focused tool built for speed will handle a high-volume residential pipeline well but will struggle with C&I bankability requirements. Define your monthly design volume and the average number of revision rounds per project — those two numbers determine whether a per-project credit model or a flat subscription will cost you more. Demo at least two platforms using real projects from your own portfolio, not the vendor’s prepared scenarios, and score each against a consistent checklist before making a decision.
What should solar design software include?
At minimum, a professional solar design platform should include: true 3D rooftop or ground-mount modeling with per-facet tilt and azimuth, physics-based shade and irradiance analysis from hourly TMY data, automatic string sizing with inverter compatibility checking, energy yield simulation with a full loss cascade breakdown, financial modeling (payback period, NPV, IRR, 25-year cash flow) in the same workspace as the design, and branded proposal generation from the completed design in one click. For C&I and EPC teams, the list extends to P50/P90 yield output, TOU and demand charge modeling, and lender-formatted yield reports. If any of these are missing or require a separate tool, evaluate what that gap costs you per project.
Is free solar design software good enough for professional use?
Free tiers and freemium platforms work for low-volume residential quoting where proposal quality and simulation depth are not competitive differentiators. The limitations become significant quickly: most free tiers restrict monthly project volume, exclude bankable yield simulations, produce generic unbranded proposals, and do not include current module and inverter databases. For an installer closing more than 10–15 projects a month or quoting any C&I work, a paid platform with flat-rate subscription pricing typically pays for itself within the first completed project. The more relevant question is whether the paid platform you are considering has a pricing model that scales predictably with your volume.
What’s the difference between residential and commercial solar design software?
Residential solar design tools are optimised for speed: satellite roof tracing in under three minutes, automatic panel placement with setback logic, and consumer-ready proposals with bill savings and payback period as the headline numbers. Commercial and industrial tools prioritise simulation accuracy: hourly TMY simulation with full 3D obstruction shading, P50/P90 yield estimates that lenders and off-takers will accept, TOU and demand charge financial modeling, and lender-formatted yield reports. The same platform is rarely excellent at both. An installer transitioning from residential to C&I work needs to evaluate whether their current residential tool’s simulation engine is genuinely adequate for commercial project finance — not just whether the interface can draw a larger system.
How long does it take to learn solar design software?
The right benchmark is whether a new team member can complete a real, unassisted design within one working day — not within one week or a few weeks. Residential-focused platforms with structured onboarding flows typically reach this benchmark. C&I platforms with advanced simulation engines and configurable financial models generally require more time — several days to a week for a designer to work through complex projects confidently. The onboarding timeline matters because it is a recurring cost: every new hire, every platform switch, and every team member who onboards slowly represents unbilled project time. Ask any vendor to show you the onboarding flow for a new user, not the documentation library.
What integrations should solar design software have?
The most important integration is internal: design, simulation, and proposal in the same workspace, so that a scope change flows through all three without manual re-entry. Beyond that, CRM integration allows qualified designs to push directly to your sales pipeline without re-entering project data. An up-to-date module and inverter database with the models your suppliers stock eliminates manual datasheet entry and its associated error risk. Permit package export is useful for residential installers in jurisdictions with online permit submission portals. For growing teams, identity management integration (single sign-on) reduces account management overhead. The integrations that matter most are the ones that eliminate manual data transfers between tools you currently use every day.
How accurate is solar design software?
Accuracy varies widely depending on the simulation methodology. Tools using simple rule-of-thumb multipliers or monthly irradiance averages without 3D shading geometry can be 15–25% off actual generation — a range that creates post-commissioning disputes and bankability problems on C&I projects. Physics-based engines that use hourly TMY irradiance data, temperature and soiling loss profiles from module datasheets, and 3D obstruction shading geometry for every hour of the year typically come within 3–6% of metered generation for well-modeled projects. For C&I work requiring bankable yield reports, the platform should be able to produce P50/P90 estimates with documented uncertainty methodology. Ask any vendor for back-test data against metered generation from real projects in your climate region — that is the most direct answer to the accuracy question.